Sony DPP-SV55 Operating Instructions: Basic Operations - Page 2
Setting the clock, Unpacking the printer, Using the printing pack, Loading the print cartridge, - driver
 |
View all Sony DPP-SV55 manuals
Add to My Manuals
Save this manual to your list of manuals |
Page 2 highlights
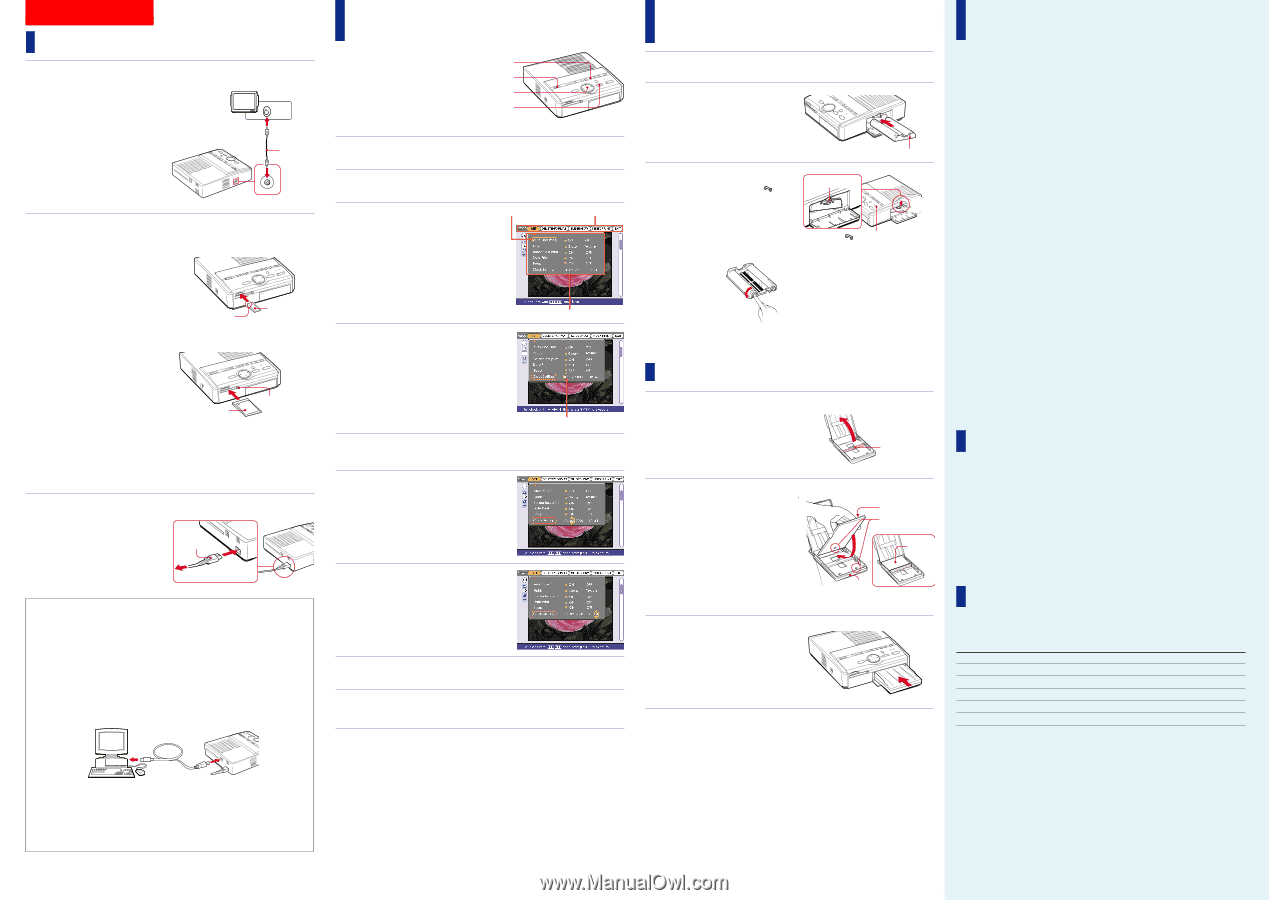
Getting Started Connecting the printer 1 Connecting to the television Connect the VIDEO OUT connector of the printer to the video input of the television to display the images to be printed. Notes •Before making connections or plugging in a cable, turn off the power of the printer and the television. •When you connect your printer to the personal computer, you do not need connect your printer to the television. Television Set the VIDEO/TV input selector to VIDEO. VIDEO IN Video connecting cable (supplied) VIDEO OUT 2 Inserting a "Memory Stick" or PC card ❒ Inserting a "Memory Stick" Insert the "Memory Stick" into the "MEMORY STICK" insertion slot until it clicks into place. To eject the "Memory Stick" Push the "Memory Stick" further into the insertion slot and let it pop out. Then remove it slowly. ❒ Inserting a PC card Insert the PC card into the PC CARD insertion slot until it clicks into place. To eject the PC card Press the PC CARD ejection button. After the PC card pops out, remove it slowly. With the notch facing left and the arrow facing forward on the left PC card "Memory Stick" PC CARD ejection button Notes •Do not attempt to force the "Memory Stick" or the PC card into or out of the slot. Otherwise, the "Memory Stick" or the PC card or the printer may be damaged. •When the printer is accessing the "Memory Stick" or PC card and the relevant INPUT SELECT indicator flashes, do not remove the "Memory Stick" or PC card from the printer. Otherwise, the "Memory Stick" or the PC card or the printer may be damaged. 3 Connecting the AC power cord After you make the connections, connect the supplied AC power cord to the AC IN connector of the printer and then to the AC outlet. The POWER indicator lights in red. AC power cord (supplied) To the wall outlet Connecting to a computer Connect the USB connectors of the printer and Windows 98/98SE or Mac OS 8.5.1/8.6/9.0 pre-installed computer with a commercially available USB cable. By installing the supplied driver software into your computer, you can print an image from your computer's hard disk. With the "Memory Stick/PC card Reader Software for Windows 98/98SE Ver. 1.0," you can also transfer the images from a "Memory Stick" or PC card into your computer's hard disk. For how to install and operate the software, refer to the supplied "Operating Instructions - Software Guide/Additional Information." Windows/Macintosh computer To USB connector Notes •Also refer to the instruction manual of your computer. •You may not be able to use the printer and the printer driver on a network or a commercially available printer buffer. •Use a USB cable of 3 m or shorter. To USB connector Setting the clock By adjusting the clock of the printer, you can record the time when the images were saved onto the "Memory Stick" or PC card. You can also automatically start the calendar with the current month when making a calendar print. When you unplug the AC power cord, set the clock again. 2,9 1 4-7 3,4,7,8 1 Press POWER to turn on the power of the printer. The POWER indicator lights in green. 2 Press MENU. The menu bar appears on your television. 3 Make sure that "SET" is selected on the menu bar, then press ENTER. If another menu item is selected, press B/b to move the cursor to "SET" and press ENTER. The cursor moves to the SET sub menu. Cursor Menu bar 4 Press V/v to move the cursor to "Clock Setting" and press ENTER. The cursor appears on the month (for NTSC) or the day (for PAL). Sub menu 5 Press V/v to set the month or day. Press V to increase the number. Press v to decrease the number. 6 Press b. The cursor moves to the day (for NTSC) or the month (for PAL). Cursor 7 Repeat steps 5 and 6 to set all of the items: day or month, year, hour and minute. If you want to set the previous item, press B. The hour is displayed in 24-hour system. 8 Press ENTER. The clock setting mode ends. 9 Press MENU. The menu disappears and the printer returns to the previous screen. To cancel the menu operations Press CANCEL. The menu display disappears without saving the settings. The printer returns to the previous screen. To confirm the clock setting Follow the steps 1 through 4. The current clock setting appears on the screen. To return to the previous screen, press MENU. Loading the print cartridge 1 Turn on the printer and pull and open the cartridge compartment lid. 2 Remove the protective film and insert the print cartridge into the printer firmly until it clicks into place and close the cartridge compartment lid. The side with the Sony logo To replace the print cartridge When the print cartridge runs out, the cartridge error indicator lights and the error message appears on the screen. Open the cartridge compartment lid, push up the eject lever, remove the used print cartridge, and then insert the new cartridge. Eject lever cartridge error indicator Notes •If the print cartridge does not click into place, remove it and then re-insert it. Only when the ink ribbon is too slack to be loaded, wind the ink ribbon in the direction of the arrow to remove the slack. •If ink ribbon should tear, repair the ribbon with transparent tape. There should be no problem with using the remaining portion of the ribbon. Before loading the print cartridge into the printer, turn the reel until the transparent tape can no longer be seen. •If the print cartridge is not loaded when you turn on the printer, the warning sound beeps and the cartridge error indicator lights up. •Never put your hand into the cartridge compartment. The thermal head reaches high temperatures, especially after repeated printing. Inserting the print paper 1 Open the paper tray lid and set the partition according to the print paper size you use. To use the Post Card Size Paper, lay down the partition. To use the Small Size Paper, stand the partition upright. 2 Set the print paper into the tray. Riffle the print paper. Then insert the print paper with its printing surface (the side with no imprint) facing up and the arrow pointing in the same direction as the arrow in the tray. When inserting paper, insert the protective sheet together into the tray. After you placed the paper, remove the protective sheet. You can set up to 25 sheets for Post Card Size and 30 sheets for Small Size print paper. When inserting Small Size print paper, set in the back of the partition. Partition Printing surface Arrow Paper Front side When inserting Small Size print paper 3 Close the paper tray lid. Then push and open the printer's paper tray compartment lid and insert the paper tray into the printer. Insert it firmly until it clicks into place. Notes •If print paper does not feed automatically, the paper error and cartridge error indicators light. Pull out the paper tray and check the paper jam. •When adding the print paper to a partially full tray, make sure that the total number of sheets does not exceed 25 for the Post Card Size or 30 for the Small Size print paper. Do not place different types of paper in the tray. Otherwise, paper jam or malfunction may occur. •Do not remove the backing from sticker print paper before printing is completed. Otherwise, jams or printer damage may occur. •Do not print on the same print paper twice. Otherwise, a malfunction or breakdown may occur. • If the print paper runs out when you press PRINT, the warning sound beeps and the paper error indicator lights. Features With the Digital Photo Printer DPP-SV55, you can print images on a "Memory Stick" or PC card. You can also print easily from your computer. Photo-realistic printing With sharpness, contrast, tint, and other fullfeatured picture adjustment functions, the printer can make photo-realistic print fitting for the type of image and your taste. Auto Fine Print function Even a dark picture with low contrast will be adjusted and printed in vivid and clear picture. Selection of print sizes and border/borderless print You can select from a large, dynamic Post Card Size print or economical Small Size print. For the Post Card Size print, you can also select borderless or border print. Direct printing of the "Memory Stick" or PC card images Just take out a "Memory Stick" or PC card from your digital still camera and insert it into the printer. You can immediately print the images on the "Memory Stick" or PC card. You can also print all the images in a "Memory Stick" or PC card or the images preset by a digital still camera at one time. Selection of print finish You can select the print finish either from glossy or texture. Printing 25/30 sheets continuously With the supplied paper tray, you can print up to 25 sheets for Post Card Size and 30 sheets for Small Size print paper continuously. A wide variety of prints using the printer You can make various prints such as a standard print, date print, and index print of the images stored in a "Memory Stick" or PC card. A variety of image processing functions allow you to magnify/reduce, rotate, or move the image. You can also add a special effect to the pictures to produce sepia, monochrome, or paint pictures. An even wider variety of prints using the CREATIVE PRINT menu The CREATIVE PRINT menu allows you to make more types of prints such as a calendar, card, split images or sticker with framed images. Convenient USB connection with your computer With the supplied DPP-SV55 printer driver software for a Microsoft Windows 98/98SE and Mac OS 8.5.1/8.6/9.0 pre-installed personal computer, you can print the images from your computer. With the supplied "Memory Stick/PC card Reader Software for Windows 98/98SE," you can view and handle the images of a "Memory Stick" or PC card inserted in the printer from your computer. Unpacking the printer Make sure that the following accessories are supplied with your printer. • AC power cord (1) • Video connection cable (1) • Paper tray (1) • CD-ROM (for Sony DPP-SV55 Printer Driver Software for Windows 98/98SE Ver. 1.0/for Mac OS 8.5.1, 8.6, 9.0 Ver. 1.0 and Memory Stick/PC card Reader Software for Windows 98/ 98SE Ver. 1.0) (1) • Operating Instructions - Basic Operations (1) • Operating Instructions - Advanced Operations (1) • Operating Instructions - Software Guide/Additional Information (1) • Warranty (1) • Sample Printing Pack (1) Using the printing pack You need an optional printing pack designed for the printer. The pack contains a set of print paper and a print cartridge for either Post Card Size (4x6 inch) or Small Size (3.5x4 inch) print. Select the printing pack according to the type of printing you will do: Printing Pack SVM-25LS SVM-25LW SVM-30SS SVM-30SW SVM-30SW09 Contents 25 sheets of Post Card Size photo paper/Print cartridge for 25 prints 25 sheets of Post Card Size sticker/Print cartridge for 25 prints 30 sheets of Small Size photo paper/Print cartridge for 30 prints 30 sheets of Small Size sticker/Print cartridge for 30 prints 30 sheets of Small Size 9-split Sticker/Print cartridge for 30 prints Notes •Use the printing pack for this printer only. •Always use the print cartridge and print paper from the same carton as a set. If you mix cartridges and paper of different types, printing may not be possible, or a paper jam or other trouble may occur. •When storing a partially-used pack of the print cartridge and print paper for an extended period of time, store it in its original bag or in a similar container. •Do not touch the ink ribbon of the print cartridge or the printing surface of the print paper. If there are fingerprints or dusts on the printing surface or the ink ribbon, the printing quality may deteriorate. •For quality print, avoid placing the print cartridge and print paper in locations that are subject to high temperature, high humidity, excessive dust, or direct sunlight.
-
 1
1 -
 2
2
 |
 |