Sony DSC-P100LJ Operating Instructions - Page 103
PictBridge compliant printer, SET UP settings.
 |
View all Sony DSC-P100LJ manuals
Add to My Manuals
Save this manual to your list of manuals |
Page 103 highlights
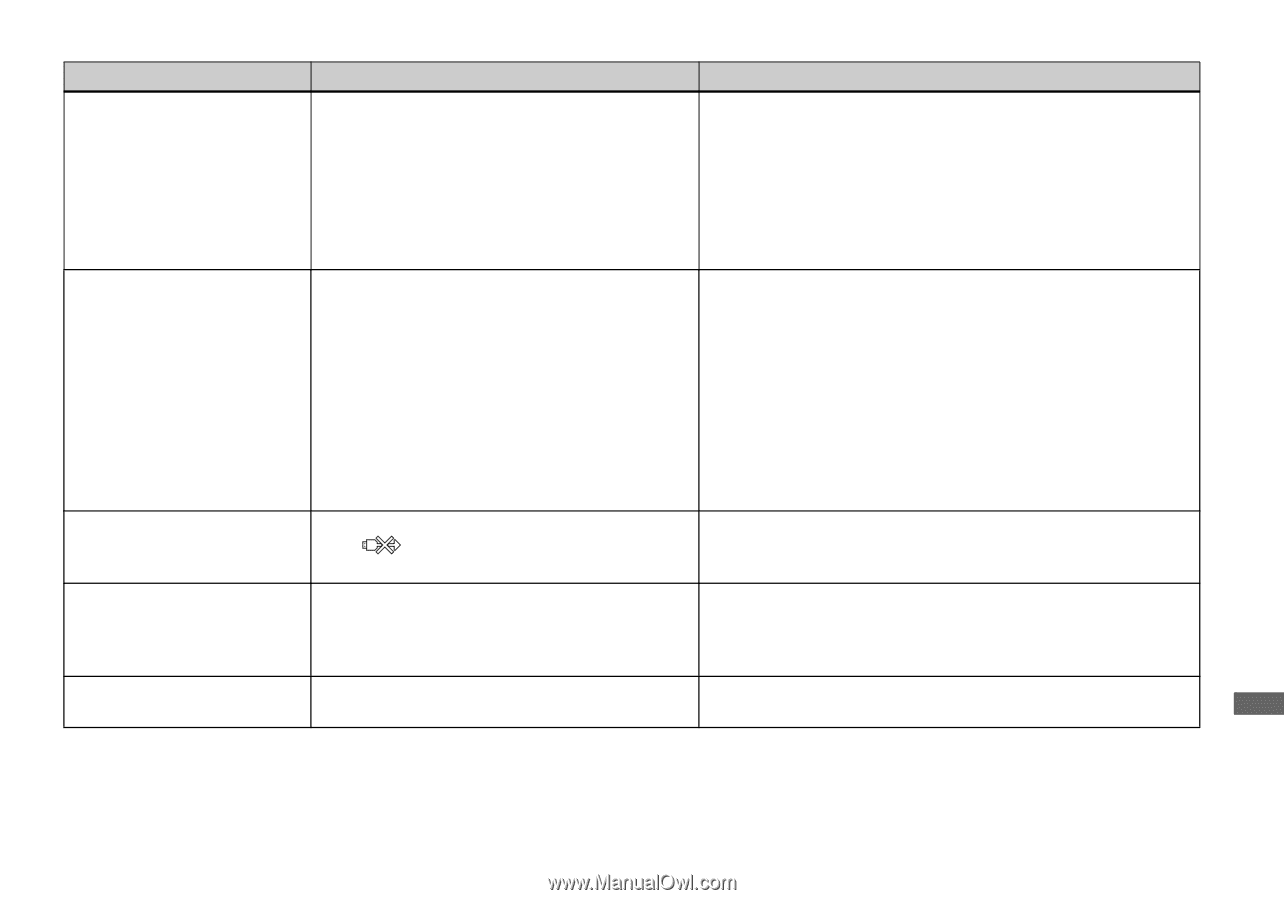
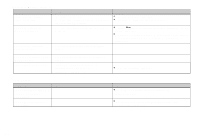
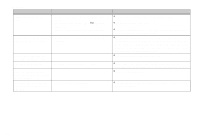
PictBridge compliant printer Symptom Cause Solution The connection cannot be established. • The printer is not compliant with the PictBridge. • The printer is not set for the connection with the camera. • [USB Connect] is not set to [PictBridge] in the SET UP settings. • Depending on the circumstances, the connection may not be established. p Consult with the printer manufacturer. p Check that the printer is turned on and can connect with the camera. p Set it to [PictBridge] (page 114). p Disconnect and connect the USB multi cable again. If an error message is indicated on the printer, refer to the operating instructions supplied with the printer. You cannot print images. • The camera is not connected to the printer. • The printer is not turned on. • If you select [Exit] during printing, you may not print again depending on your printer. • Movies cannot be printed. • Images modified with a computer or images shot using other than this camera may not be able to be printed. p Check that the camera and the printer are properly connected using the USB multi cable. p Turn on the printer. For further information, refer to the operating instructions supplied with it. p Disconnect and connect the USB multi cable again. If you cannot print still, disconnect the USB multi cable, turn off and on the printer, then connect the USB multi cable again. - - Printing is canceled. • You disconnected the USB multi cable before - the (Not disconnect USB multi cable) mark disappears. You cannot insert the date or print images in the index mode. • The printer does not provide these functions. • The date may not be inserted in the index mode depending on the printer. p Consult with the printer manufacturer whether the printer provides these functions or not. p Consult with the printer manufacturer. is printed on the • The recording date data is not recorded on the p The images that do not have the recording date data cannot be date-inserted part. image. printed with the date inserted. Set [Date] to [Off] and print it. Troubleshooting 103
-
 1
1 -
2
-
3
-
4
-
5
-
6
-
7
-
8
-
9
-
10
-
11
-
12
-
13
-
14
-
15
-
16
-
17
-
18
-
19
-
20
-
21
-
22
-
23
-
24
-
25
-
26
-
27
-
28
-
29
-
30
-
31
-
32
-
33
-
34
-
35
-
36
-
37
-
38
-
39
-
40
-
41
-
42
-
43
-
44
-
45
-
46
-
47
-
48
-
49
-
50
-
51
-
52
-
53
-
54
-
55
-
56
-
57
-
58
-
59
-
60
-
61
-
62
-
63
-
64
-
65
-
66
-
67
-
68
-
69
-
70
-
71
-
72
-
73
-
74
-
75
-
76
-
77
-
78
-
79
-
80
-
81
-
82
-
83
-
84
-
85
-
86
-
87
-
88
-
89
-
90
-
91
-
92
-
93
-
94
-
95
-
96
-
97
-
 98
98 -
 99
99 -
 100
100 -
 101
101 -
 102
102 -
 103
103 -
 104
104 -
 105
105 -
 106
106 -
 107
107 -
 108
108 -
109
-
110
-
111
-
112
-
113
-
114
-
115
-
116
-
117
-
118
-
119
-
120
-
121
-
122
-
123
-
124
-
125
-
126
-
127
-
128
 |
 |