Sony DSC-RX100M2 Cyber-shot® User Guide (Printable PDF) - Page 104
Auto Object Framing, When [DRO/Auto HDR] is set to [Auto HDR] - - cyber shot review
 |
View all Sony DSC-RX100M2 manuals
Add to My Manuals
Save this manual to your list of manuals |
Page 104 highlights
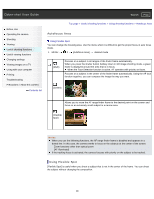
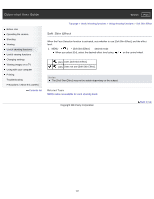
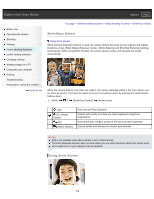
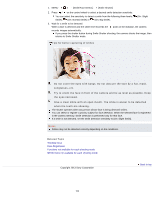
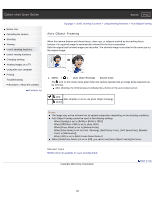
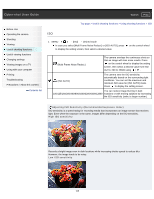
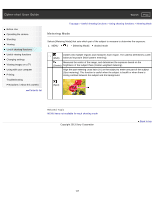
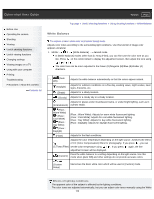
Cyber-shot User Guide Search Print Before Use Operating the camera Shooting Viewing Useful shooting functions Useful viewing functions Changing settings Viewing images on a TV Using with your computer Printing Troubleshooting Precautions / About this camera Contents list Top page > Useful shooting functions > Using shooting functions > Auto Object Framing Auto Object Framing When the camera detects and shoots faces, close-ups, or subjects tracked by the tracking focus function, the captured image is automatically trimmed for the best composition. Both the original and trimmed images are recorded. The trimmed image is recorded in the same size as the original image. 1. MENU 2 [Auto Object Framing] desired mode The icon on the screen turns green when the camera decides that an image being captured can be trimmed. After shooting, the trimmed area is indicated by a frame on the auto review screen. (Off) Sets whether or not to use [Auto Object Framing]. (Auto) Notes The image may not be trimmed into its optimal composition depending on the shooting conditions. Auto Object Framing cannot be used in the following settings. When [Quality] is set to [RAW] or [RAW & JPEG] When [DRO/Auto HDR] is set to [Auto HDR] When [Focus Mode] is set to [Manual Focus] When [Drive Mode] is set to [Cont. Shooting], [Spd Priority Cont.], [Self-timer(Cont)], [Bracket: Cont.] or [WB bracket] When [ISO] is set to [Multi Frame Noise Reduct.] When [Smile/Face Detect.] is set to [Off], you cannot use [Auto Object Framing] for faces. Related Topic MENU items not available for each shooting mode Copyright 2013 Sony Corporation Back to top 104
-
 1
1 -
2
-
3
-
4
-
5
-
6
-
7
-
8
-
9
-
10
-
11
-
12
-
13
-
14
-
15
-
16
-
17
-
18
-
19
-
20
-
21
-
22
-
23
-
24
-
25
-
26
-
27
-
28
-
29
-
30
-
31
-
32
-
33
-
34
-
35
-
36
-
37
-
38
-
39
-
40
-
41
-
42
-
43
-
44
-
45
-
46
-
47
-
48
-
49
-
50
-
51
-
52
-
53
-
54
-
55
-
56
-
57
-
58
-
59
-
60
-
61
-
62
-
63
-
64
-
65
-
66
-
67
-
68
-
69
-
70
-
71
-
72
-
73
-
74
-
75
-
76
-
77
-
78
-
79
-
80
-
81
-
82
-
83
-
84
-
85
-
86
-
87
-
88
-
89
-
90
-
91
-
92
-
93
-
94
-
95
-
96
-
97
-
98
-
 99
99 -
 100
100 -
 101
101 -
 102
102 -
 103
103 -
 104
104 -
 105
105 -
 106
106 -
 107
107 -
 108
108 -
 109
109 -
110
-
111
-
112
-
113
-
114
-
115
-
116
-
117
-
118
-
119
-
120
-
121
-
122
-
123
-
124
-
125
-
126
-
127
-
128
-
129
-
130
-
131
-
132
-
133
-
134
-
135
-
136
-
137
-
138
-
139
-
140
-
141
-
142
-
143
-
144
-
145
-
146
-
147
-
148
-
149
-
150
-
151
-
152
-
153
-
154
-
155
-
156
-
157
-
158
-
159
-
160
-
161
-
162
-
163
-
164
-
165
-
166
-
167
-
168
-
169
-
170
-
171
-
172
-
173
-
174
-
175
-
176
-
177
-
178
-
179
-
180
-
181
-
182
-
183
-
184
-
185
-
186
-
187
-
188
-
189
-
190
-
191
-
192
-
193
-
194
-
195
-
196
-
197
-
198
-
199
-
200
-
201
-
202
-
203
-
204
-
205
-
206
-
207
-
208
-
209
-
210
-
211
-
212
-
213
-
214
-
215
-
216
-
217
-
218
-
219
-
220
-
221
-
222
-
223
-
224
-
225
-
226
-
227
-
228
-
229
-
230
-
231
-
232
-
233
-
234
-
235
-
236
-
237
-
238
-
239
-
240
-
241
-
242
-
243
-
244
-
245
-
246
-
247
-
248
-
249
-
250
-
251
-
252
-
253
-
254
-
255
-
256
-
257
-
258
-
259
-
260
-
261
-
262
-
263
-
264
-
265
-
266
-
267
 |
 |