Sony DSC-RX100M2 Cyber-shot® User Guide (Printable PDF) - Page 99
Autofocus Area, Using Flexible Spot
 |
View all Sony DSC-RX100M2 manuals
Add to My Manuals
Save this manual to your list of manuals |
Page 99 highlights
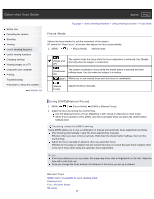
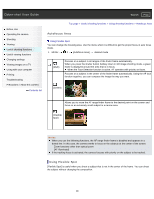
Cyber-shot User Guide Search Print Before Use Operating the camera Shooting Viewing Useful shooting functions Useful viewing functions Changing settings Viewing images on a TV Using with your computer Printing Troubleshooting Precautions / About this camera Contents list Top page > Useful shooting functions > Using shooting functions > Autofocus Area Autofocus Area Using Flexible Spot You can change the focusing area. Use the menu when it is difficult to get the proper focus in auto focus mode. 1. MENU 2 [Autofocus Area] desired mode (Multi) Focuses on a subject in all ranges of the finder frame automatically. When you press the shutter button halfway down in still image shooting mode, a green frame is displayed around the area that is in focus. When the Face Detection function is active, AF operates with priority on faces. Focuses on a subject in the center of the finder frame automatically. Using the AF lock function together, you can compose the image the way you want. (Center) Allows you to move the AF range finder frame to the desired point on the screen and focus on an extremely small subject in a narrow area. (Flexible Spot) Notes When you use the following functions, the AF range finder frame is disabled and appears in a dotted line. In this case, the camera works to focus on the subjects at the center of the screen. Zoom functions other than optical zoom [AF Illuminator] If the tracking focus is activated, the camera focuses with priority on the subject to be tracked. Using Flexible Spot [Flexible Spot] is useful when you shoot a subject that is not in the center of the frame. You can shoot the subject without changing the composition. 99
-
 1
1 -
2
-
3
-
4
-
5
-
6
-
7
-
8
-
9
-
10
-
11
-
12
-
13
-
14
-
15
-
16
-
17
-
18
-
19
-
20
-
21
-
22
-
23
-
24
-
25
-
26
-
27
-
28
-
29
-
30
-
31
-
32
-
33
-
34
-
35
-
36
-
37
-
38
-
39
-
40
-
41
-
42
-
43
-
44
-
45
-
46
-
47
-
48
-
49
-
50
-
51
-
52
-
53
-
54
-
55
-
56
-
57
-
58
-
59
-
60
-
61
-
62
-
63
-
64
-
65
-
66
-
67
-
68
-
69
-
70
-
71
-
72
-
73
-
74
-
75
-
76
-
77
-
78
-
79
-
80
-
81
-
82
-
83
-
84
-
85
-
86
-
87
-
88
-
89
-
90
-
91
-
92
-
93
-
 94
94 -
 95
95 -
 96
96 -
 97
97 -
 98
98 -
 99
99 -
 100
100 -
 101
101 -
 102
102 -
 103
103 -
 104
104 -
105
-
106
-
107
-
108
-
109
-
110
-
111
-
112
-
113
-
114
-
115
-
116
-
117
-
118
-
119
-
120
-
121
-
122
-
123
-
124
-
125
-
126
-
127
-
128
-
129
-
130
-
131
-
132
-
133
-
134
-
135
-
136
-
137
-
138
-
139
-
140
-
141
-
142
-
143
-
144
-
145
-
146
-
147
-
148
-
149
-
150
-
151
-
152
-
153
-
154
-
155
-
156
-
157
-
158
-
159
-
160
-
161
-
162
-
163
-
164
-
165
-
166
-
167
-
168
-
169
-
170
-
171
-
172
-
173
-
174
-
175
-
176
-
177
-
178
-
179
-
180
-
181
-
182
-
183
-
184
-
185
-
186
-
187
-
188
-
189
-
190
-
191
-
192
-
193
-
194
-
195
-
196
-
197
-
198
-
199
-
200
-
201
-
202
-
203
-
204
-
205
-
206
-
207
-
208
-
209
-
210
-
211
-
212
-
213
-
214
-
215
-
216
-
217
-
218
-
219
-
220
-
221
-
222
-
223
-
224
-
225
-
226
-
227
-
228
-
229
-
230
-
231
-
232
-
233
-
234
-
235
-
236
-
237
-
238
-
239
-
240
-
241
-
242
-
243
-
244
-
245
-
246
-
247
-
248
-
249
-
250
-
251
-
252
-
253
-
254
-
255
-
256
-
257
-
258
-
259
-
260
-
261
-
262
-
263
-
264
-
265
-
266
-
267
 |
 |