Sony DSC W55 Service Manual - Page 14
Remove Old Barrier Assy, 2-3. Install New Barrier Assy - lens
 |
UPC - 027242705432
View all Sony DSC W55 manuals
Add to My Manuals
Save this manual to your list of manuals |
Page 14 highlights
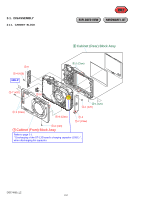
2-2-2. REMOVE OLD BARRIER ASSY 1 Remove two screws. * Discard the removed screws. 2 Remove the Barrier Assy. * Discard the removed Barrier Assy. 2 1 1 * After removing the Barrier Assy, if the "G1 Dust-Proof Ring" was removed, it must be returned to the home position. In returning the ring, adjust the location of a projection to the lens direction. This is an important part to prevent the dust and light from coming in. * After removing the Barrier Assy, take extreme care not to drop dust or foreign substances in the lens barrel. 2-2-3. INSTALL NEW BARRIER ASSY 1 Install new Barrier Assy. 2 Tighten two screws. * Tightening torque = 0.5 kgf 1 2 2 DSC-W55_L2 2-7
-
 1
1 -
2
-
3
-
4
-
5
-
6
-
7
-
8
-
 9
9 -
 10
10 -
 11
11 -
 12
12 -
 13
13 -
 14
14 -
 15
15 -
 16
16 -
 17
17 -
 18
18 -
 19
19 -
20
-
21
-
22
-
23
-
24
-
25
-
26
-
27
-
28
-
29
-
30
-
31
-
32
-
33
-
34
-
35
-
36
-
37
-
38
-
39
-
40
-
41
-
42
-
43
-
44
-
45
-
46
-
47
-
48
-
49
-
50
-
51
-
52
-
53
-
54
-
55
-
56
-
57
-
58
-
59
-
60
 |
 |

2-7
DSC-W55_L2
2-2-2. REMOVE OLD BARRIER ASSY
1
Remove two screws.
*
Discard the removed screws.
2
Remove the Barrier Assy.
*
Discard the removed Barrier Assy.
*
After removing the Barrier Assy, if the
“
G1 Dust-Proof Ring
”
was removed, it must be returned to the home position.
In returning the ring, adjust the location of a projection to the lens direction.
This is an important part to prevent the dust and light from coming in.
*
After removing the Barrier Assy, take extreme care not to drop dust or foreign substances in the lens barrel.
2-2-3. INSTALL NEW BARRIER ASSY
1
Install new Barrier Assy.
2
Tighten two screws.
*
Tightening torque = 0.5 kgf
1
1
2
2
2
1