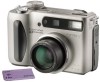
Sony DSCS75 Operating Instructions - Page 6

Table of contents, Getting started, Basic operations, Advanced operations - memory

Page 6 highlights

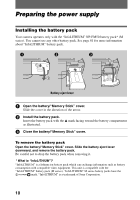
Table of contents Getting started Identifying the parts 8 Preparing the power supply 10 Setting the date and time 15 Inserting the "Memory Stick 17 Basic operations B Recording Recording still images 19 Recording moving images 26 B Playback Playing back still images 28 Playing back moving images 29 Viewing images using a personal computer 31 Image file storage destinations and image files 38 Advanced operations Before performing advanced operations How to use the mode dial 40 How to use the control button 41 How to use the jog dial 42 Setting the image size (IMAGE SIZE 47 B Various recording Recording with the exposure fixed (AE LOCK 49 Recording with the manual adjustments 50 Records images according to shooting conditions (SCENE SELECTION 51 Recording two images continuously ... 52 Recording still images for e-mail (E-MAIL 53 Adding audio files to still images (VOICE 54 Recording text documents (TEXT) ..... 55 Recording still images as uncompressed files (TIFF 56 Creating Clip Motion Files 56 Setting the distance to the subject ....... 58 Recording images in macro 58 Adjusting the exposure (EXPOSURE 59 Adjusting the white balance (WHITE BALANCE 60 Enjoying picture effects (P. EFFECT 61 Recording the date and time on the still image (DATE/TIME 61 Using the spot light-metering function 62 B Various playback Playing back three or nine images at once 63 Enlarging a part of the still image (Zoom and trimming 64 Playing back the still images in order (SLIDE 65 Rotating a still image (ROTATE) ....... 66 Viewing images on a TV screen ......... 66 B Editing Deleting images (DELETE 67 Preventing accidental erasure (PROTECT 68 Changing the recorded still image size (RESIZE 70 Copying images (COPY 71 Selecting still images to print (PRINT 72 Dividing a moving image file (DIVIDE 74 Changing the setup settings (SETUP) ...76 6

  • 1
  • 2
  • 3
  • 4
  • 5
  • 6
  • 7
  • 8
  • 9
  • 10
  • 11
  • 12
  • 13
  • 14
  • 15
  • 16
  • 17
  • 18
  • 19
  • 20
  • 21
  • 22
  • 23
  • 24
  • 25
  • 26
  • 27
  • 28
  • 29
  • 30
  • 31
  • 32
  • 33
  • 34
  • 35
  • 36
  • 37
  • 38
  • 39
  • 40
  • 41
  • 42
  • 43
  • 44
  • 45
  • 46
  • 47
  • 48
  • 49
  • 50
  • 51
  • 52
  • 53
  • 54
  • 55
  • 56
  • 57
  • 58
  • 59
  • 60
  • 61
  • 62
  • 63
  • 64
  • 65
  • 66
  • 67
  • 68
  • 69
  • 70
  • 71
  • 72
  • 73
  • 74
  • 75
  • 76
  • 77
  • 78
  • 79
  • 80
  • 81
  • 82
  • 83
  • 84
  • 85
  • 86
  • 87
  • 88
  • 89
  • 90
  • 91
  • 92
  • 93
  • 94
  • 95
  • 96
  • 97
  • 98
  • 99
  • 100

6
Table of contents
Identifying the parts
..............................
8
Preparing the power supply
.................
10
Setting the date and time
.....................
15
Inserting the “Memory Stick”
.............
17
B
Recording
Recording still images
.........................
19
Recording moving images
..................
26
B
Playback
Playing back still images
.....................
28
Playing back moving images
..............
29
Viewing images using a personal
computer
......................................
31
Image file storage destinations and
image files
....................................
38
How to use the mode dial
....................
40
How to use the control button
.............
41
How to use the jog dial
.......................
42
Setting the image size
(IMAGE SIZE)
............................
47
B
Various recording
Recording with the exposure fixed
(AE LOCK)
..................................
49
Recording with the manual
adjustments
..................................
50
Records images according to shooting
conditions
(SCENE SELECTION)
...............
51
Recording two images continuously ...52
Recording still images for e-mail
(E-MAIL)
.....................................
53
Adding audio files to still images
(VOICE)
.......................................
54
Recording text documents (TEXT)
.....
55
Recording still images as uncompressed
files (TIFF)
...................................
56
Creating Clip Motion Files
.................
56
Setting the distance to the subject
.......
58
Recording images in macro
.................
58
Adjusting the exposure
(EXPOSURE)
..............................
59
Adjusting the white balance
(WHITE BALANCE)
..................
60
Enjoying picture effects
(P. EFFECT)
................................
61
Recording the date and time on the still
image (DATE/TIME)
...................
61
Using the spot light-metering
function
........................................
62
B
Various playback
Playing back three or nine images
at once
..........................................
63
Enlarging a part of the still image
(Zoom and trimming)
...................
64
Playing back the still images in order
(SLIDE)
........................................
65
Rotating a still image (ROTATE)
.......
66
Viewing images on a TV screen
.........
66
B
Editing
Deleting images (DELETE)
................
67
Preventing accidental erasure
(PROTECT)
.................................
68
Changing the recorded still image size
(RESIZE)
.....................................
70
Copying images (COPY)
....................
71
Selecting still images to print
(PRINT)
.......................................
72
Dividing a moving image file
(DIVIDE)
.....................................
74
Changing the setup settings (SETUP) ...76
Getting started
Basic operations
Advanced operations
Before performing advanced operations