Sony DVD910 Operation Guide - Page 90
COLOR SLOW SHTR, Color Slow Shutter, SUPER NIGHTSHOT, FADER
 |
UPC - 027242727441
View all Sony DVD910 manuals
Add to My Manuals
Save this manual to your list of manuals |
Page 90 highlights
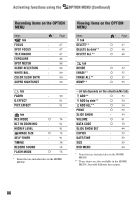
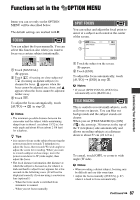
Functions set in the OPTION MENU (Continued) • When you select [ONE PUSH], keep framing white object while is flashing quickly. • flashes slowly if [ONE PUSH] could not be set. • When [ONE PUSH] was selected, if keeps flashing after touching , set [WHITE BAL.] to [AUTO]. • If you set [WHITE BAL.], [SCENE SELECTION] is automatically set to [AUTO]. z Tips • If you changed the battery pack, or moved your camcorder to or from outdoors when [AUTO] was selected, aim your camcorder at a nearby white object with [AUTO] for about 10 seconds for better color balance adjustment. • If you changed the [SCENE SELECTION] setting or moved your camcorder to or from outdoors during white balance setting with [ONE PUSH], you need to repeat the [ONE PUSH] operation. COLOR SLOW SHTR (Color Slow Shutter) When you set [COLOR SLOW SHTR] to [ON], you can record an image brighter in color even in dark places. appears on the screen. To cancel [COLOR SLOW SHTR], touch [OFF]. b Notes • Adjust the focus manually ([FOCUS], p. 87) when it is hard to focus automatically. • The shutter speed of your camcorder changes depending on the brightness, which may result in a slowdown of the motion of the image. SUPER NIGHTSHOT The image will be recorded at a maximum of 16 times the sensitivity of NightShot recording if you set [SUPER NIGHTSHOT] to [ON] while the NIGHTSHOT switch (p. 37) is also set to ON. appears on the screen. To return to the normal setting, set [SUPER NIGHTSHOT] to [OFF]. b Notes • Do not use [SUPER NIGHTSHOT] in bright places. This may cause a malfunction. • Do not cover the infrared port with your fingers or other objects (p. 125). • Remove the conversion lens (optional). • Adjust the focus manually ([FOCUS], p. 87) when it is hard to focus automatically. • The shutter speed of your camcorder changes depending on the brightness, which may result in a slowdown of the motion of the image. FADER You can record a transition with the following effects adding to the interval between scenes. 1 Select the desired effect in [STBY] (during fading in) or [REC] (during fading out) mode, then touch . 2 Press START/STOP. The fader indicator stops flashing and disappears when the fade is complete. To cancel the fader before starting the operation, touch [OFF] in step 1. If you press START/STOP, the setting is cleared. STBY Fading out WHITE FADER REC Fading in BLACK FADER 90
-
 1
1 -
2
-
3
-
4
-
5
-
6
-
7
-
8
-
9
-
10
-
11
-
12
-
13
-
14
-
15
-
16
-
17
-
18
-
19
-
20
-
21
-
22
-
23
-
24
-
25
-
26
-
27
-
28
-
29
-
30
-
31
-
32
-
33
-
34
-
35
-
36
-
37
-
38
-
39
-
40
-
41
-
42
-
43
-
44
-
45
-
46
-
47
-
48
-
49
-
50
-
51
-
52
-
53
-
54
-
55
-
56
-
57
-
58
-
59
-
60
-
61
-
62
-
63
-
64
-
65
-
66
-
67
-
68
-
69
-
70
-
71
-
72
-
73
-
74
-
75
-
76
-
77
-
78
-
79
-
80
-
81
-
82
-
83
-
84
-
 85
85 -
 86
86 -
 87
87 -
 88
88 -
 89
89 -
 90
90 -
 91
91 -
 92
92 -
 93
93 -
 94
94 -
 95
95 -
96
-
97
-
98
-
99
-
100
-
101
-
102
-
103
-
104
-
105
-
106
-
107
-
108
-
109
-
110
-
111
-
112
-
113
-
114
-
115
-
116
-
117
-
118
-
119
-
120
-
121
-
122
-
123
-
124
-
125
-
126
-
127
-
128
-
129
-
130
-
131
-
132
-
133
-
134
-
135
-
136
-
137
-
138
-
139
-
140
-
141
-
142
-
143
-
144
-
145
-
146
-
147
-
148
-
149
-
150
-
151
 |
 |
