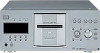
Sony DVP-CX777ES Operating Instructions (DVD Player DVPCX777ES) - Page 33
Playing Discs, Inserting Discs, Press DISC CHANGE. - 400
 |
UPC - 027242621046
View all Sony DVP-CX777ES manuals
Add to My Manuals
Save this manual to your list of manuals |
Page 33 highlights
Playing Discs Inserting Discs inserted the disc into each slot at a right angle to the rotary table. If the disc is not put in straight, it may damage the player or the disc. Playing Discs You can insert up to 400 discs into this player. [/1 OPEN/CLOSE Front cover +100 .-/>+/ENTER dial DISC CHANGE 1 Press [/1. The player turns on. 2 Press OPEN/CLOSE. The front cover opens. 3 Press DISC CHANGE. The DISC CHANGE indicator lights up. 4 While checking the disc slot number indicated on the front panel display or by the slot, turn the .-/>+/ ENTER dial until you find the disc slot where you want to insert a disc. Disc slot number With the playback side facing left 6 Repeat steps 4 and 5 to insert more discs. 7 Press OPEN/CLOSE. The front cover closes. The rotary table turns and the disc slot selected in step 4 is set to the playing position. z Hint In step 4, you can select a disc slot number by skipping 10 slots. After sliding the TV/DISC EXPLORER/DVD switch to DISC EXPLORER or DVD, press DISC SKIP +/- on the remote. 10 disc slots before or after the current disc slot number will be skipped. To skip 100 slots, press +100 on the player. Notes • Do not turn the turntable by hand. • Do not reach inside of the turntable compartment. Always follow the correct steps for inserting and removing discs. • When transporting the player, remove all discs from the player. Failure to remove the discs may cause damage to the player. • When closing the front cover, be careful not to let anything get caught between the door and the player. Disc slot at the loading position 5 Insert a disc. Gently place the disc all the way into the slot and do not release the disc until it is completely seated. Make sure you have c continued 33
-
 1
1 -
2
-
3
-
4
-
5
-
6
-
7
-
8
-
9
-
10
-
11
-
12
-
13
-
14
-
15
-
16
-
17
-
18
-
19
-
20
-
21
-
22
-
23
-
24
-
25
-
26
-
27
-
 28
28 -
 29
29 -
 30
30 -
 31
31 -
 32
32 -
 33
33 -
 34
34 -
 35
35 -
 36
36 -
 37
37 -
 38
38 -
39
-
40
-
41
-
42
-
43
-
44
-
45
-
46
-
47
-
48
-
49
-
50
-
51
-
52
-
53
-
54
-
55
-
56
-
57
-
58
-
59
-
60
-
61
-
62
-
63
-
64
-
65
-
66
-
67
-
68
-
69
-
70
-
71
-
72
-
73
-
74
-
75
-
76
-
77
-
78
-
79
-
80
-
81
-
82
-
83
-
84
-
85
-
86
-
87
-
88
-
89
-
90
-
91
-
92
-
93
-
94
-
95
-
96
-
97
-
98
-
99
-
100
-
101
-
102
-
103
-
104
-
105
-
106
-
107
-
108
 |
 |
