Sony DVP NS725P Operating Instructions - Page 25
Press ENTER., Enjoying the surround sound, effects
 |
UPC - 027242622463
View all Sony DVP NS725P manuals
Add to My Manuals
Save this manual to your list of manuals |
Page 25 highlights
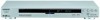
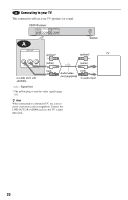
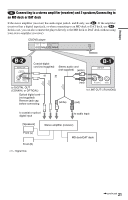
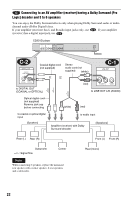
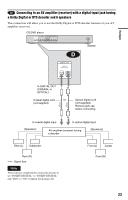
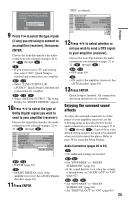
Is this player connected to an amplifier (receiver) ? Select the type of jack you are using. YES LINE OUTPUT L/R (AUDIO) DIGITAL OUTPUT NO 9 Press X/x to select the type of jack (if any) you are using to connect to an amplifier (receiver), then press ENTER. Choose the item that matches the audio connection you selected on pages 20 to 23 ( A through D ). A • If you connect just a TV and nothing else, select "NO." Quick Setup is finished and connections are complete. B-1 C-1 • Select "LINE OUTPUT L/R (AUDIO)." Quick Setup is finished and connections are complete. B-2 C-2 D • Select "DIGITAL OUTPUT." The Setup Display for "DOLBY DIGITAL" appears. 10Press X/x to select the type of Dolby Digital signal you wish to send to your amplifier (receiver). Choose the signal that matches the audio connection you selected on pages 21 to 23 ( B through D ). AUDIO SETUP AUDIO ATT: OFF AUDIO DRC: STANDARD DOWNMIX: DOLBY SURROUND DIGITAL OUT: ON DOLBY DIGITAL: D-PCM DTS: D-PCM DOLBY DIGITAL B-2 C-2 • D-PCM (page 63) D • DOLBY DIGITAL (only if the amplifier (receiver) has a Dolby Digital decoder) (page 63) 11Press ENTER. "DTS" is selected. AUDIO SETUP AUDIO ATT: OFF AUDIO DRC: STANDARD DOWNMIX: DIGITAL OUT: DOLBY SURROUND ON DOLBY DIGITAL: D-PCM DTS: OFF OFF ON Hookups 12Press X/x to select whether or not you wish to send a DTS signal to your amplifier (receiver). Choose the item that matches the audio connection you selected on pages 21 to 23 ( B through D ). B-2 C-2 • OFF (page 63) D • ON (only if the amplifier (receiver) has a DTS decoder) (page 63) 13Press ENTER. Quick Setup is finished. All connections and setup operations are complete. Enjoying the surround sound effects To enjoy the surround sound effects of this player or your amplifier (receiver), set the following items as described below for the audio connection you selected on pages 21 to 23 ( B through D ). Each of these is the default setting and does not need to be adjusted when you first connect the player. Refer to page 58 for using the Setup Display. Audio Connection (pages 20 to 23) A • No additional settings are needed. B-1 C-1 • Set "DOWNMIX" to "DOLBY SURROUND" (page 63) • If the sound distorts even when the volume is turned down, set "AUDIO ATT" to "ON" (page 62) B-2 C-2 D • Set "DOWNMIX" to "DOLBY SURROUND" (page 63) • Set "DIGITAL OUT" to "ON" (page 63) 25
-
 1
1 -
2
-
3
-
4
-
5
-
6
-
7
-
8
-
9
-
10
-
11
-
12
-
13
-
14
-
15
-
16
-
17
-
18
-
19
-
 20
20 -
 21
21 -
 22
22 -
 23
23 -
 24
24 -
 25
25 -
 26
26 -
 27
27 -
 28
28 -
 29
29 -
 30
30 -
31
-
32
-
33
-
34
-
35
-
36
-
37
-
38
-
39
-
40
-
41
-
42
-
43
-
44
-
45
-
46
-
47
-
48
-
49
-
50
-
51
-
52
-
53
-
54
-
55
-
56
-
57
-
58
-
59
-
60
-
61
-
62
-
63
-
64
-
65
-
66
-
67
-
68
-
69
-
70
-
71
-
72
 |
 |
