Sony HCD-DJ2i Operating Instructions - Page 39
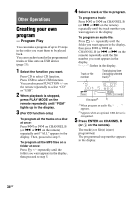
Other Operations, Select the sound source or, prepare the USB device. Then
 |
View all Sony HCD-DJ2i manuals
Add to My Manuals
Save this manual to your list of manuals |
Page 39 highlights
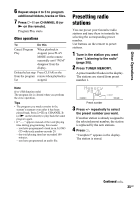
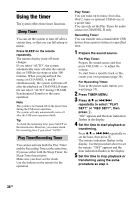
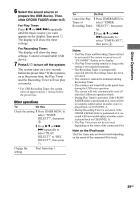
Other Operations 6 Select the sound source or prepare the USB device. Then, slide CROSS FADER slider to B. For Play Timer: Press V/v or ./> repeatedly until the music source you want appears in the display, then press . The display will show the timer settings. For Recording Timer: The display will show the timer settings. Connect a transferable USB device. 7 Press "/1 to turn off the system. The system turns on a few seconds before the preset time.* If the system is on at the preset time, the Play Timer and the Recording Timer will not play or transfer. * For USB Recording Timer, the system turns on approximately 1 minute before the preset time. Other operations To Do this Check the setting 1 Press TIMER MENU to select "TIMER SELECT?", then press . 2 Press V/v or ./ > repeatedly to select "PLAY SELECT?" or "REC SELECT?", then press . Change the setting Start from step 1. To Do this Cancel the Play 1 Press TIMER MENU to Timer or select "TIMER Recording Timer SELECT?", then press . 2 Press V/v or ./ > repeatedly to select "TIMER OFF?", then press . Notes • The Play Timer and Recording Timer will not be activated if the system is turned on or if "STANDBY" flashes in the display. • The Play Timer setting remains as long as the setting is not canceled manually. • The Recording Timer is automatically canceled after the Recording Timer has been activated. • The volume is reduced to minimum during Recording Timer. • The system is not turned off on the preset time during the USB erase operation. The system will only automatically turns off after the USB erase operation finish. • During Play Timer is activated, if the CROSS FADER slider is positioned at A, there will be no sound is output unless an audio source is played back on CHANNEL A. • During Recording Timer is activated, if the CROSS FADER slider is positioned at A, no sound will be recorded unless an audio source is played back on CHANNEL A. • The Play Timer may not be activated depending on the status of the connected iPod. Note on the iPod touch The Play Timer may not be activated depending on the status of the connected iPod touch. 39GB
-
 1
1 -
2
-
3
-
4
-
5
-
6
-
7
-
8
-
9
-
10
-
11
-
12
-
13
-
14
-
15
-
16
-
17
-
18
-
19
-
20
-
21
-
22
-
23
-
24
-
25
-
26
-
27
-
28
-
29
-
30
-
31
-
32
-
33
-
 34
34 -
 35
35 -
 36
36 -
 37
37 -
 38
38 -
 39
39 -
 40
40 -
 41
41 -
 42
42 -
 43
43 -
 44
44 -
45
-
46
-
47
-
48
-
49
-
50
-
51
-
52
-
53
-
54
-
55
-
56
 |
 |
