Sony HCD-HDX500 Operating Instructions - Page 25
AUDIO IN / A.CAL MIC, formation image as the speakers are - dav no sound
 |
View all Sony HCD-HDX500 manuals
Add to My Manuals
Save this manual to your list of manuals |
Page 25 highlights
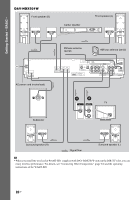
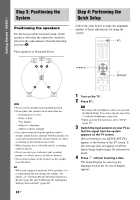
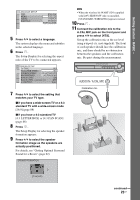
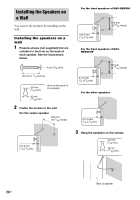
Getting Started - BASIC - LANGUAGE SETUP OSD: MENU: AUDIO: SUBTITLE: ENGLISH ENGLISH FRENCH SPANISH PORTUGUESE 5 Press X/x to select a language. The system displays the menu and subtitles in the selected language. 6 Press . The Setup Display for selecting the aspect ratio of the TV to be connected appears. SCREEN SETUP TV TYPE: 16:9 YCBCR/RGB (HDMI): 16:9 SCREEN SAVER: 4:3 LETTER BOX BACKGROUND: 4:3 PAN SCAN BLACK LEVEL: ON BLACK LEVEL (COMPONENT OUT): OFF 4:3 OUTPUT: FULL 7 Press X/x to select the setting that matches your TV type. x If you have a wide-screen TV or a 4:3 standard TV with a wide-screen mode [16:9] (page 88) x If you have a 4:3 standard TV [4:3 LETTER BOX] or [4:3 PAN SCAN] (page 88) 8 Press . The Setup Display for selecting the speaker formation appears. 9 Press C/c to select the speaker formation image as the speakers are actually positioned. For details, see "Getting Optimal Surround Sound for a Room" (page 82). SPEAKER FORMATION Note • When the wireless kit WAHT-SD1 (supplied with DAV-HDX501W only) is installed, [STANDARD (WIRELESS)] appears instead. 10 Press . 11 Connect the calibration mic to the A.CAL MIC jack on the front panel and press X/x to select [YES]. Set up the calibration mic at the ear level using a tripod, etc. (not supplied). The front of each speaker should face the calibration mic, and there should be no obstruction between the speakers and the calibration mic. Be quiet during the measurement. AUDIO IN / A.CAL MIC Calibration mic STANDARD continued 25US
-
 1
1 -
2
-
3
-
4
-
5
-
6
-
7
-
8
-
9
-
10
-
11
-
12
-
13
-
14
-
15
-
16
-
17
-
18
-
19
-
 20
20 -
 21
21 -
 22
22 -
 23
23 -
 24
24 -
 25
25 -
 26
26 -
 27
27 -
 28
28 -
 29
29 -
 30
30 -
31
-
32
-
33
-
34
-
35
-
36
-
37
-
38
-
39
-
40
-
41
-
42
-
43
-
44
-
45
-
46
-
47
-
48
-
49
-
50
-
51
-
52
-
53
-
54
-
55
-
56
-
57
-
58
-
59
-
60
-
61
-
62
-
63
-
64
-
65
-
66
-
67
-
68
-
69
-
70
-
71
-
72
-
73
-
74
-
75
-
76
-
77
-
78
-
79
-
80
-
81
-
82
-
83
-
84
-
85
-
86
-
87
-
88
-
89
-
90
-
91
-
92
-
93
-
94
-
95
-
96
-
97
-
98
-
99
-
100
-
101
-
102
-
103
-
104
-
105
-
106
-
107
-
108
-
109
-
110
-
111
-
112
-
113
-
114
-
115
-
116
-
117
-
118
-
119
-
120
 |
 |
