Sony HCD-HDX678WF Operating Instructions - Page 15
Step 1: Assembling the Speakers
 |
View all Sony HCD-HDX678WF manuals
Add to My Manuals
Save this manual to your list of manuals |
Page 15 highlights
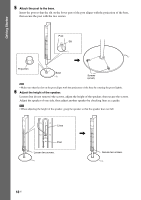
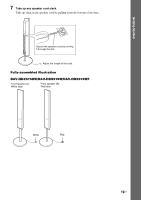
Getting Started Step 1: Assembling the Speakers Before connecting the speakers, attach the speaker stand to the speaker. (For the front speakers of DAV-HDX575WC/DAV-HDX578W/DAV-HDX678WF, front and surround speakers of DAV-HDX975WF) Use the parts as follows: DAV-HDX575WC/DAV-HDX578W/DAV-HDX678WF • Front speakers (2) • Speaker cords (2, red/white) • Posts (2) • Bases (2) • Mounting plates (2) • Post covers (2) • Screws (large, with washer) (4) • Screws (small) (6) DAV-HDX975WF • Front and surround speakers (4) • Speaker cords (4, red/white/blue/gray) • Posts (4) • Bases (4) • Mounting plates (4) • Post covers (4) • Screws (large, with washer) (8) • Screws (small) (12) Although the rear layout of the front speaker is slightly different from it of the surround speaker, the way of the assembling is the same. (The illustrations in the following steps are for the front speakers as example.) About how to connect the speaker cords to the SPEAKER jacks, see page 29. Note • Spread a cloth on the floor to avoid damaging the floor when you assemble the speakers. Tip • You can use the speaker without the speaker stand by installing it on the wall (page 21). 15US
-
 1
1 -
2
-
3
-
4
-
5
-
6
-
7
-
8
-
9
-
 10
10 -
 11
11 -
 12
12 -
 13
13 -
 14
14 -
 15
15 -
 16
16 -
 17
17 -
 18
18 -
 19
19 -
 20
20 -
21
-
22
-
23
-
24
-
25
-
26
-
27
-
28
-
29
-
30
-
31
-
32
-
33
-
34
-
35
-
36
-
37
-
38
-
39
-
40
-
41
-
42
-
43
-
44
-
45
-
46
-
47
-
48
-
49
-
50
-
51
-
52
-
53
-
54
-
55
-
56
-
57
-
58
-
59
-
60
-
61
-
62
-
63
-
64
-
65
-
66
-
67
-
68
-
69
-
70
-
71
-
72
-
73
-
74
-
75
-
76
-
77
-
78
-
79
-
80
-
81
-
82
-
83
-
84
-
85
-
86
-
87
-
88
-
89
-
90
-
91
-
92
-
93
-
94
-
95
-
96
-
97
-
98
-
99
-
100
-
101
-
102
-
103
-
104
-
105
-
106
-
107
-
108
-
109
-
110
-
111
-
112
-
113
-
114
-
115
-
116
-
117
-
118
-
119
-
120
-
121
-
122
-
123
-
124
-
125
-
126
-
127
-
128
 |
 |
