Sony HCD-X10 Operating Instructions - Page 19
Press, to select [YES], then press, Unplug the calibration mic and press, To quit the Quick Setup
 |
View all Sony HCD-X10 manuals
Add to My Manuals
Save this manual to your list of manuals |
Page 19 highlights
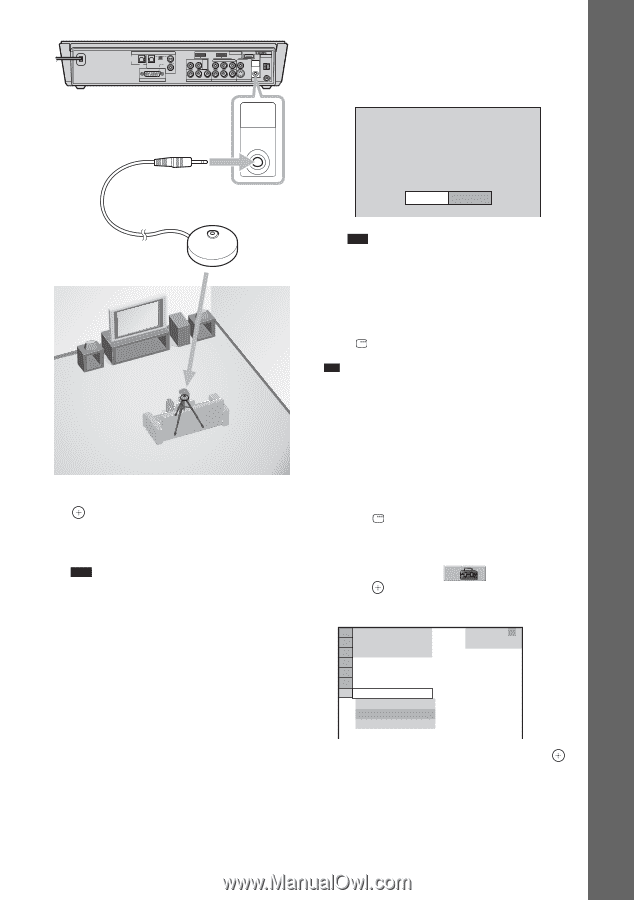
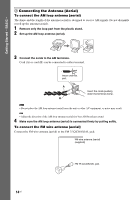
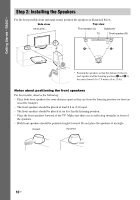
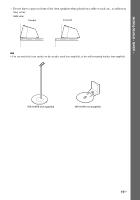
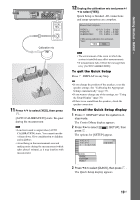
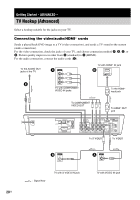
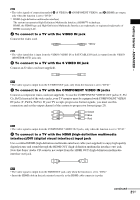
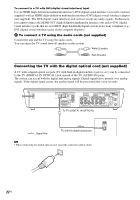
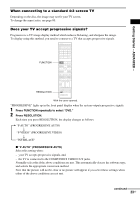
Getting Started - BASIC - OPTICAL TV DIGITAL IN OPTICAL COAXIAL SAT/ CABLE COAXIAL IMPEDANCE USE 4 VIDEO SPEAKER R AUDIO L IN 1 2 DMPORT (DVD COMPONENT VIDEO OUT ONLY) PB / PR / TV Y CB CR (DVD ONLY) OUT ANTENNA VIDEO A.CAL AM MIC ECM-AC2 R AUDIO L VIDEO SAT/CABLE IN R AUDIO L VIDEO VIDEO IN S VIDEO (DVD ONLY) MONITOR OUT FM 75 COAXIAL A.CAL MIC ECM-AC2 Calibration mic 11 Press X/x to select [YES], then press . [AUTO CALIBRATION] starts. Be quiet during the measurement. Note • Loud test sound is output when [AUTO CALIBRATION] starts. You cannot turn the volume down. Give consideration to children and neighbors. • Avoid being in the measurement area and making noise during the measurement (which takes about 1 minute), as it may interfere with measurement. 12 Unplug the calibration mic and press C/ c to select [YES]. Quick Setup is finished. All connections and setup operations are complete. Measurement complete. FRONT L : 10 1/4 ft 3.12m 0.0dB FRONT R : 11ft 3.35m + 0.5dB SUBWOOFER : 11ft 3.35m + 1.0dB If OK, unplug calibration mic and select "YES". YES NO Note • The environment of the room in which the system is installed may affect measurements. • If measurement fails, follow the message then retry [AUTO CALIBRATION]. To quit the Quick Setup Press DISPLAY in any Step. Tip • If you change the position of the speakers, reset the speaker settings. See "Calibrating the Appropriate Settings Automatically" (page 75). • If you want to change any of the settings, see "Using the Setup Display" (page 78). • If there is no sound from the speakers, check the speaker connection. To recall the Quick Setup display 1 Press DISPLAY when the system is in stop mode. The Control Menu display appears. 2 Press X/x to select press . [SETUP], then The options for [SETUP] appear. 1 2 ( 2 7 ) 1 8 ( 3 4 ) T 1:32:55 DVD VIDEO QUICK QUICK CUSTOM RESET BNR 3 Press X/x to select [QUICK], then press . The Quick Setup display appears. 19US
-
 1
1 -
2
-
3
-
4
-
5
-
6
-
7
-
8
-
9
-
10
-
11
-
12
-
13
-
 14
14 -
 15
15 -
 16
16 -
 17
17 -
 18
18 -
 19
19 -
 20
20 -
 21
21 -
 22
22 -
 23
23 -
 24
24 -
25
-
26
-
27
-
28
-
29
-
30
-
31
-
32
-
33
-
34
-
35
-
36
-
37
-
38
-
39
-
40
-
41
-
42
-
43
-
44
-
45
-
46
-
47
-
48
-
49
-
50
-
51
-
52
-
53
-
54
-
55
-
56
-
57
-
58
-
59
-
60
-
61
-
62
-
63
-
64
-
65
-
66
-
67
-
68
-
69
-
70
-
71
-
72
-
73
-
74
-
75
-
76
-
77
-
78
-
79
-
80
-
81
-
82
-
83
-
84
-
85
-
86
-
87
-
88
-
89
-
90
-
91
-
92
-
93
-
94
-
95
-
96
-
97
-
98
-
99
-
100
-
101
-
102
-
103
-
104
-
105
-
106
-
107
 |
 |