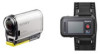
Sony HDR-AS100VR Operating Instructions - Handbook
Sony HDR-AS100VR Manual
 |
View all Sony HDR-AS100VR manuals
Add to My Manuals
Save this manual to your list of manuals |
Sony HDR-AS100VR manual content summary:
- Sony HDR-AS100VR | Operating Instructions - Handbook - Page 1
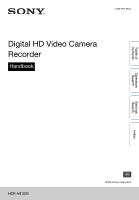
4-532-707-11(2) Digital HD Video Camera Recorder Handbook Table of contents Operation Search Settings Search Index HDR-AS100V GB © 2014 Sony Corporation - Sony HDR-AS100VR | Operating Instructions - Handbook - Page 2
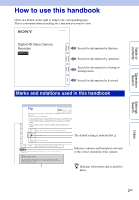
Table of contents Table of contents Operation Search Settings Search Operation Search Index How to use this handbook Click on a button on the right to jump to the corresponding page. This is convenient when searching for a function you want to view. Search for information by function. Search - Sony HDR-AS100VR | Operating Instructions - Handbook - Page 3
[PAL] are shown in this manual. On camera's temperature The camera may overheat protection Depending on the camera and battery temperature, you may be unable to image data compatibility • This camera supports "MP4 format" as movie file content or recording failure Sony cannot compensate for failure - Sony HDR-AS100VR | Operating Instructions - Handbook - Page 4
the camera. • In this manual, Memory Stick Micro™ media been confirmed to conform with WiFi specifications set forth by the service provider. • Sony makes no guarantees whatsoever in the provision of a network service. Sony Firmly close the connector cover and battery pack/memory card cover. (If the - Sony HDR-AS100VR | Operating Instructions - Handbook - Page 5
2 Notes on using the camera 3 Operation Search 8 Settings Search 9 Identifying parts 11 Getting started Checking the bundled items 12 Inserting the battery pack 13 Inserting a memory card 16 Date & Time Setting 18 Daylight Saving Time (Summer Time) Setting ···· 20 Image Quality Setting Mode - Sony HDR-AS100VR | Operating Instructions - Handbook - Page 6
to your smartphone 56 Connecting to your smartphone 57 Connecting with the Live-View Remote 61 Computer Useful functions when connecting the camera to your computer 63 Preparing a computer 64 Troubleshooting Troubleshooting 66 Warning indicators and messages 70 Settings Search Index 6GB - Sony HDR-AS100VR | Operating Instructions - Handbook - Page 7
Others Index Recordable time 72 Battery pack 74 Using the camera abroad 75 Precautions 76 Specifications 78 Index 81 Table of contents Operation Search Settings Search Index 7GB - Sony HDR-AS100VR | Operating Instructions - Handbook - Page 8
or tablet Preparation for connecting to your smartphone 56 Connecting to your smartphone 57 Copying images to a smartphone from the camera Copy 34 Operating using a Live- Connecting with the Live-View Remote 61 View Remote Settings Search Index 8GB - Sony HDR-AS100VR | Operating Instructions - Handbook - Page 9
Table of contents Operation Search Settings Search Setting items Click each item to jump to the corresponding page. List of modes Display Modes MOVIE Movie Mode PHOTO Photo Mode INTVL Interval Photo Recording Mode VMODE Image Quality Setting Mode SETUP Setup Mode PLAY PwOFF Play Mode - Sony HDR-AS100VR | Operating Instructions - Handbook - Page 10
next menu PREV*: Goes to the previous menu ENTER: Executes the menu * Both NEXT and PREV buttons are used to change the menu. In this manual, we usually use the NEXT button for description. When using only the PREV button, we describe it as the PREV button. REC button/ ENTER button - Sony HDR-AS100VR | Operating Instructions - Handbook - Page 11
/Micro USB Terminal*6 V Battery pack/memory card cover W Memory card insertion slot X Battery ejection lever Y Battery insertion slot *1 The lamp external microphone (sold separately) is connected, audio cannot be recorded through the built-in microphone. *5 Used to connect accessories. *6 Supports - Sony HDR-AS100VR | Operating Instructions - Handbook - Page 12
that item bundled. • Camera (1) • Micro USB cable (1) • Rechargeable battery pack (NP-BX1) (1) • Waterproof Case (SPK-AS2) (1) • Adhesive Mount (1) Curved Adhesive Mount (1) • Tripod Adaptor (1) • Handbook (this manual) Included in the internal memory of this camera. • Set of printed documentation - Sony HDR-AS100VR | Operating Instructions - Handbook - Page 13
properly, so as the yellow mark on the lock lever is not visible. Lock lever Battery ejection lever zTo remove the battery pack Open the cover and slide the battery ejection lever, then remove the battery pack. zTo set Auto Power Off function Select [A.OFF] from the [SETUP] t [CONFG] screen, then - Sony HDR-AS100VR | Operating Instructions - Handbook - Page 14
NP-BX1 (supplied) Via a computer Approx. 245 min. Via AC-UD20* (sold separately) Approx. 175 min. • Time required to charge a fully depleted battery pack at a temperature of 25°C (77°F). Charging may take longer under certain circumstances or conditions. * Rapid charging is possible by using the - Sony HDR-AS100VR | Operating Instructions - Handbook - Page 15
zChecking the remaining battery charge A remaining charge indicator appears on the upper right of the display panel. High Low • The displayed remaining charge indicator may not be correct under - Sony HDR-AS100VR | Operating Instructions - Handbook - Page 16
Table of contents Inserting a memory card 1 Slide the lock lever until the yellow mark can be seen, then open the cover. Lock lever 2 Insert the memory card until it clicks. microSD card: Insert in the direction of A. Memory Stick Micro (M2) media: Insert in the direction of B. • When [WAIT] - Sony HDR-AS100VR | Operating Instructions - Handbook - Page 17
40°C (14°F to 104°F). However, depending on the types of memory cards, guaranteed operating temperature varies. For details, refer to the operating instructions supplied with the memory card. • Images recorded in a microSDXC memory card cannot be transferred or played back on a computer or AV device - Sony HDR-AS100VR | Operating Instructions - Handbook - Page 18
Table of contents Operation Search Date & Time Setting Setting display t t You can set the year/month/day and region. To make the setting, select [SETUP] t [CONFG] first. 1 Press the NEXT button to display [SETUP], then press the ENTER button. 2 Press the NEXT button to display [CONFG], then - Sony HDR-AS100VR | Operating Instructions - Handbook - Page 19
Table of contents Operation Search Settings Search zSetting the region You can set the clock to the local time of a country you visit by selecting the region. Regions are defined by time difference from Greenwich Mean Time (GMT). Refer also to "World time difference" (page 75). 19GB Index - Sony HDR-AS100VR | Operating Instructions - Handbook - Page 20
Table of contents Daylight Saving Setting Time (Summer display Time) Setting t t You can set the camera's clock to the Daylight Saving Time. To make the setting, select [SETUP] t [CONFG] first. 1 Press the NEXT button to display [SETUP], then press the ENTER button. 2 Press the NEXT button to - Sony HDR-AS100VR | Operating Instructions - Handbook - Page 21
Image Quality Setting Setting Mode display Table of contents You can set the image resolution and frame rate for shooting movies. Image qualities that can be set depend on the [PRO] setting (page 28). 1 Press the NEXT button to display [VMODE], then press the ENTER button. 2 Press the NEXT - Sony HDR-AS100VR | Operating Instructions - Handbook - Page 22
/100p in high speed recording, the continuous movie shooting time is approximately 9 hours 40 minutes maximum. • The times shown are recordable times using a Sony memory card. • Audio is not recorded when shooting in [SSLOW] mode. • The field angle changes when the Image Quality Setting Mode is set - Sony HDR-AS100VR | Operating Instructions - Handbook - Page 23
Table of contents SteadyShot Setting display t You can activate the camera-shake reduction when shooting. To make the setting, select [SETUP] first. 1 Press the NEXT button to display [SETUP], then press the ENTER button. 2 Press the NEXT button to display [STEDY] (SteadyShot), then press the - Sony HDR-AS100VR | Operating Instructions - Handbook - Page 24
Table of contents Flip Setting display t You can record the image upside down. This function is useful when the camera is attached upside down. To make the setting, select [SETUP] first. 1 Press the NEXT button to display [SETUP], then press the ENTER button. 2 Press the NEXT button to display - Sony HDR-AS100VR | Operating Instructions - Handbook - Page 25
Table of contents Scene Setting display t You can select suitable image quality according to the shooting scene. To make the setting, select [SETUP] first. 1 Press the NEXT button to display [SETUP], then press the ENTER button. 2 Press the NEXT button to display [SCENE] (Scene), then press the - Sony HDR-AS100VR | Operating Instructions - Handbook - Page 26
Table of contents Operation Search Interval Photo Recording Setting display t You can set the interval period of the interval photo recording. To make the setting, select [SETUP] first. 1 Press the NEXT button to display [SETUP], then press the ENTER button. 2 Press the NEXT button to display - Sony HDR-AS100VR | Operating Instructions - Handbook - Page 27
Table of contents Color Setting Setting display t You can change the image color tone when shooting. To make the setting, select [SETUP] first. 1 Press the NEXT button to display [SETUP], then press the ENTER button. 2 Press the NEXT button to display [COLOR] (Color), then press the ENTER - Sony HDR-AS100VR | Operating Instructions - Handbook - Page 28
Table of contents XAVC S Setting display t This setting is suitable for professional movie shooting. The format when recording movies will be XAVC S, and you can record high quality images at a high bit rate of approximately 50 Mbps. You can change the time code/user bit setting when [PRO] is - Sony HDR-AS100VR | Operating Instructions - Handbook - Page 29
Table of contents Operation Search Time Code/User Bit Setting display t You can use the time code/user bit when [PRO] is set to [ON]. You can set the following settings from [TC/UB]. To make the setting, select [SETUP] first. 1 Press the NEXT button to display [SETUP], then press the ENTER - Sony HDR-AS100VR | Operating Instructions - Handbook - Page 30
Table of contents Operation Search Sets the user bit. • Set four 2-digit numbers, then press the ENTER button. • The user bit can be selected within the following range. 00:00:00:00 (default) - FF:FF:FF:FF Initializes the use bit. • Press the ENTER button to display [SURE?] while [OK] is displayed - Sony HDR-AS100VR | Operating Instructions - Handbook - Page 31
to the [IR-RC] menu. Notes • The infrared remote controller RMT-845 (sold separately) is required to use this function. Purchase it at a Sony service center. • You can operate only the following settings using the RMT-845 (sold separately). Other settings are inoperable. - Initialize the time code - Sony HDR-AS100VR | Operating Instructions - Handbook - Page 32
Table of contents Configuration Settings Setting display t You can set the following settings from [CONFG]. Click each item to jump to the corresponding page. See page 9 for the hierarchical menu structure of the camera. Items Wi-Fi Remote Control GPS Log Airplane Mode USB Power Supply Auto - Sony HDR-AS100VR | Operating Instructions - Handbook - Page 33
-View Remote or smartphone through Wi- Fi. For details of the connecting method, see page 61 for a Live-View Remote and see page 56 for a smartphone. 7 Operate the camera by the Live-View Remote or smartphone. Notes • The camera battery charge may be consumed quickly if the camera is operated by the - Sony HDR-AS100VR | Operating Instructions - Handbook - Page 34
on the PlayMemories Mobile screen of the smartphone. 4 Select the image(s) to be copied. Notes • Before activating the Wi-Fi remote control function, update the PlayMemories Mobile software to the latest. • You can copy images to your smartphone when the camera is set to a shooting mode (movie mode - Sony HDR-AS100VR | Operating Instructions - Handbook - Page 35
does not collect location information and routing information. • To display location information and routing information as a map on a computer, Sony provides data of location information and routing information to Google Inc. • Although the camera does not have the function to delete log files, you - Sony HDR-AS100VR | Operating Instructions - Handbook - Page 36
of validity of GPS assist data has run out, the time until you can record location information cannot be shortened. Using the GPS support tool You can also update the GPS assist data by inserting a memory card into the computer. Display the main screen of PlayMemories Home and select the connected - Sony HDR-AS100VR | Operating Instructions - Handbook - Page 37
Table of contents Airplane Mode Setting display t t When you are in an airplane or another restricted place, you can set the camera to disable all functions related to the wireless applications such as Wi-Fi/GPS, etc. If you set the airplane mode to [ON], an airplane mark will be displayed on - Sony HDR-AS100VR | Operating Instructions - Handbook - Page 38
supplied properly from a USB device with a power supply capacity of less than 1.5 A. • If you turn the power of the camera on while charging the battery pack, charging stops and power is supplied to the camera from a device connected via USB. zHow to supply power from a wall outlet (wall socket) Use - Sony HDR-AS100VR | Operating Instructions - Handbook - Page 39
Table of contents Operation Search Auto Power Off Setting display t t You can change the setting of the Auto Power Off function. To make the setting, select [SETUP] t [CONFG] first. 1 Press the NEXT button to display [SETUP], then press the ENTER button. 2 Press the NEXT button to display [ - Sony HDR-AS100VR | Operating Instructions - Handbook - Page 40
Table of contents Beep Setting display t t You can set the audible notification of operations to ON/OFF. To make the setting, select [SETUP] t [CONFG] first. 1 Press the NEXT button to display [SETUP], then press the ENTER button. 2 Press the NEXT button to display [CONFG], then press the ENTER - Sony HDR-AS100VR | Operating Instructions - Handbook - Page 41
Table of contents Language Setting Setting display t t You can set the displayed language. To make the setting, select [SETUP] t [CONFG] first. 1 Press the NEXT button to display [SETUP], then press the ENTER button. 2 Press the NEXT button to display [CONFG], then press the ENTER button. 3 - Sony HDR-AS100VR | Operating Instructions - Handbook - Page 42
Table of contents Operation Search Switching NTSC/ Setting PAL display t t You can select NTSC/PAL, depending on the TV system of the country or region where you use this camera. To make the setting, select [SETUP] t [CONFG] first. 1 Press the NEXT button to display [SETUP], then press the - Sony HDR-AS100VR | Operating Instructions - Handbook - Page 43
Resetting the Settings Setting display t t You can reset the settings to their defaults. If you activate [RESET], images are not deleted. 1 Press the NEXT button to display [SETUP], then press the ENTER button. 2 Press the NEXT button to display [CONFG], then press the ENTER button. 3 Press the - Sony HDR-AS100VR | Operating Instructions - Handbook - Page 44
images before formatting. • Do not perform any of the following operations while formatting. - Press a button. - Eject the memory card. - Connect/disconnect a cable. - Insert/remove the battery pack. Operation Search Settings Search Index 44GB - Sony HDR-AS100VR | Operating Instructions - Handbook - Page 45
Refer to the website of this camera for the latest information on accessories. Tripod Adaptor By attaching the Tripod Adaptor to the camera, you can attach accessories to the camera without using the Waterproof Case. Opening/closing the connector cover of the Multi/Micro USB Terminal is also - Sony HDR-AS100VR | Operating Instructions - Handbook - Page 46
Table of contents Operation Search Waterproof Case (SPK-AS2) By inserting the camera in the Waterproof Case, you can shoot movies at a beach. Case body HOLD lever REC button NEXT button PREV button Cord attachment hole Case cover Attachment method Tripod screw hole Buckle lock Buckle 1 - Sony HDR-AS100VR | Operating Instructions - Handbook - Page 47
Table of contents Operation Search Settings Search 5 Hook the buckle over the tab on the lower part of the case cover 1, then close the buckle in the direction of 2, until it clicks into place. • Close the buckle until the buckle lock returns to the original position. On waterproof performance of - Sony HDR-AS100VR | Operating Instructions - Handbook - Page 48
damage due to water leakage, Sony does not guarantee against damages to the equipment contained in it (camera, battery pack, etc.) and the recorded it in water to make sure no water leaks in. O-ring serviceable life The serviceable life of the O-ring varies with frequency of use of the Waterproof - Sony HDR-AS100VR | Operating Instructions - Handbook - Page 49
Table of contents Operation Search Settings Search Maintenance • After recording in a location with a sea breeze, wash this unit thoroughly in fresh water with the buckle fastened to remove salt and sand, then wipe with a soft dry cloth. It is recommended that you submerge the Waterproof Case in - Sony HDR-AS100VR | Operating Instructions - Handbook - Page 50
Adhesive Mount (VCT-AM1) The Adhesive Mount is used for fixing the Waterproof Case or Tripod Adaptor to an item you intend to use. The Adhesive Mount is a general term for the Attachment Buckle, Flat Adhesive Mount, and Curved Adhesive Mount. Before attaching, insert the camera in the Waterproof - Sony HDR-AS100VR | Operating Instructions - Handbook - Page 51
Table of contents Operation Search Settings Search Notes • The Flat Adhesive Mount and Curved Adhesive Mount cannot be used again once they are detached from the location surface. • When detaching, peel off slowly. If peeled off forcibly, the surface on which the mount is fixed might be damaged. - Sony HDR-AS100VR | Operating Instructions - Handbook - Page 52
Shooting Display About the REC HOLD (lock) switch The REC HOLD (lock) switch can prevent accidental operation. Slide the REC HOLD (lock) switch in the direction of the arrow as illustrated to lock the REC button. To release the lock, slide it in the opposite direction of the arrow. • Before - Sony HDR-AS100VR | Operating Instructions - Handbook - Page 53
Table of contents Operation Search Settings Search zNotes on long-time recording • When you continue to shoot for a long time, the temperature of the camera rises. If the temperature reaches above a certain level, shooting stops automatically. Leave the camera for 10 minutes or longer to allow - Sony HDR-AS100VR | Operating Instructions - Handbook - Page 54
TV which has an HDMI terminal using a micro HDMI cable (sold separately). Refer also to the instruction manuals of the TV. 1 Turn off both the camera and the TV. 2 Open the connector cover you use an authorized cable with HDMI logo or a Sony HDMI cable. Settings Search Index 54GB Continued r - Sony HDR-AS100VR | Operating Instructions - Handbook - Page 55
zTo control a content being played back • Viewing the previous/next image: Press the PREV/NEXT button. • Fast-rewind/fast-forward (movies only): Press and hold the PREV/NEXT button. • Pause (movies only): Press the PREV and NEXT buttons simultaneously. If you press and hold the PREV or NEXT button - Sony HDR-AS100VR | Operating Instructions - Handbook - Page 56
. Update PlayMemories the following website. http://www.sony.net/pmm/ Search for PlayMemories is required. Search for PlayMemories Mobile on App Store, then install it. • When using password • Have ready the sticker attached to the Operating Guide, on which the ID/password is printed. • The ID/password - Sony HDR-AS100VR | Operating Instructions - Handbook - Page 57
of the camera. If there is no (N Mark) on the smartphone, refer to the instruction manual of the smartphone for the touch area. • If the camera and the smartphone cannot be connected by NFC, see "Android/iPhone not supporting NFC" and connect them. Notes • When the airplane mode is set to [ON], the - Sony HDR-AS100VR | Operating Instructions - Handbook - Page 58
Table of contents Operation Search Settings Search Android/iPhone not supporting NFC 1 Select [SETUP] t [CONFG] t [Wi-Fi] t [ON] on the camera (page Select the SSID, as printed on the sticker attached to the Operating Guide. 3 Input the password, as printed on the sticker attached to the Operating - Sony HDR-AS100VR | Operating Instructions - Handbook - Page 59
Search iPhone/iPad 1 Select [Settings] on the smartphone, then select [Wi-Fi] and the SSID of the camera. 2 Input the password, as printed on the sticker attached to the Operating Guide (First time only). 3 Confirm the connection to the SSID, as printed on the sticker attached to the Operating - Sony HDR-AS100VR | Operating Instructions - Handbook - Page 60
]/[INTVL] Notes • You cannot connect a smartphone to two or more cameras at the same time. • Depending on local electrical interference or the smartphone's capabilities, the live view images may not be displayed smoothly. Table of contents Operation Search Settings Search Index 60GB - Sony HDR-AS100VR | Operating Instructions - Handbook - Page 61
Update the Live-View Remote to the latest firmware version before using. For details, visit the website below. www.sony.net/SonyInfo/Support/ Connecting the Live-View Remote to the camera 1 Turn on the power of the Live-View Remote. For details on operation, refer to the operating guide of the Live - Sony HDR-AS100VR | Operating Instructions - Handbook - Page 62
editing, which displays movies recorded in multiple cameras on one screen, by using PlayMemories Home. Notes • The camera should only be connected to a smartphone or a Live-View Remote via Wi-Fi and not other Wi-Fi access points. If you choose to connect the camera to other Wi-Fi access points - Sony HDR-AS100VR | Operating Instructions - Handbook - Page 63
import movies and still images to your computer to use them in a variety of ways. Visit the following URL to install the software. www.sony.net/pm/ Playback Importing images Edit Display movies with tracking information and movement speed. • Use the micro USB cable (supplied) when connecting the - Sony HDR-AS100VR | Operating Instructions - Handbook - Page 64
following URL with the Internet browser of the computer and install PlayMemories Home. www.sony.net/pm/ • For more information about installing, refer to the PlayMemories Home support page. http://www.sony.co.jp/pmh-se/ • When the installation completes, PlayMemories Home starts up. 3 Connect the - Sony HDR-AS100VR | Operating Instructions - Handbook - Page 65
Table of contents To delete the USB connection Windows 7/Windows 8 1 Click on the task tray. 2 Click the disconnect icon in Customize. 3 Click the device to remove. Windows Vista Perform the procedure from step 1 to 3 below before: • Disconnecting the micro USB cable (supplied). • Turning off the - Sony HDR-AS100VR | Operating Instructions - Handbook - Page 66
Operation Search Settings Search Troubleshooting If you experience trouble with the camera, try the following solutions. 1 Check the items on pages 67 to 71. 2 Turn the power off and then on again. 3 Consult your Sony dealer or local authorized Sony service facility. 66GB Continued r Index - Sony HDR-AS100VR | Operating Instructions - Handbook - Page 67
battery life becomes half the usual time, even after charging the battery pack fully, the battery pack may need to be replaced. Consult your nearest Sony operating system that is supported by the camera. The battery pack again. If the problem persists, the battery pack is worn out. Replace the battery - Sony HDR-AS100VR | Operating Instructions - Handbook - Page 68
time correctly. • The term of validity of GPS assist data has expired. Update GPS assist data. • As the positions of GPS satellites vary constantly, it . Index Computers Your computer does not recognize the camera. • When the battery level is low, charge the camera. • Turn on the camera and - Sony HDR-AS100VR | Operating Instructions - Handbook - Page 69
Table of contents Operation Search Cannot import images. • Connect the camera and your computer correctly making a USB connection (page 64). PlayMemories Home cannot be installed. • Check the computer environment or installation procedure required to install PlayMemories Home. PlayMemories Home - Sony HDR-AS100VR | Operating Instructions - Handbook - Page 70
follow the instructions. • The battery level is low. Charge the battery pack immediately. external microphone, etc., is connected). • A different battery pack is detected when the camera is powered on. • Battery memory card does not support XAVC S movie recording (page 17). NoCRD • There - Sony HDR-AS100VR | Operating Instructions - Handbook - Page 71
Table of contents Operation Search NoDSP • The camera is not connected to a TV when playback is started. PLANE • When the airplane mode is set to [ON], GPS and Wi-Fi cannot be used (page 37). 71GB Settings Search Index - Sony HDR-AS100VR | Operating Instructions - Handbook - Page 72
of contents Operation Search Settings Search Estimated duration of recording and playback for each battery pack Recording time Approximate time available when you use a fully charged battery pack. Battery pack Image quality NP-BX1 (supplied) Continuous recording time HQ VGA 120 (130) 140 - Sony HDR-AS100VR | Operating Instructions - Handbook - Page 73
minutes maximum. • The times shown are recordable times using a Sony memory card. Estimated number of recordable photos 2M (Interval photo 64 GB 7700 15500 31000 40000 1450 3000 6000 12000 • When using a Sony memory card. • The number of recordable photos for the memory card shown is - Sony HDR-AS100VR | Operating Instructions - Handbook - Page 74
, etc., be sure to use a plastic bag to keep away from metal materials when carrying or storing. On battery pack life • The battery pack life is limited. Battery capacity decreases over time and through repeated use. If decreased usage time between charges becomes significant, it is probably time - Sony HDR-AS100VR | Operating Instructions - Handbook - Page 75
Table of contents Operation Search Using the camera abroad On TV color systems To view images shot by the camera on a TV, you need a TV (or monitor) with an HDMI jack and a micro HDMI cable (sold separately). Before shooting, be sure to set [V.SYS] to the TV system of the country and region where - Sony HDR-AS100VR | Operating Instructions - Handbook - Page 76
Precautions Table of contents Operation Search Settings Search Do not use/store the camera in the following places • In an extremely hot, cold or humid place In places such as in a car parked in the sun, the camera body may become deformed and this may cause a malfunction. • Under direct - Sony HDR-AS100VR | Operating Instructions - Handbook - Page 77
. Remove the bag when the air temperature inside the plastic bag has reached the ambient temperature (after about 1 hour). Notes on optional accessories • Genuine Sony accessories may not be available in some countries/regions. Note on disposal/transfer of the memory card Even if you delete data in - Sony HDR-AS100VR | Operating Instructions - Handbook - Page 78
(including NP-BX1 (supplied)) Microphone: Stereo Speaker: Monaural Rechargeable battery pack: NP-BX1 (supplied) Supported security protocols: WPA-PSK/WPA2- PSK Configuration method: WPS (Wi-Fi Protected Setup) Access method: Infrastructure Mode NFC: NFC Forum Type 3 Tag compliant [Accessories - Sony HDR-AS100VR | Operating Instructions - Handbook - Page 79
Table of contents Operation Search Waterproof Case (SPK-AS2) Dimensions: Approx. 35.5 mm × 62.0 mm × 96.0 mm (1 7/16 in. × 2 1/2 in. × 3 7/8 in.) (W/ H/D, excluding protrusions) Mass: Approx. 55 g (1.9 oz) Pressure-resistance: Shooting underwater at a depth of 5 m (16 feet) for 30 continuous - Sony HDR-AS100VR | Operating Instructions - Handbook - Page 80
However, the ™ or ® marks may not be described in this manual. On GNU GPL/LGPL applied software The software that is eligible for to download it. When downloading the source code, select HDR-AS100V as the model for your camera. http://www.sony.net/Products/Linux/ We would prefer you do not contact - Sony HDR-AS100VR | Operating Instructions - Handbook - Page 81
Search A A.OFF 39 Airplane mode 37 Auto power off 39 B Battery pack 74 BEEP 40 Beep 40 C Charging 14 COLOR 27 Color Setting 52 IR-RC 31 IR-Remote controller 31 L LANG 41 Language setting 41 LAPSE 26 Live-View Remote 61 M MOVIE 52 Multi/Micro USB Terminal 64 N NEXT button 10 NFC - Sony HDR-AS100VR | Operating Instructions - Handbook - Page 82
Table of contents Operation Search SteadyShot 23 STEDY 23 Switching NTSC/PAL 42 T TC/UB 29 Time code/user bit 29 Troubleshooting 66 U USB 14 USB power supply 38 USBPw 38 V V.SYS 42 Viewing Movies 54 Still image 54 VMODE 21 W Warning messages 70 Wi-Fi 57
-
 1
1 -
 2
2 -
 3
3 -
 4
4 -
 5
5 -
 6
6 -
 7
7 -
8
-
9
-
10
-
11
-
12
-
13
-
14
-
15
-
16
-
17
-
18
-
19
-
20
-
21
-
22
-
23
-
24
-
25
-
26
-
27
-
28
-
29
-
30
-
31
-
32
-
33
-
34
-
35
-
36
-
37
-
38
-
39
-
40
-
41
-
42
-
43
-
44
-
45
-
46
-
47
-
48
-
49
-
50
-
51
-
52
-
53
-
54
-
55
-
56
-
57
-
58
-
59
-
60
-
61
-
62
-
63
-
64
-
65
-
66
-
67
-
68
-
69
-
70
-
71
-
72
-
73
-
74
-
75
-
76
-
77
-
78
-
79
-
80
-
81
-
82
 |
 |

HDR-AS100V
4-532-707-
11
(2)
GB
© 2014 Sony Corporation
Digital HD Video Camera
Recorder
Handbook
Table of
contents
Operation
Search
Settings
Search
Index