Sony HDR-CX760V Operating Guide - Page 15
To fasten the grip belt, To attach the lens hood, HDR-CX760V/PJ760/PJ760V - viewfinder
 |
View all Sony HDR-CX760V manuals
Add to My Manuals
Save this manual to your list of manuals |
Page 15 highlights
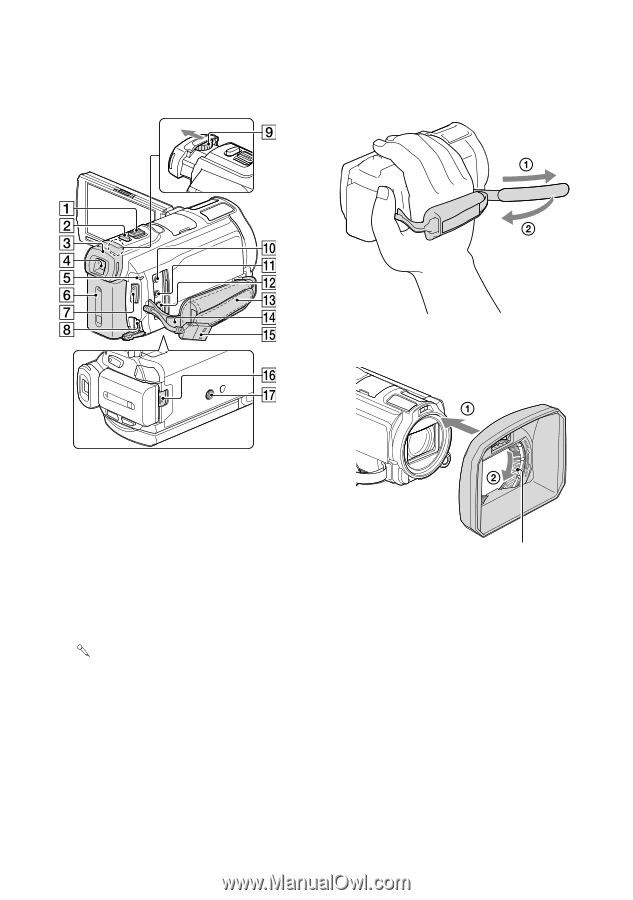
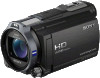
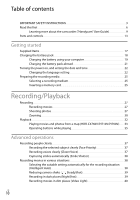
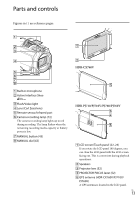
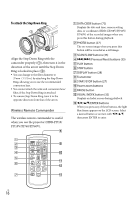
HDR-CX760V/PJ760/PJ760V To fasten the grip belt To attach the lens hood Power zoom lever (30) PHOTO button (27) Eyecup Viewfinder (23) CHG (charge) lamp (18) Battery pack (18) START/STOP button (27) DC IN jack (18) Viewfinder lens adjustment lever (23) (microphone) jack (PLUG IN POWER) (headphones) jack A/V Remote Connector (50) Grip belt Loop for a shoulder belt Built-in USB Cable (19) BATT (battery) release lever (20) Tripod receptacle Attach a tripod (sold separately: the length of the screw must be less than 5.5 mm (7/32 in.)). Securing ring Align the lens hood with the camcorder properly (), then turn the securing ring of the lens hood in the direction of the arrow (). When attaching the lens hood, align the opening section of the lens hood with the flashemitting section of the camcorder properly. To remove the lens hood, turn the securing ring of the lens hood in the opposite direction from that of the arrow. Remove the lens hood when you record movies using the NightShot function. If you do not do so, the shadow of the lens hood will be reflected and recorded in your movies. Remove the lens hood when you operate the camcorder with the supplied remote commander. US 15
-
 1
1 -
2
-
3
-
4
-
5
-
6
-
7
-
8
-
9
-
 10
10 -
 11
11 -
 12
12 -
 13
13 -
 14
14 -
 15
15 -
 16
16 -
 17
17 -
 18
18 -
 19
19 -
 20
20 -
21
-
22
-
23
-
24
-
25
-
26
-
27
-
28
-
29
-
30
-
31
-
32
-
33
-
34
-
35
-
36
-
37
-
38
-
39
-
40
-
41
-
42
-
43
-
44
-
45
-
46
-
47
-
48
-
49
-
50
-
51
-
52
-
53
-
54
-
55
-
56
-
57
-
58
-
59
-
60
-
61
-
62
-
63
-
64
-
65
-
66
-
67
-
68
-
69
-
70
-
71
-
72
-
73
-
74
-
75
-
76
-
77
-
78
-
79
-
80
-
81
-
82
-
83
-
84
-
85
-
86
-
87
-
88
-
89
-
90
-
91
-
92
-
93
-
94
-
95
-
96
-
97
-
98
-
99
-
100
-
101
-
102
-
103
-
104
-
105
-
106
-
107
-
108
-
109
-
110
-
111
-
112
-
113
-
114
-
115
-
116
-
117
-
118
-
119
-
120
-
121
-
122
-
123
-
124
-
125
-
126
-
127
-
128
-
129
-
130
-
131
-
132
-
133
-
134
-
135
-
136
-
137
-
138
-
139
-
140
-
141
-
142
-
143
-
144
-
145
-
146
-
147
-
148
-
149
-
150
-
151
-
152
-
153
-
154
-
155
-
156
-
157
-
158
-
159
-
160
-
161
-
162
-
163
-
164
-
165
-
166
-
167
-
168
-
169
-
170
-
171
-
172
-
173
-
174
-
175
-
176
-
177
-
178
-
179
-
180
-
181
-
182
-
183
-
184
-
185
-
186
-
187
-
188
-
189
-
190
-
191
 |
 |