Sony HDR-CX760V Operating Guide - Page 30
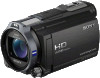
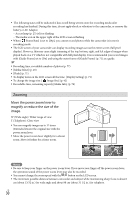
Zooming, Move the power zoom lever to, magnify or reduce the size of the, image.
 |
View all Sony HDR-CX760V manuals
Add to My Manuals
Save this manual to your list of manuals |
Page 30 highlights
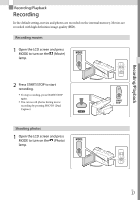
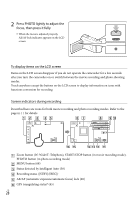
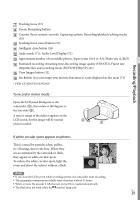
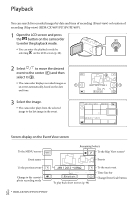
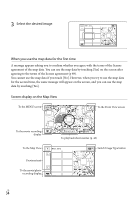
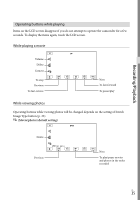
The following states will be indicated if data is still being written onto the recording media after recording has finished. During this time, do not apply shock or vibration to the camcorder, or remove the battery or AC Adaptor. Access lamp (p. 25) is lit or flashing The media icon in the upper right of the LCD screen is flashing When [ Frame Rate] is set to [24p], you cannot record photos while the camcorder is in movie recording mode. The LCD screen of your camcorder can display recording images across the entire screen (full pixel display). However, this may cause slight trimming of the top, bottom, right, and left edges of images when played back on a TV which is not compatible with full pixel display. It is recommended you record images with [Guide Frame] set to [On] and using the outer frame of [Guide Frame] (p. 71) as a guide. Recording time, recordable number of photos (p. 77) [Media Select] (p. 25) [Flash] (p. 71) To display items on the LCD screen all the time: [Display Setting] (p. 71) To change the image size: [ Image Size] (p. 42) Recordable time, remaining capacity [Media Info] (p. 72) Zooming Move the power zoom lever to magnify or reduce the size of the image. W (Wide angle): Wider range of view T (Telephoto): Close view You can magnify images up to 17 times (Extended Zoom) the original size with the power zoom lever. Move the power zoom lever slightly for a slower zoom. Move it further for a faster zoom. Notes Be sure to keep your finger on the power zoom lever. If you move your finger off the power zoom lever, the operation sound of the power zoom lever may also be recorded. You cannot change the zoom speed with the / button on the LCD screen. The minimum possible distance between camcorder and subject while maintaining sharp focus is about 1 cm (about 13/32 in.) for wide angle and about 80 cm (about 31 1/2 in.) for telephoto. US 30
-
 1
1 -
2
-
3
-
4
-
5
-
6
-
7
-
8
-
9
-
10
-
11
-
12
-
13
-
14
-
15
-
16
-
17
-
18
-
19
-
20
-
21
-
22
-
23
-
24
-
 25
25 -
 26
26 -
 27
27 -
 28
28 -
 29
29 -
 30
30 -
 31
31 -
 32
32 -
 33
33 -
 34
34 -
 35
35 -
36
-
37
-
38
-
39
-
40
-
41
-
42
-
43
-
44
-
45
-
46
-
47
-
48
-
49
-
50
-
51
-
52
-
53
-
54
-
55
-
56
-
57
-
58
-
59
-
60
-
61
-
62
-
63
-
64
-
65
-
66
-
67
-
68
-
69
-
70
-
71
-
72
-
73
-
74
-
75
-
76
-
77
-
78
-
79
-
80
-
81
-
82
-
83
-
84
-
85
-
86
-
87
-
88
-
89
-
90
-
91
-
92
-
93
-
94
-
95
-
96
-
97
-
98
-
99
-
100
-
101
-
102
-
103
-
104
-
105
-
106
-
107
-
108
-
109
-
110
-
111
-
112
-
113
-
114
-
115
-
116
-
117
-
118
-
119
-
120
-
121
-
122
-
123
-
124
-
125
-
126
-
127
-
128
-
129
-
130
-
131
-
132
-
133
-
134
-
135
-
136
-
137
-
138
-
139
-
140
-
141
-
142
-
143
-
144
-
145
-
146
-
147
-
148
-
149
-
150
-
151
-
152
-
153
-
154
-
155
-
156
-
157
-
158
-
159
-
160
-
161
-
162
-
163
-
164
-
165
-
166
-
167
-
168
-
169
-
170
-
171
-
172
-
173
-
174
-
175
-
176
-
177
-
178
-
179
-
180
-
181
-
182
-
183
-
184
-
185
-
186
-
187
-
188
-
189
-
190
-
191
 |
 |