Sony HDR-PJ200 Operating Guide - Page 48
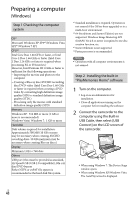
Preparing a computer (Windows), Step 1 Checking the computer system
 |
View all Sony HDR-PJ200 manuals
Add to My Manuals
Save this manual to your list of manuals |
Page 48 highlights
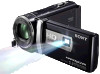
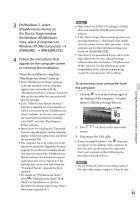
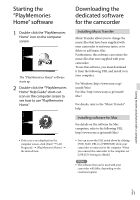
Preparing a computer (Windows) Step 1 Checking the computer system OS*1 Microsoft Windows XP SP3*2/Windows Vista SP2*3/Windows 7 SP1 CPU*4 Intel Core Duo 1.66 GHz or faster, or Intel Core 2 Duo 1.66 GHz or faster (Intel Core 2 Duo 2.26 GHz or faster is required when processing FX or FH movies.) However, Intel Pentium III 1 GHz or faster is sufficient for the following operations: Importing the movies and photos to the computer Creating a Blu-ray disc/AVCHD recording disc/DVD-video (Intel Core Duo 1.66 GHz or faster is required when creating a DVD video by converting high definition image quality (HD) to standard definition image quality (STD).) Processing only the movies with standard definition image quality (STD) Memory Windows XP: 512 MB or more (1 GB or more is recommended) Windows Vista/ Windows 7: 1 GB or more Hard disk Disk volume required for installation: Approximately 500 MB (10 GB or more may be necessary when creating AVCHD recording discs. 50 GB maximum may be necessary when creating Blu-ray discs.) Display Minimum 1,024 × 768 dots Others USB port (this must be provided as standard, Hi-Speed USB (USB 2.0 compatible)), Blu-ray disc/DVD burner Either NTFS or exFAT file system is recommended as the hard disk file system. *1 Standard installation is required. Operation is not assured if the OS has been upgraded or in a multi-boot environment. *2 64-bit editions and Starter (Edition) are not supported. Windows Image Mastering API (IMAPI) Ver.2.0 or newer is required to use disc creation function, etc. *3 Starter (Edition) is not supported. *4 Faster processor is recommended. Notes Operation with all computer environments is not assured. Step 2 Installing the built-in "PlayMemories Home" software 1 Turn on the computer. Log on as an Administrator for installation. Close all applications running on the computer before installing the software. 2 Connect the camcorder to the computer using the Built-in USB Cable, then select [USB Connect] on the LCD screen of the camcorder. When using Windows 7: The Device Stage window opens. When using Windows XP/Windows Vista: The AutoPlay wizard is displayed. US 48
-
 1
1 -
2
-
3
-
4
-
5
-
6
-
7
-
8
-
9
-
10
-
11
-
12
-
13
-
14
-
15
-
16
-
17
-
18
-
19
-
20
-
21
-
22
-
23
-
24
-
25
-
26
-
27
-
28
-
29
-
30
-
31
-
32
-
33
-
34
-
35
-
36
-
37
-
38
-
39
-
40
-
41
-
42
-
 43
43 -
 44
44 -
 45
45 -
 46
46 -
 47
47 -
 48
48 -
 49
49 -
 50
50 -
 51
51 -
 52
52 -
 53
53 -
54
-
55
-
56
-
57
-
58
-
59
-
60
-
61
-
62
-
63
-
64
-
65
-
66
-
67
-
68
-
69
-
70
-
71
-
72
-
73
-
74
-
75
-
76
-
77
-
78
-
79
-
80
-
81
-
82
-
83
-
84
-
85
-
86
-
87
-
88
-
89
-
90
-
91
-
92
-
93
-
94
-
95
-
96
-
97
-
98
-
99
-
100
-
101
-
102
-
103
-
104
-
105
-
106
-
107
-
108
-
109
-
110
-
111
-
112
-
113
-
114
-
115
-
116
-
117
-
118
-
119
-
120
-
121
-
122
-
123
-
124
-
125
-
126
-
127
-
128
-
129
-
130
-
131
-
132
-
133
-
134
-
135
-
136
-
137
-
138
-
139
-
140
-
141
-
142
-
143
-
144
-
145
-
146
-
147
-
148
-
149
-
150
-
151
-
152
-
153
-
154
-
155
 |
 |