Sony HDR-PJ200 Operating Guide - Page 63
Date & Time Setting, Customizing your camcorder
 |
View all Sony HDR-PJ200 manuals
Add to My Manuals
Save this manual to your list of manuals |
Page 63 highlights
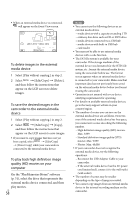
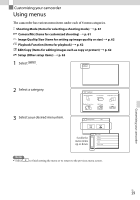
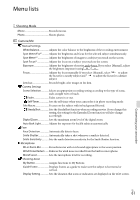
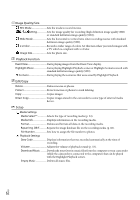
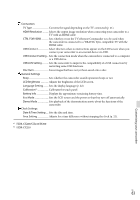
Customizing your camcorder Connection TV Type Converts the signal depending on the TV connected (p. 41). HDMI Resolution Selects the output image resolution when connecting your camcorder to a TV with an HDMI cable. CTRL FOR HDMI Sets whether or not the TV's Remote Commander is to be used when the camcorder is connected to a "BRAVIA" Sync compatible TV with the HDMI cable. USB Connect Select this item when no instructions appear on the LCD screen when you connect your camcorder to an external device via USB. USB Connect Setting.... Sets the connection mode when the camcorder is connected to a computer or a USB device. USB LUN Setting Sets the camcorder to improve the compatibility of a USB connection by restricting some USB functions. Disc Burn Saves images that have not yet been saved onto a disc. General Settings Beep Sets whether the camcorder sounds operation beeps or not. LCD Brightness Adjusts the brightness of the LCD screen. Language Setting.......... Sets the display language (p. 22). Calibration*1 Calibrates the touch panel. Battery Info Displays the approximate remaining battery time. Eco Mode Sets the LCD screen and the power so that they turn off automatically. Demo Mode Sets playback of the demonstration movie about the functions of the camcorder. Clock Settings Date & Time Setting...... Sets the date and time. Area Setting Adjusts for a time difference without stopping the clock (p. 22). *1 HDR-CX200/CX210/PJ200 *2 HDR-CX210 US 63
-
 1
1 -
2
-
3
-
4
-
5
-
6
-
7
-
8
-
9
-
10
-
11
-
12
-
13
-
14
-
15
-
16
-
17
-
18
-
19
-
20
-
21
-
22
-
23
-
24
-
25
-
26
-
27
-
28
-
29
-
30
-
31
-
32
-
33
-
34
-
35
-
36
-
37
-
38
-
39
-
40
-
41
-
42
-
43
-
44
-
45
-
46
-
47
-
48
-
49
-
50
-
51
-
52
-
53
-
54
-
55
-
56
-
57
-
 58
58 -
 59
59 -
 60
60 -
 61
61 -
 62
62 -
 63
63 -
 64
64 -
 65
65 -
 66
66 -
 67
67 -
 68
68 -
69
-
70
-
71
-
72
-
73
-
74
-
75
-
76
-
77
-
78
-
79
-
80
-
81
-
82
-
83
-
84
-
85
-
86
-
87
-
88
-
89
-
90
-
91
-
92
-
93
-
94
-
95
-
96
-
97
-
98
-
99
-
100
-
101
-
102
-
103
-
104
-
105
-
106
-
107
-
108
-
109
-
110
-
111
-
112
-
113
-
114
-
115
-
116
-
117
-
118
-
119
-
120
-
121
-
122
-
123
-
124
-
125
-
126
-
127
-
128
-
129
-
130
-
131
-
132
-
133
-
134
-
135
-
136
-
137
-
138
-
139
-
140
-
141
-
142
-
143
-
144
-
145
-
146
-
147
-
148
-
149
-
150
-
151
-
152
-
153
-
154
-
155
 |
 |