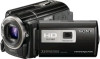
Sony HDR-PJ50V Operating Guide - Page 26
Shooting photos, Data code during recording
 |
UPC - 027242820104
View all Sony HDR-PJ50V manuals
Add to My Manuals
Save this manual to your list of manuals |
Page 26 highlights
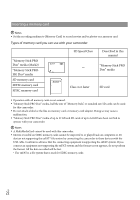
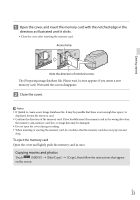
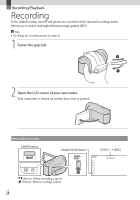
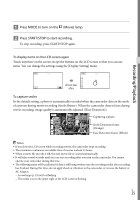
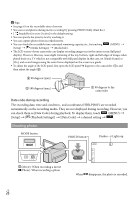
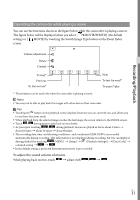
Tips See page 63 on the recordable time of movies. You can record photos during movie recording by pressing PHOTO fully (Dual Rec). [ SteadyShot] is set to [Active] in the default setting. You can specify the priority face by touching it. You can capture photos from recorded movies. You can check the recordable time, estimated remaining capacity, etc., by touching (MENU) [Setup] [ (Media Settings)] [Media Info]. The LCD screen of your camcorder can display recording images across the entire screen (full pixel display). However, this may cause slight trimming of the top, bottom, right and left edges of images when played back on a TV which is not compatible with full pixel display. In this case, set [Guide Frame] to [On], and record images using the outer frame displayed on the screen as a guide. To adjust the angle of the LCD panel, first open the LCD panel 90 degrees to the camcorder (), and then adjust the angle (). 90 degrees (max.) 180 degrees (max.) 90 degrees to the camcorder Data code during recording The recording date, time and condition , and coordinates (HDR-PJ50V) are recorded automatically on the recording media. They are not displayed during recording. However, you can check them as [Data Code] during playback. To display them, touch (MENU) [Setup] [ (Playback Settings)] [Data Code] a desired setting . Shooting photos MODE button PHOTO button Flashes Lights up (Movie): When recording a movie (Photo): When recording a photo US 26 When disappears, the photo is recorded.
-
 1
1 -
2
-
3
-
4
-
5
-
6
-
7
-
8
-
9
-
10
-
11
-
12
-
13
-
14
-
15
-
16
-
17
-
18
-
19
-
20
-
 21
21 -
 22
22 -
 23
23 -
 24
24 -
 25
25 -
 26
26 -
 27
27 -
 28
28 -
 29
29 -
 30
30 -
 31
31 -
32
-
33
-
34
-
35
-
36
-
37
-
38
-
39
-
40
-
41
-
42
-
43
-
44
-
45
-
46
-
47
-
48
-
49
-
50
-
51
-
52
-
53
-
54
-
55
-
56
-
57
-
58
-
59
-
60
-
61
-
62
-
63
-
64
-
65
-
66
-
67
-
68
-
69
-
70
-
71
-
72
-
73
-
74
-
75
-
76
-
77
-
78
-
79
-
80
-
81
-
82
-
83
-
84
-
85
-
86
-
87
-
88
-
89
-
90
-
91
-
92
-
93
-
94
-
95
-
96
-
97
-
98
-
99
-
100
-
101
-
102
-
103
-
104
-
105
-
106
-
107
-
108
-
109
-
110
-
111
-
112
-
113
-
114
-
115
-
116
-
117
-
118
-
119
-
120
-
121
-
122
-
123
-
124
-
125
-
126
-
127
-
128
-
129
-
130
-
131
-
132
-
133
-
134
-
135
-
136
-
137
-
138
-
139
-
140
-
141
-
142
-
143
-
144
-
145
-
146
-
147
-
148
-
149
-
150
-
151
 |
 |
