Sony HDR SR8 Operating Guide - Page 28
Installing software, Read [License Agreement], select - hd camcorder
 |
UPC - 027242719705
View all Sony HDR SR8 manuals
Add to My Manuals
Save this manual to your list of manuals |
Page 28 highlights
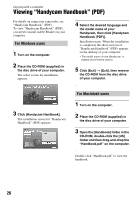
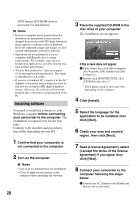
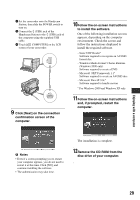
DVD burner (CD-ROM drive is necessary for installation) b Notes • Even in a computer environment where the operations are guaranteed, frames may be dropped from movies with HD (high definition) image quality, resulting in uneven playback. However, imported images and images on discs created subsequently will not be affected. • Operations are not guaranteed, even on computers fulfilling the above system requirements. For example, other open or background applications currently running may limit product performance. • "Picture Motion Browser" does not support 5.1ch surround sound reproduction. The sound is reproduced in 2ch sound. • If you use a Notebook PC, connect it to the AC Adaptor as the power source when you view or edit movies recorded in HD (high definition) format. Otherwise, the software will not work properly due to the power saving function of the PC. Installing software You need to install the software to your Windows computer before connecting your camcorder to the computer. The installation is required only for the first time. Contents to be installed and procedures may differ depending on your OS. 1 Confirm that your camcorder is not connected to the computer. 2 Turn on the computer. b Notes • Log on as an Administrator for installation. • Close all applications running on the computer before installing the software. 28 3 Place the supplied CD-ROM in the disc drive of your computer. The installation screen appears. If the screen does not appear 1 Click [Start], then click [My Computer]. (For Windows 2000, double-click [My Computer].) 2 Double-click [SONYPICTUTIL (E:)] (CD-ROM) (disc drive).* * Drive names (such as (E:)) may vary depending on the computer. 4 Click [Install]. 5 Select the language for the application to be installed, then click [Next]. 6 Check your area and country/ region, then click [Next]. 7 Read [License Agreement], select [I accept the terms of the license agreement] if you agree, then click [Next]. 8 Connect your camcorder to the computer following the steps below. 1 Connect the AC Adaptor to the Handycam Station and a wall outlet.
-
 1
1 -
2
-
3
-
4
-
5
-
6
-
7
-
8
-
9
-
10
-
11
-
12
-
13
-
14
-
15
-
16
-
17
-
18
-
19
-
20
-
21
-
22
-
 23
23 -
 24
24 -
 25
25 -
 26
26 -
 27
27 -
 28
28 -
 29
29 -
 30
30 -
 31
31 -
 32
32 -
 33
33 -
34
-
35
-
36
-
37
-
38
-
39
-
40
 |
 |
