Sony HDR UX7 Instruction Manual - Page 62
Deleting all scenes on the disc (Formatting), Formatting the disc - screen replacement and camcorder
 |
UPC - 027242701410
View all Sony HDR UX7 manuals
Add to My Manuals
Save this manual to your list of manuals |
Page 62 highlights
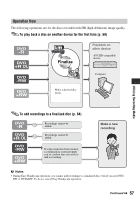
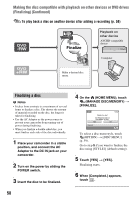
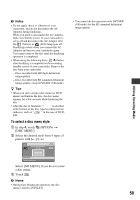
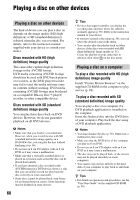
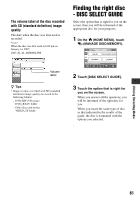
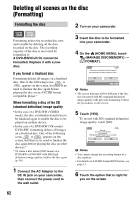
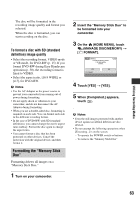
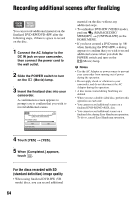
Deleting all scenes on the disc (Formatting) Formatting the disc 2 Turn on your camcorder. Formatting makes the recorded disc new and reusable by deleting all the data recorded on the disc. The recording capacity of the disc is recovered by formatting it. A DVD-R/DVD+R DL cannot be formatted. Replace it with a new disc. If you format a finalized disc Formatting deletes all images on a finalized disc. One of the following icons, or , appears on the screen, but there is no need to finalize the disc again before playing the disc on an AVCHD format compatible player.* When formatting a disc of the SD (standard definition) image quality • In the case of a DVD-RW (VIDEO mode), the disc is unfinalized and it has to be finalized again to enable the disc to be played on another device. • In the case of a DVD-RW (VR mode)/ DVD+RW, formatting deletes all images on a finalized disc. One of the following icons, or , appears on the screen, but there is no need to finalize the disc again before playing the disc on other devices.* * To create a disc menu (DVD menu) on a DVD+RW or DVD-RW with HD (high definition) image quality, finalize the disc again (p. 56). 1 Connect the AC Adaptor to the DC IN jack on your camcorder, then connect the power cord to the wall outlet. 3 Insert the disc to be formatted into your camcorder. 4 On the (HOME MENU), touch (MANAGE DISC/MEMORY) t [ FORMAT]. b Notes • The screen message will be different if the disc was formatted with SD (standard definition) image quality at the previous formatting. Follow the procedures on the screen. 5 Touch [YES]. To record with SD (standard definition) image quality, touch [SD]. b Notes • You cannot change the recording format of a disc midway. • For details on AVCHD format/DVD format, see page 13. 6 Touch the option that is right for you on the screen. 62
-
 1
1 -
2
-
3
-
4
-
5
-
6
-
7
-
8
-
9
-
10
-
11
-
12
-
13
-
14
-
15
-
16
-
17
-
18
-
19
-
20
-
21
-
22
-
23
-
24
-
25
-
26
-
27
-
28
-
29
-
30
-
31
-
32
-
33
-
34
-
35
-
36
-
37
-
38
-
39
-
40
-
41
-
42
-
43
-
44
-
45
-
46
-
47
-
48
-
49
-
50
-
51
-
52
-
53
-
54
-
55
-
56
-
 57
57 -
 58
58 -
 59
59 -
 60
60 -
 61
61 -
 62
62 -
 63
63 -
 64
64 -
 65
65 -
 66
66 -
 67
67 -
68
-
69
-
70
-
71
-
72
-
73
-
74
-
75
-
76
-
77
-
78
-
79
-
80
-
81
-
82
-
83
-
84
-
85
-
86
-
87
-
88
-
89
-
90
-
91
-
92
-
93
-
94
-
95
-
96
-
97
-
98
-
99
-
100
-
101
-
102
-
103
-
104
-
105
-
106
-
107
-
108
-
109
-
110
-
111
-
112
-
113
-
114
-
115
-
116
-
117
-
118
-
119
-
120
-
121
-
122
-
123
-
124
-
125
-
126
-
127
-
128
-
129
-
130
-
131
-
132
-
133
-
134
-
135
-
136
-
137
-
138
-
139
-
140
-
141
-
142
-
143
 |
 |