Sony HDR UX7 Instruction Manual - Page 68
Wb Shift White, Balance Shift Hdr, Nightshot Light, Wide Select, Digital Zoom, Steadyshot - hdr ux5 manual
 |
UPC - 027242701410
View all Sony HDR UX7 manuals
Add to My Manuals
Save this manual to your list of manuals |
Page 68 highlights
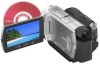
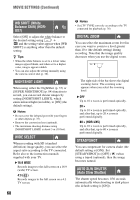
MOVIE SETTINGS (Continued) WB SHIFT (White Balance Shift) (HDRUX7) Select [ON] to adjust the white balance to the desired setting using / . and the setting value appear when [WB SHIFT] is anything other than the default setting. z Tips • When the white balance is set to a lower value, images appear bluish, and when set to a higher value, images appear reddish. • You can also adjust the setting manually using the camera control dial (p. 38). NIGHTSHOT LIGHT When using either the NightShot (p. 37) or [SUPER NIGHTSHOT] (p. 84) function to record, you can record clearer images by setting [NIGHTSHOT LIGHT], which emits infrared light (invisible), to [ON] (the default setting). b Notes • Do not cover the infrared port with your fingers or other objects (p. 37). • Remove the conversion lens (optional). • The maximum shooting distance using [NIGHTSHOT LIGHT] is about 3 m (10 feet). WIDE SELECT When recording with SD (standard definition) image quality, you can select the aspect ratio according to the TV connected. Refer also to the instruction manuals supplied with your TV. B 16:9 WIDE Records images to the full screen on a 16:9 (wide) TV screen. 4:3 ( ) Records images to the full screen on a 4:3 TV screen. 68 b Notes • Set [TV TYPE] correctly according to the TV connected for playback (p. 76). DIGITAL ZOOM You can select the maximum zoom level in case you want to zoom to a level greater than 10 × (the default setting) during recording. Note that the image quality decreases when you use the digital zoom. The right side of the bar shows the digital zooming factor. The zooming zone appears when you select the zooming level. B OFF Up to 10 × zoom is performed optically. 20 × Up to 10 × zoom is performed optically, and after that, up to 20 × zoom is performed digitally. 80 × (HDR-UX5) Up to 10 × zoom is performed optically, and after that, up to 80 × zoom is performed digitally. STEADYSHOT You can compensate for camera shake (the default setting is [ON]). Set [STEADYSHOT] to [OFF] ( ) when using a tripod (optional), then the image becomes natural. AUTO SLW SHUTTR (Auto Slow Shutter) The shutter speed becomes 1/30 seconds automatically when shooting in dark places (the default setting is [ON]).
-
 1
1 -
2
-
3
-
4
-
5
-
6
-
7
-
8
-
9
-
10
-
11
-
12
-
13
-
14
-
15
-
16
-
17
-
18
-
19
-
20
-
21
-
22
-
23
-
24
-
25
-
26
-
27
-
28
-
29
-
30
-
31
-
32
-
33
-
34
-
35
-
36
-
37
-
38
-
39
-
40
-
41
-
42
-
43
-
44
-
45
-
46
-
47
-
48
-
49
-
50
-
51
-
52
-
53
-
54
-
55
-
56
-
57
-
58
-
59
-
60
-
61
-
62
-
 63
63 -
 64
64 -
 65
65 -
 66
66 -
 67
67 -
 68
68 -
 69
69 -
 70
70 -
 71
71 -
 72
72 -
 73
73 -
74
-
75
-
76
-
77
-
78
-
79
-
80
-
81
-
82
-
83
-
84
-
85
-
86
-
87
-
88
-
89
-
90
-
91
-
92
-
93
-
94
-
95
-
96
-
97
-
98
-
99
-
100
-
101
-
102
-
103
-
104
-
105
-
106
-
107
-
108
-
109
-
110
-
111
-
112
-
113
-
114
-
115
-
116
-
117
-
118
-
119
-
120
-
121
-
122
-
123
-
124
-
125
-
126
-
127
-
128
-
129
-
130
-
131
-
132
-
133
-
134
-
135
-
136
-
137
-
138
-
139
-
140
-
141
-
142
-
143
 |
 |