Sony HT-CT60BT Operating Instructions - Page 15
Removing the stands, Installing the Sound Bar on, a wall
 |
View all Sony HT-CT60BT manuals
Add to My Manuals
Save this manual to your list of manuals |
Page 15 highlights
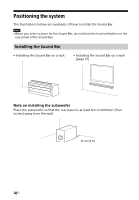
Removing the stands When the Sound Bar is to be placed facing upward slightly or on a wall, remove the two stands at the bottom of the Sound Bar, as shown below. improper screw installation or natural calamity, etc. 1 Prepare screws (not supplied) that are suitable for the holes on the back of the Sound Bar. Getting Started Stand 4 mm (3/16 inches) more than 25 mm (1 inch) 5 mm (7/32 inches) 10 mm (13/32 inches) Note When the Sound Bar is placed facing upward slightly with the stands removed, take care not to block the ventilation holes with carpet, etc. Installing the Sound Bar on a wall You can install the Sound Bar on the wall. Notes Use screws that are suitable for the wall material and strength. As a plaster board wall is especially fragile, attach the screws securely to a wall beam. Install the Sound Bar on a vertical and flat reinforced area of the wall. Be sure to subcontract the installation to Sony dealers or licensed contractors and pay special attention to safety during the installation. Sony is not responsible for accidents or damage caused by improper installation, insufficient wall strength, Hole on the back of the Sound Bar 2 Fasten the screws to the wall. The screws should protrude 7 to 8 mm (approx. 5/16 inches). 380 mm (15 inches) 7 to 8 mm (approx. 5/16 inches) 3 Hang the Sound Bar onto the screws. Align the holes on the back of the Sound Bar to the screws, then continued 15US
-
 1
1 -
2
-
3
-
4
-
5
-
6
-
7
-
8
-
9
-
 10
10 -
 11
11 -
 12
12 -
 13
13 -
 14
14 -
 15
15 -
 16
16 -
 17
17 -
 18
18 -
 19
19 -
 20
20 -
21
-
22
-
23
-
24
-
25
-
26
-
27
-
28
-
29
-
30
-
31
-
32
-
33
-
34
-
35
-
36
-
37
-
38
-
39
-
40
-
41
-
42
-
43
-
44
-
45
-
46
-
47
-
48
-
49
-
50
-
51
-
52
-
53
-
54
-
55
-
56
-
57
-
58
-
59
-
60
-
61
-
62
-
63
-
64
-
65
-
66
-
67
-
68
-
69
-
70
-
71
-
72
-
73
-
74
-
75
-
76
-
77
-
78
-
79
-
80
-
81
-
82
-
83
-
84
-
85
-
86
-
87
-
88
 |
 |
