Sony HTSS360 Operating Instructions - Page 16
: Connecting the TV - speaker cables
 |
UPC - 027242753938
View all Sony HTSS360 manuals
Add to My Manuals
Save this manual to your list of manuals |
Page 16 highlights
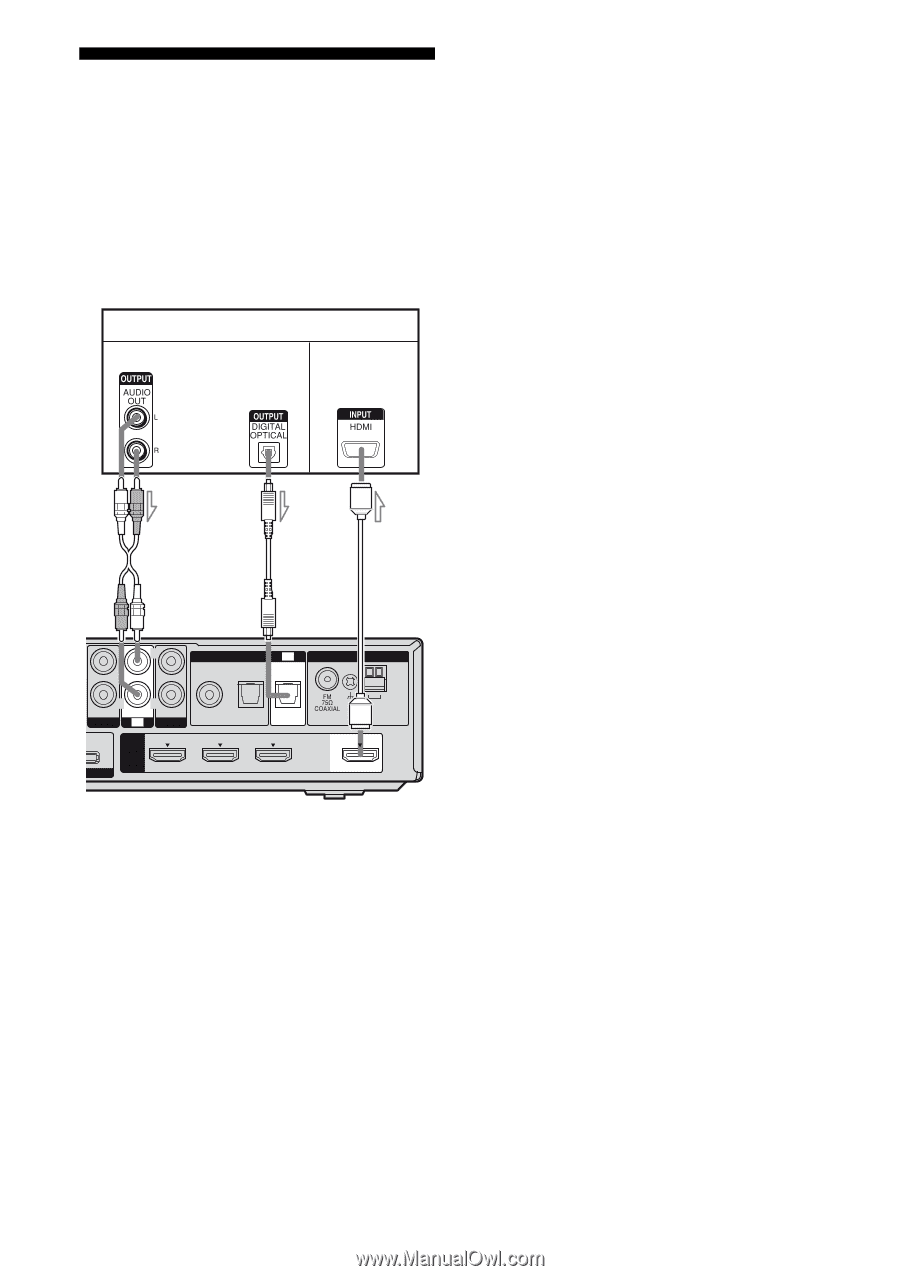
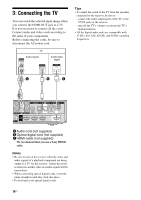
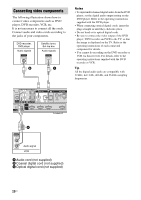
3: Connecting the TV You can watch the selected input image when you connect the HDMI OUT jack to a TV. It is not necessary to connect all the cords. Connect audio and video cords according to the jacks of your components. Before connecting the cords, be sure to disconnect the AC power cord. TV Audio signal Audio/video signal Tips • To output the sound of the TV from the speakers connected to the receiver, be sure to - connect the audio output jacks of the TV to the TV IN jacks of the receiver. - turn off the TV's volume or activate the TV's muting function. • All the digital audio jacks are compatible with 32 kHz, 44.1 kHz, 48 kHz, and 96 kHz sampling frequencies. A B C L L DIGITAL TV ANTENNA R R AUDIO IN AUDIO IN AUDIO IN COAX IN VIDEO 1 TV SA-CD/CD VIDEO 2 mA MAX HDMI BD IN RT DVD IN OPT IN SAT OPT IN SAT IN AM OUT A Audio cord (not supplied) B Optical digital cord (not supplied) C HDMI cable (not supplied) We recommend that you use a Sony HDMI cable. Notes • Be sure to turn on the receiver when the video and audio signals of a playback component are being output to a TV via the receiver. Unless the power is turned on, neither video nor audio signals will be transmitted. • When connecting optical digital cords, insert the plugs straight in until they click into place. • Do not bend or tie optical digital cords. 16US
-
 1
1 -
2
-
3
-
4
-
5
-
6
-
7
-
8
-
9
-
10
-
 11
11 -
 12
12 -
 13
13 -
 14
14 -
 15
15 -
 16
16 -
 17
17 -
 18
18 -
 19
19 -
 20
20 -
 21
21 -
22
-
23
-
24
-
25
-
26
-
27
-
28
-
29
-
30
-
31
-
32
-
33
-
34
-
35
-
36
-
37
-
38
-
39
-
40
-
41
-
42
-
43
-
44
-
45
-
46
-
47
-
48
-
49
-
50
-
51
-
52
-
53
-
54
-
55
-
56
-
57
-
58
-
59
-
60
 |
 |