Sony HVRM25AU Operating Instructions - Page 11
Tape transport control AUDIO DUB audio dubbing A2 button, indicator
 |
UPC - 027242746763
View all Sony HVRM25AU manuals
Add to My Manuals
Save this manual to your list of manuals |
Page 11 highlights
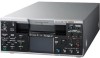
Chapter 1 Overview 2 Tape transport control section 1 AUDIO DUB (audio dubbing) (A2) button / indicator 2 DUPLICATE button / indicator 3 REC (record) button / indicator 4 FF (fast forward) button / indicator 5 PLAY button / indicator 6 REW (rewind) button / indicator 7 STOP button 8 PAUSE button / indicator a AUDIO DUB (audio dubbing) (A2) button / indicator Use this button to dub sounds. The indicator lights while sounds are being dubbed. Also, this button can be used as the ASSIGN (A2) button. For details on audio dubbing, see "Audio Dubbing" on page 63. When the unit is in the stop mode, and the INPUT SELECT switch is set to other than HDV/DV and color bars are not displayed, you can check the EE signals of the sound (channels 3 and 4) to be dubbed by pressing this button. While the operation is in progress, the indicator lights. To stop the operation, press the STOP button. For details, see "EE/PB SEL" in the "IN/OUT REC" menu on page 74. When you change ASSIGN buttons setting with [ASSIGN [A2]] of [ASSIGN BTN] in the [OTHERS] menu, this button executes the function you have set. For details on ASSIGN buttons, see "ASSIGN BTN" on page 80. b DUPLICATE button / indicator Use this button to duplicate a tape, including the time code. While duplication is in progress, the indicator lights. For details on the duplicate function, see "Duplication (Generating a work tape with the same time code)" on page 59. When the unit is in the stop mode and HDV/DV signals are selected and input, you can check the EE signals for an image, sound and time code by pressing this button. While you are checking EE signals, the indicator lights. To stop this operation, press the STOP button. For details, see "EE/PB SEL" in the "IN/OUT REC" menu on page 74. For details on time codes, see "HVR-M25AU/M25AN/ M25AE/M25AP time codes" on page 56. (Continued) 11 Chapter 1 Overview
-
 1
1 -
2
-
3
-
4
-
5
-
 6
6 -
 7
7 -
 8
8 -
 9
9 -
 10
10 -
 11
11 -
 12
12 -
 13
13 -
 14
14 -
 15
15 -
 16
16 -
17
-
18
-
19
-
20
-
21
-
22
-
23
-
24
-
25
-
26
-
27
-
28
-
29
-
30
-
31
-
32
-
33
-
34
-
35
-
36
-
37
-
38
-
39
-
40
-
41
-
42
-
43
-
44
-
45
-
46
-
47
-
48
-
49
-
50
-
51
-
52
-
53
-
54
-
55
-
56
-
57
-
58
-
59
-
60
-
61
-
62
-
63
-
64
-
65
-
66
-
67
-
68
-
69
-
70
-
71
-
72
-
73
-
74
-
75
-
76
-
77
-
78
-
79
-
80
-
81
-
82
-
83
-
84
-
85
-
86
-
87
-
88
-
89
-
90
-
91
-
92
-
93
-
94
-
95
-
96
-
97
-
98
-
99
-
100
-
101
-
102
-
103
-
104
-
105
-
106
-
107
-
108
 |
 |
