Sony ICD-BM1B Operating Instructions - Page 8
Step 2: Setting the Clock, Slide POWER to ON., Press MENU., Press the jog lever up or down, to select
 |
UPC - 027242626423
View all Sony ICD-BM1B manuals
Add to My Manuals
Save this manual to your list of manuals |
Page 8 highlights
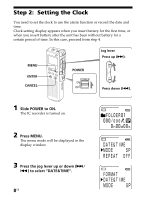
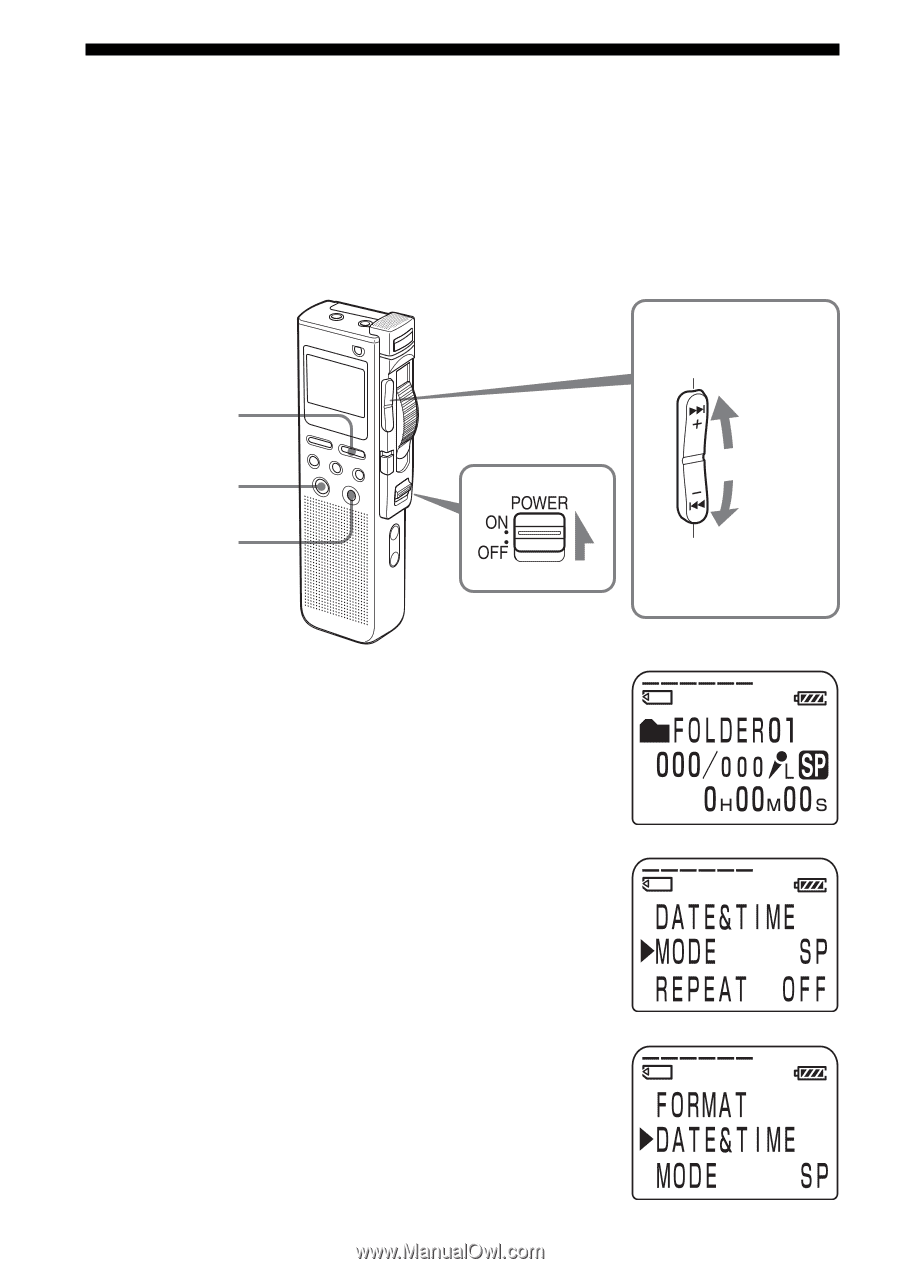
Step 2: Setting the Clock You need to set the clock to use the alarm function or record the date and time. Clock setting display appears when you insert battery for the first time, or when you insert battery after the unit has been without battery for a certain period of time. In this case, proceed from step 4. MENU ENTER CANCEL POWER Jog lever Press up (>). Press down (.). 1 Slide POWER to ON. The IC recorder is turned on. 2 Press MENU. The menu mode will be displayed in the display window. 3 Press the jog lever up or down (>/ .) to select "DATE&TIME". 8GB
-
 1
1 -
2
-
 3
3 -
 4
4 -
 5
5 -
 6
6 -
 7
7 -
 8
8 -
 9
9 -
 10
10 -
 11
11 -
 12
12 -
 13
13 -
14
-
15
-
16
-
17
-
18
-
19
-
20
-
21
-
22
-
23
-
24
-
25
-
26
-
27
-
28
-
29
-
30
-
31
-
32
-
33
-
34
-
35
-
36
-
37
-
38
-
39
-
40
-
41
-
42
-
43
-
44
-
45
-
46
-
47
-
48
-
49
-
50
-
51
-
52
-
53
-
54
-
55
-
56
-
57
-
58
-
59
-
60
-
61
-
62
-
63
-
64
-
65
-
66
-
67
-
68
 |
 |
8
GB
Jog lever
Step 2:
Setting the Clock
You need to set the clock to use the alarm function or record the date and
time.
Clock setting display appears when you insert battery for the first time, or
when you insert battery after the unit has been without battery for a
certain period of time. In this case, proceed from step 4.
1
Slide POWER to ON.
The IC recorder is turned on.
2
Press MENU.
The menu mode will be displayed in the
display window.
3
Press the jog lever up or down (
>/
.
) to select
“DATE&TIME”.
MENU
Press up (
>
).
Press down (
.
).
ENTER
CANCEL
POWER