Sony KDL-32LL150 Operating Instructions - Page 21
Using Features, Using BRAVIA Sync with Control for HDMI, Inputs, Using BRAVIA Sync - remote control
 |
UPC - 027242753273
View all Sony KDL-32LL150 manuals
Add to My Manuals
Save this manual to your list of manuals |
Page 21 highlights
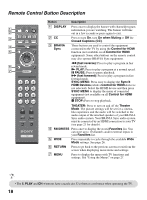
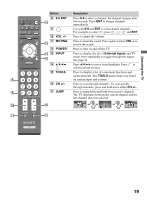
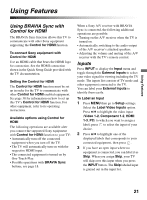
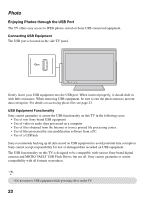
Using Features Using Features Using BRAVIA Sync with Control for HDMI The BRAVIA Sync function allows this TV to communicate with other Sony equipment supporting the Control for HDMI function. To connect Sony equipment with Control for HDMI Use an HDMI cable that bears the HDMI logo for connection. See the HDMI connection shown in the Quick Setup Guide provided with the TV documentation. Setting the Control for HDMI The Control for HDMI function must be set up in order for the TV to communicate with other Control for HDMI enabled equipment. See page 38 for information on how to set up this TV's Control for HDMI function. For other equipment, refer to its operating instructions. Available options using Control for HDMI The following operations are available after you connect the supported Sony equipment with Control for HDMI function to your TV: • Automatically turn off the connected equipment when you turn off the TV. • The TV will automatically turn on with the respective HDMI input. • The connected equipment is turned on by One-Touch-Play. • Possible operations with BRAVIA Sync buttons, see page 18. When a Sony A/V receiver with BRAVIA Sync is connected, the following additional operations are possible: • Turning on the A/V receiver when the TV is turned on. • Automatically switching to the audio output of the A/V receiver's attached speakers. • Adjusting the volume and muting of the A/V receiver with the TV's remote control. Inputs Press INPUT to display the Input menu and toggle through the External Inputs to select your video signal for viewing including the TV mode. The inputs list consists of TV mode and other equipment connected to the TV. You can label your External Inputs to identify them easily. To Label an Input 1 Press MENU then go to Setup settings. Select the Label Video Inputs option. Press V/v to highlight the video input (Video 1-2, Component 1-2, HDMI 1-3, PC) to which you want to assign a label; press to select the input of your choice. 2 Press V/v to highlight one of the displayed labels that corresponds to your connected equipment, then press . 3 If you have an open input where no equipment is connected, you can label it as Skip. When you assign Skip, your TV will skip over this input when you press the INPUT button. The Skip labeled input is grayed out in the input list. 21
-
 1
1 -
2
-
3
-
4
-
5
-
6
-
7
-
8
-
9
-
10
-
11
-
12
-
13
-
14
-
15
-
 16
16 -
 17
17 -
 18
18 -
 19
19 -
 20
20 -
 21
21 -
 22
22 -
 23
23 -
 24
24 -
 25
25 -
 26
26 -
27
-
28
-
29
-
30
-
31
-
32
-
33
-
34
-
35
-
36
-
37
-
38
-
39
-
40
-
41
-
42
-
43
-
44
-
45
-
46
-
47
-
48
 |
 |