Sony KDL-40W580B Operating Instructions (Setup Guide) (Large File - 13.87 MB) - Page 11
: Connecting the TV, Detaching the Table-Top, Stand from the TV, Bundling the AC adapter
 |
View all Sony KDL-40W580B manuals
Add to My Manuals
Save this manual to your list of manuals |
Page 11 highlights
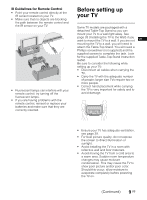
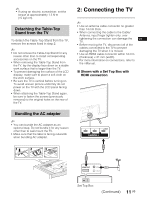
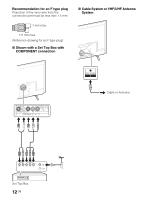
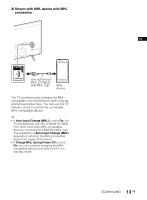
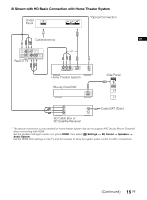
~ • If using an electric screwdriver, set the torque at approximately 1.5 N·m {15 kgf·cm}. Detaching the Table-Top Stand from the TV To detach the Table-Top Stand from the TV, remove the screws fixed in step 2. ~ • Do not remove the Table-Top Stand for any reason other than to install corresponding accessories on the TV. • When removing the Table-Top Stand from the TV, lay the display face down on a stable work surface that is larger than the TV. • To prevent damaging the surface of the LCD display, make sure to place a soft cloth on the work surface. • Be sure the TV is vertical before turning on. To avoid uneven picture uniformity do not power on the TV with the LCD panel facing down. • When attaching the Table-Top Stand again, be sure to fasten the screws (previously removed) to the original holes on the rear of the TV. 2: Connecting the TV ~ • Use an antenna cable connector no greater than 14 mm thick. • When connecting the cable to the Cable/ Antenna, input finger tighten only, over tightening the connection can damage the US TV. • Before moving the TV, disconnect all of the cables connected to the TV to prevent damaging the TV when it is moved. • Use an HDMI cable connector within 12 mm (thickness) × 21 mm (width). • For more information on connections, refer to the i-Manual. x Shown with a Set Top Box with HDMI connection Bundling the AC adapter ~ • You can bundle the AC adapter as an optional step. Do not bundle it for any reason other than to wall-mount the TV. • Make sure that the label is facing outwards when bundling AC adapter. 1 2 3 Set Top Box (Continued) 11 US
-
 1
1 -
2
-
3
-
4
-
5
-
 6
6 -
 7
7 -
 8
8 -
 9
9 -
 10
10 -
 11
11 -
 12
12 -
 13
13 -
 14
14 -
 15
15 -
 16
16 -
17
-
18
-
19
-
20
-
21
-
22
-
23
-
24
-
25
-
26
-
27
-
28
-
29
-
30
-
31
-
32
-
33
-
34
-
35
-
36
-
37
-
38
-
39
-
40
-
41
-
42
-
43
-
44
-
45
-
46
-
47
-
48
-
49
-
50
-
51
-
52
-
53
-
54
-
55
-
56
-
57
-
58
-
59
-
60
-
61
-
62
-
63
-
64
-
65
-
66
-
67
-
68
-
69
-
70
-
71
-
72
-
73
-
74
-
75
-
76
-
77
-
78
-
79
-
80
-
81
-
82
-
83
-
84
 |
 |
