Sony KDL-46XBR10 Operating Instructions - Page 19
Two M6 × 8 mm anchor bolts screw into the top-most wall-mount holes located on the rear - canada
 |
UPC - 027242753150
View all Sony KDL-46XBR10 manuals
Add to My Manuals
Save this manual to your list of manuals |
Page 19 highlights
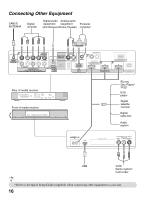
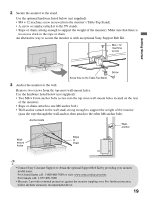
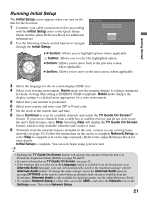
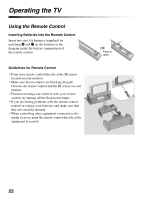
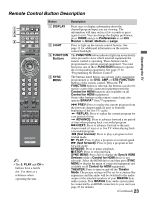
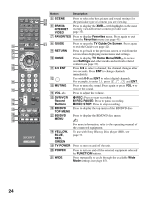
Getting Started 2 Secure the monitor to the stand. Use the optional hardware listed below (not supplied): • M4 × 12 machine screw (screwed into the monitor's Table-Top Stand). • A screw or similar (attach it to the TV stand). • Rope or chain (strong enough to support the weight of the monitor). Make sure that there is no excess slack in the rope or chain. An alternative way to secure the monitor is with an optional Sony Support Belt Kit. M4 × 12 machine screw Screw hole on the Table-Top Stand Screw 3 Anchor the monitor to the wall. Remove two screws from the top-most wall-mount holes. Use the hardware listed below (not supplied): • Two M6 × 8 mm anchor bolts (screw into the top-most wall-mount holes located on the rear of the monitor). • Rope or chain (attach to one M6 anchor bolt). • Wall-anchor (attach to the wall stud) strong enough to support the weight of the monitor (pass the rope through the wall-anchor, then attach to the other M6 anchor bolt). Anchor bolts Wallanchor Wallmount holes Rope or chain • Contact Sony Customer Support to obtain the optional Support Belt Kit by providing your monitor model name. For United States call: 1-800-488-7669 or visit: www.sony.com/accessories For Canada call: 1-877-899-7669 • Measure 2 provides minimal protection against the monitor toppling over. For further protection, follow all three measures recommended above. 19
-
 1
1 -
2
-
3
-
4
-
5
-
6
-
7
-
8
-
9
-
10
-
11
-
12
-
13
-
 14
14 -
 15
15 -
 16
16 -
 17
17 -
 18
18 -
 19
19 -
 20
20 -
 21
21 -
 22
22 -
 23
23 -
 24
24 -
25
-
26
-
27
-
28
-
29
-
30
-
31
-
32
-
33
-
34
-
35
-
36
-
37
-
38
-
39
-
40
-
41
-
42
-
43
-
44
-
45
-
46
-
47
-
48
-
49
-
50
-
51
-
52
-
53
-
54
-
55
-
56
 |
 |
