Sony KE-42XBR900 Operating Instructions - Page 19
Media receiver unit Front Panel, Media receiver unit, Front Panel - inputs
 |
View all Sony KE-42XBR900 manuals
Add to My Manuals
Save this manual to your list of manuals |
Page 19 highlights
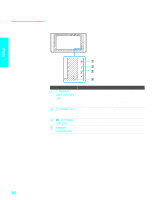
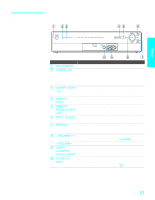
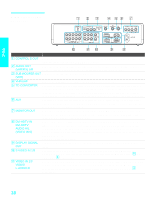
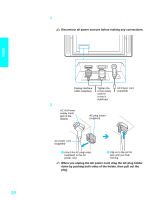
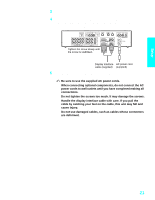
Setup Media receiver unit Front Panel POWER POWER ON/OFF TIMER TV VIDEO1 VIDEO2 VIDEO3 VIDEO4 VIDEO5 VIDEO6 MEMORY STICK S VIDEO VIDEO L-AUDIO-R VIDEO 2 INPUT CHANNEL + INPUT SELECT VOL - VOL + CHANNEL - MTS/SAP Item Description 1 Main POWER Press to turn on and off the main power of the TV Set. 2 POWER LED Lights up in green when the TV set is turned on. The LED lights up in red when in standby mode. The LED does not light up when the main power is turned off. If the LED blinks continuously, this may indicate the Media receiver unit needs servicing (see "Contacting Sony" on page 96). 3 ON/OFF TIMER When lit, indicates one of the timers is set. When the timer LED is set, this LED will remain lit even if the TV set is turned off. For details, see page 89. 4 MEMORY STICK Memory Stick insertion slot. For details, see "Inserting and Removing a Memory Stick" on page 70. 5 MEMORY When lit, indicates that the Memory Stick is being read. STICK ACCESS (Do not remove the Memory Stick when the indicator is lit.) LED 6 INPUT SELECT Press repeatedly to cycle through the video equipment connected to the Media receiver unit's video inputs. 7 MTS/SAP Press repeatedly to cycle through the Multi-channel TV Sound (MTS) options: Stereo, Auto SAP, and Mono. For details on each option, see page 80. 8 - CHANNEL + Press to scan through channels. To scan quickly through channels, press and hold down either CHANNEL. - VOLUME + Press to adjust the volume. 9 VIDEO/ Connects to the composite A/V output jacks on your L-AUDIO-R camcorder or other video equipment. VIDEO 2 INPUT 0 S VIDEO 2 INPUT Connects to the S VIDEO OUT jack on your camcorder or other video equipment that has S VIDEO. Provides better picture quality than composite video (9). 17
-
 1
1 -
2
-
3
-
4
-
5
-
6
-
7
-
8
-
9
-
10
-
11
-
12
-
13
-
 14
14 -
 15
15 -
 16
16 -
 17
17 -
 18
18 -
 19
19 -
 20
20 -
 21
21 -
 22
22 -
 23
23 -
 24
24 -
25
-
26
-
27
-
28
-
29
-
30
-
31
-
32
-
33
-
34
-
35
-
36
-
37
-
38
-
39
-
40
-
41
-
42
-
43
-
44
-
45
-
46
-
47
-
48
-
49
-
50
-
51
-
52
-
53
-
54
-
55
-
56
-
57
-
58
-
59
-
60
-
61
-
62
-
63
-
64
-
65
-
66
-
67
-
68
-
69
-
70
-
71
-
72
-
73
-
74
-
75
-
76
-
77
-
78
-
79
-
80
-
81
-
82
-
83
-
84
-
85
-
86
-
87
-
88
-
89
-
90
-
91
-
92
-
93
-
94
-
95
-
96
-
97
-
98
-
99
-
100
-
101
-
102
-
103
-
104
-
105
-
106
-
107
-
108
-
109
-
110
-
111
-
112
 |
 |
