Sony KLV-15SR1 Operating Instructions (SU-W100) - Page 5
Step 3: Secure bracket A to the wall, tighten the four screws on the wall.
 |
View all Sony KLV-15SR1 manuals
Add to My Manuals
Save this manual to your list of manuals |
Page 5 highlights
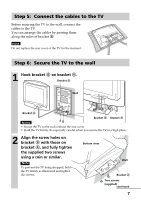
Step 3: Secure bracket A to the wall 1 Insert four of the screws you prepared at the positions marked in Step 2 (page 4). Do not tighten the screws completely for the moment. Keep a space of 2 to 3 mm (3/32 to 1/8 inches) from the wall. Wall Screws you prepared 2 - 3 mm (3/32 - 1/8 inches) 2 Press bracket A to the wall and slide it down. Then fully tighten the four screws on the wall. Bracket A , Wall Bracket A Wall 3 Fully tighten two of the screws you prepared in screw holes 1 and 2 firmly. Bracket A Screws you prepared continued 5
-
 1
1 -
 2
2 -
 3
3 -
 4
4 -
 5
5 -
 6
6 -
 7
7 -
 8
8 -
 9
9 -
 10
10 -
 11
11 -
12
-
13
-
14
-
15
-
16
-
17
-
18
-
19
-
20
-
21
-
22
-
23
-
24
-
25
-
26
-
27
-
28
 |
 |

5
Step 3:
Secure bracket
A
to the wall
1
Insert four of the screws you prepared at the positions
marked in Step 2 (page 4).
Do not tighten the screws completely for the moment. Keep a space of 2
to 3 mm (
3
/
32
to
1
/
8
inches) from the wall.
2
Press bracket
A
to the wall and slide it down. Then fully
tighten the four screws on the wall.
3
Fully tighten two of the screws you prepared in screw
holes
1
and
2
firmly.
Screws you
prepared
Wall
2 - 3 mm (
3
/
32
-
1
/
8
inches)
,
Wall
Bracket
A
Screws you
prepared
Bracket
A
Wall
Bracket
A
continued