Sony KLV-40U100M Operating Instructions - Page 17
Connecting the Unit, Making Video and Audio Connections
 |
UPC - 027242689633
View all Sony KLV-40U100M manuals
Add to My Manuals
Save this manual to your list of manuals |
Page 17 highlights
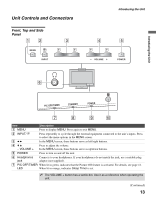
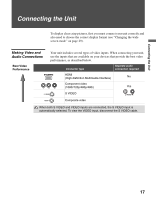
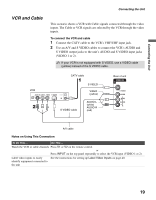
Connecting the Unit Connecting the Unit To display clear crisp pictures, first you must connect your unit correctly and also need to choose the correct display format (see "Changing the wide screen mode" on page 29). Making Video and Audio Connections Best Video Performance Y Your unit includes several types of video inputs. When connecting your unit, use the inputs that are available on your devices that provide the best video performance, as described below. Connector type Separate audio connection required HDMI (High-Definition Multimedia Interface) No PB PR Component video (1080i/720p/480p/480i) S VIDEO Yes L-AUDIO-R Composite video When both S VIDEO and VIDEO inputs are connected, the S VIDEO input is automatically selected. To view the VIDEO input, disconnect the S VIDEO cable. 17
-
 1
1 -
2
-
3
-
4
-
5
-
6
-
7
-
8
-
9
-
10
-
11
-
 12
12 -
 13
13 -
 14
14 -
 15
15 -
 16
16 -
 17
17 -
 18
18 -
 19
19 -
 20
20 -
 21
21 -
 22
22 -
23
-
24
-
25
-
26
-
27
-
28
-
29
-
30
-
31
-
32
-
33
-
34
-
35
-
36
-
37
-
38
-
39
-
40
-
41
-
42
-
43
-
44
-
45
-
46
-
47
-
48
 |
 |