Sony LBT-D110CD Operating Instuctions - Page 24
Troubleshooting, Guide
 |
View all Sony LBT-D110CD manuals
Add to My Manuals
Save this manual to your list of manuals |
Page 24 highlights
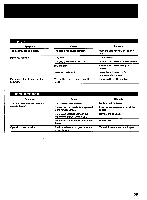
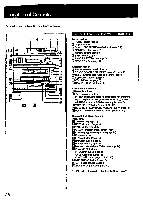
Troubleshooting Guide Before going through the check list below, first refer back to the connections and operating procedures. Should any problem persist after you have made these checks, consult your nearest Sony service facility. General Symptom No power. No sound. Reversed left and right sound. Severe hum or noise. Cause AC power cord is not connected securely. Volume is not turned up. Wrong connection. Wrong connection. Loose connections. Unit is near TV or VCR. Remedy Connect the AC power cord securely. Turn up the volume. Connect the speaker cords correctly. Connect the speaker cords correctly. Make connections securely. Move TV or VCR away from the unit. Tuner Symptom The "TUNED" or "STEREO" indication blinks. Severe hum or noise. Cause Antenna is not aimed in the right direction. Weak signal. Antenna is not aimed in the right direction. Weak signal. Remedy Adjust the location and direction of the antenna. Connect to an external antenna if the indication still blinks. Adjust the location and direction of the antenna. Connect to an external antenna if hum or noise still interferes with reception. Cassette deck Symptom You cannot play back a tape. You cannot record on a tape. You cannot dub tapes. Unbalanced tone in higher frequencies. Unclear recording or playback. Excessive wow or flutter, or sound dropout. Incomplete erasure. Cause II PAUSE is engaged. The tab has been removed from the cassette. The tab of the cassette in deck B has been removed. The DOLBY NR switch is not in the correct position. Dirty head. Dirty capstan and pinch roller. Magnetized head. Remedy Press theII PAUSE button to release the unit from the pause mode. Cover the opening with plastic tape. Cover the opening with plastic tape. Set the DOLBY NR switch to the same position as was set for recording. Clean and demagnetize the recording/ playback head. Clean the capstan and pinch roller. Demagnetize the erasing head. 24
-
 1
1 -
2
-
3
-
4
-
5
-
6
-
7
-
8
-
9
-
10
-
11
-
12
-
13
-
14
-
15
-
16
-
17
-
18
-
 19
19 -
 20
20 -
 21
21 -
 22
22 -
 23
23 -
 24
24 -
 25
25 -
 26
26 -
 27
27 -
 28
28
 |
 |
