Sony LSPX-102E26 Startup Guide - Page 1
Sony LSPX-102E26 Manual
 |
View all Sony LSPX-102E26 manuals
Add to My Manuals
Save this manual to your list of manuals |
Page 1 highlights
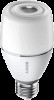
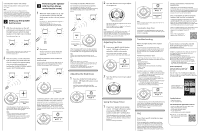
4-579-894-13(1) LED Bulb Speaker Startup Guide LSPX-102E26 Manuals Supplied Startup Guide (this document) Provides you with instructions on how to connect the unit with BLUETOOTH devices and basic operations. Reference Guide Provides you with precautions and product specifications. Help Guide Read the Help Guide on your computer or smartphone when you want to know how to use the unit in greater detail. The Help Guide also contains a troubleshooting guide which provides you with remedies for the problems you might encounter. URL: http://rd1.sony.net/help/speaker/ lspx-102e26/h_zz/ Two-dimensional code: Parts and Controls Main unit Screw base Remote receiver Speaker Remote control (rear) Battery cover Remote control transmission area To operate, aim towards the remote receiver on the main unit as illustrated. Remote receiver (play/pause)/ PAIRING (pairing) button Play music or pause playback. Press and hold to switch to pairing mode. When this happens, the main unit will make a sound to indicate that pairing mode has been entered. Volume -/+ buttons Adjust the volume. WHITE/COLOR (white/color)/ OFF (light off) button Switch the illumination of the main unit between white light, color mode, and off. Press and hold to turn off the light and disconnect BLUETOOTH. Press while pressing the STEREO/DOUBLE (switch mode)/SHIFT (shift) button to set the Sleep Timer. Dimmer/color ring Adjust the brightness. Spin to the right for brighter, and to the left for darker. When in color mode, adjust the color. STEREO/DOUBLE (switch mode)/SHIFT (shift) button Switch the playback mode between stereo and double when using the Speaker Add function. Press and hold to shift the function of the other buttons. Shift functions are listed on the back of the remote. Preparing the Remote There is a battery inside the remote control at the time of purchase. Before using the remote control for the first time, make sure to remove the protective sheet by following the steps below. 1 On the rear of the remote control, insert a coin or other object into the groove on the battery cover, and twist it to the left, until the marking is aligned with OPEN. The left side of the battery cover is slightly lifted. 2 Open the battery cover (), and remove the protective sheet (). 3 Return the battery to its former position, and align the marking on the battery cover with OPEN. The left side of the battery cover is slightly lifted. 4 Twist the battery cover to the right, until the marking is aligned with LOCK. To replace the battery in the remote control Replace with a new CR2032 lithium battery from Sony. Insert with + side up. First insert the edge, then fit the battery in snugly. Pairing and Connecting with a BLUETOOTH Device The unit can be paired with up to seven BLUETOOTH devices. 1 Turn on the light fixture to which the main unit is installed. The bulb speaker turns on. 2 Press and hold the (play/ pause)/ PAIRING (pairing) button. The main unit will make a sound to indicate that pairing mode has been entered. Release the button when the sound is made. 3 Perform the pairing procedure on the BLUETOOTH device to detect this unit. When a list of detected devices appears on the display of the BLUETOOTH device, select "LSPX-102E26." If passkey input is required on the display of a BLUETOOTH device, input "0000." 4 Make the BLUETOOTH connection from the BLUETOOTH device. When pairing is complete, the main unit will make a sound to indicate that a BLUETOOTH connection has been established. If a connection was not made, repeat the process from step 2. To connect with a device after it has been paired, see "Using a Previously Paired Device." Using a Previously Paired Device 1 Turn on the light fixture to which the main unit is installed. The bulb speaker turns on. 2 If the remote control does not have a BLUETOOTH connection with any device, press the (play/pause)/ PAIRING (pairing) button. The remote control automatically connects with the device that was last connected. If a connection cannot be made Perform steps 3 to 4 of "Pairing and connecting with a BLUETOOTH device." Hint If the unit is already connected to a BLUETOOTH device and you form a connection from a different device that was previously paired with the unit, the connection switches to the latter device. Listening to Music Profile: A2DP, AVRCP Operate after making the BLUETOOTH connection with your BLUETOOTH device. 1 Start playback on the BLUETOOTH device, and adjust the volume to a moderate level from the connected device. 2 Adjust the volume using the Volume -/+ buttons on the remote control. When the volume reaches the lowest level (mute) or the highest level, the main unit emits two short beeps. The Volume + button has a tactile dot. Hints • You can also use the (play/pause)/ PAIRING (pairing) button on the remote control to play or pause the music. • The BLUETOOTH codec setting of the main unit is set to SBC (Low) at the time of purchase. Change the BLUETOOTH codec setting to AUTO or SBC to enjoy high quality playback. For more details about the BLUETOOTH codec setting, see the Help Guide (online instruction manual) mentioned in "Manuals Supplied." Listening to Music with Two Bulb Speakers (Speaker Add Function) About Speaker Add function By using the Speaker Add function, you can connect a single BLUETOOTH device to two bulb speakers simultaneously. Select from the following two playback methods. Stereo mode One bulb speaker plays L the sound on the left channel (left side), while the other bulb speaker plays the sound on the right channel (right side) for stereo playback between the two bulb speakers. R Stereo sound Double mode Both bulb speakers play the same sound. Mono sound Mono sound When using the Speaker Add function, one bulb speaker acts as the "master unit" (left channel), while the other acts as the "satellite unit" (right channel). Be sure to connect the BLUETOOTH device only to the master unit. The master unit will then connect to the satellite unit. Master (L) Satellite (R) BLUETOOTH device Setting up the master unit Notes • The bulb speaker that is set up as the master unit plays the sound on the left channel (left side) when in stereo mode. Therefore, decide which bulb speaker you want to set up as the left side, and make that the master unit. • Only set up one bulb speaker as the master unit. If you set up two or more units as the master unit, the Speaker Add function will not work. 1 Turn on the light fixture to which the bulb speaker that you want to set as the left side is installed. The bulb speaker lights up. L R Note Make sure that the light fixture containing the bulb speaker that you want to set as the right channel (right side) remains turned off. If two bulb speakers turn on when a light fixture is in use, remove the bulb speaker that you want to set as the right side. 2 Aim the remote control toward the bulb speaker on the left side, then hold down the (play/pause)/ PAIRING (pairing) button for approximately one second after pressing and holding the STEREO/ DOUBLE (switch mode)/SHIFT (shift) button. L R The master unit setting is complete. ©2016 Sony Corporation Printed in Japan
-
 1
1 -
 2
2
 |
 |
