Sony MEX-DV1000 Operating Instructions - Page 32
Selecting the sound quality, Advanced Operations - Radio, Storing and receiving stations
 |
View all Sony MEX-DV1000 manuals
Add to My Manuals
Save this manual to your list of manuals |
Page 32 highlights
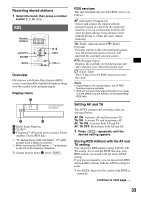
To hide the system setup display, press (SYSTEM SETUP). Note For Super Audio CDs consisting of only a Super Audio CD layer, that layer is played regardless of setting. Tip The setting in visual setup will switch the setting in system setup automatically, and vice versa. Selecting the sound quality This unit allows you to change the sound quality of Super Audio CD playback by switching the sampling frequency. The setting is configurable both from the visual setup menu (page 36) and the system setup menu (page 40). The options for "SUPER AUDIO CD MODE" (visual setup) and "SA-CD MOD" (system setup) are indicated below. HQ: Outputs at 176.4 kHz (high sound quality). STD: Outputs at 44.1 kHz (standard CD sound quality). By the visual setup menu The setting procedure is the same as for setting the playback layer (page 31). Press (VISUAL SETUP), then select "AUDIO SETUP" c "SUPER AUDIO CD MODE" c "HQ" or "STD." By the system setup menu The setting procedure is the same as for setting the playback layer (page 31). Press (SYSTEM SETUP), then select "SA-CD MOD" c "HQ" or "STD." Note When set to "HQ," EQ7 (page 35) and HPF (page 42) settings are deactivated. To activate, set to "STD." Tip The setting in visual setup will switch the setting in system setup automatically, and vice versa. Advanced Operations - Radio Storing and receiving stations Number buttons SYSTEM SETUP M/m ZXZ SRC ENTER PL MODE Caution When tuning in stations while driving, use Best Tuning Memory (BTM) to prevent an accident. Storing automatically - BTM 1 Press (SRC) repeatedly until "TUNER" appears on the main unit. To change the band, press (MODE) repeatedly. You can select from FM1, FM2, FM3, MW or LW. 2 Press (SYSTEM SETUP). The system setup item appears. 3 Press M/m to select "BTM," then press (ENTER). The unit stores stations in order of frequency on the number buttons ((1) to (6)). A beep sounds when the setting is stored. With the main unit Press (SOURCE) instead of (SRC), rotate the volume control dial instead of pressing M/m. Storing manually 1 While receiving the station that you want to store, press and hold a number button ((1) to (6)) until "MEM" appears on the main unit. The number button indication appears on the main unit. Note If you try to store another station on the same number button, the previously stored station will be replaced. Tip When an RDS station is stored, the AF/TA setting is also stored (page 33). 32
-
 1
1 -
2
-
3
-
4
-
5
-
6
-
7
-
8
-
9
-
10
-
11
-
12
-
13
-
14
-
15
-
16
-
17
-
18
-
19
-
20
-
21
-
22
-
23
-
24
-
25
-
26
-
 27
27 -
 28
28 -
 29
29 -
 30
30 -
 31
31 -
 32
32 -
 33
33 -
 34
34 -
 35
35 -
 36
36 -
 37
37 -
38
-
39
-
40
-
41
-
42
-
43
-
44
-
45
-
46
-
47
-
48
-
49
-
50
-
51
-
52
-
53
-
54
-
55
-
56
-
57
-
58
-
59
-
60
-
61
-
62
-
63
-
64
-
65
-
66
-
67
-
68
-
69
-
70
-
71
-
72
-
73
-
74
-
75
-
76
-
77
-
78
-
79
-
80
-
81
-
82
-
83
-
84
-
85
-
86
-
87
-
88
-
89
-
90
-
91
-
92
-
93
-
94
-
95
-
96
-
97
-
98
-
99
-
100
-
101
-
102
-
103
-
104
-
105
-
106
-
107
-
108
-
109
-
110
-
111
-
112
-
113
-
114
-
115
-
116
-
117
-
118
-
119
-
120
-
121
-
122
-
123
-
124
-
125
-
126
-
127
-
128
-
129
-
130
-
131
-
132
-
133
-
134
-
135
-
136
-
137
-
138
-
139
-
140
-
141
-
142
-
143
-
144
-
145
-
146
-
147
-
148
-
149
-
150
-
151
-
152
-
153
-
154
-
155
-
156
-
157
-
158
-
159
-
160
-
161
-
162
-
163
-
164
-
165
-
166
-
167
-
168
-
169
-
170
-
171
-
172
-
173
-
174
-
175
-
176
-
177
-
178
-
179
-
180
-
181
-
182
-
183
-
184
-
185
-
186
-
187
-
188
-
189
-
190
-
191
-
192
-
193
-
194
-
195
-
196
-
197
-
198
-
199
-
200
-
201
-
202
-
203
-
204
-
205
-
206
-
207
-
208
-
209
-
210
-
211
-
212
-
213
-
214
-
215
-
216
-
217
-
218
-
219
-
220
-
221
-
222
-
223
-
224
-
225
-
226
-
227
-
228
-
229
-
230
-
231
-
232
-
233
-
234
-
235
-
236
-
237
-
238
-
239
-
240
-
241
-
242
-
243
-
244
-
245
-
246
-
247
-
248
-
249
-
250
-
251
-
252
-
253
-
254
-
255
-
256
-
257
-
258
-
259
-
260
-
261
-
262
-
263
-
264
-
265
-
266
-
267
-
268
-
269
-
270
-
271
-
272
-
273
-
274
-
275
-
276
-
277
-
278
-
279
-
280
-
281
-
282
-
283
-
284
-
285
-
286
-
287
-
288
-
289
-
290
-
291
-
292
-
293
-
294
-
295
-
296
-
297
-
298
-
299
-
300
 |
 |
