Sony MHC-GX470 Operating Instructions - Page 18
Recording onto a tape, (CD Synchro recording/Manual recording/Sound Mixing) - model #
 |
View all Sony MHC-GX470 manuals
Add to My Manuals
Save this manual to your list of manuals |
Page 18 highlights
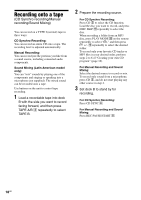
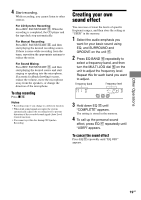
Recording onto a tape (CD Synchro recording/Manual recording/Sound Mixing) You can record on a TYPE I (normal) tape in three ways: CD Synchro Recording: You can record an entire CD onto a tape. The recording level is adjusted automatically. Manual Recording: You can record just the portions you like from a sound source, including connected audio components. Sound Mixing (Latin American model only): You can "mix" sounds by playing one of the components and singing or speaking into a microphone (not supplied). The mixed sound can be recorded onto a tape. Use buttons on the unit to control tape recording. 1 Load a recordable tape into deck B with the side you want to record facing forward, and then press TAPE A/B repeatedly to select TAPE B. 2 Prepare the recording source. For CD Synchro Recording: Press CD to select the CD function. Load the disc you want to record, and press DISC SKIP repeatedly to select the disc. When recording a folder from an MP3 disc, press PLAY MODE on the remote repeatedly to select " ," and then press +/- repeatedly to select the desired folder. To record only your favorite CD tracks or MP3 files in your desired order, perform steps 2 to 6 of "Creating your own CD program" (page 16). For Manual Recording and Sound Mixing: Select the desired source to record or mix. To record only sound from a microphone, press CD , and do not start playing any other source in step 4. 3 Set deck B to stand by for recording. For CD Synchro Recording: Press CD SYNC . For Manual Recording and Sound Mixing: Press REC PAUSE/START . 18GB
-
 1
1 -
2
-
3
-
4
-
5
-
6
-
7
-
8
-
9
-
10
-
11
-
12
-
 13
13 -
 14
14 -
 15
15 -
 16
16 -
 17
17 -
 18
18 -
 19
19 -
 20
20 -
 21
21 -
 22
22 -
 23
23 -
24
-
25
-
26
-
27
-
28
-
29
-
30
-
31
-
32
 |
 |