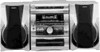
Sony MHC-RX66 Operating Instructions - Page 5
Connect the FM/AM antennas.
 |
View all Sony MHC-RX66 manuals
Add to My Manuals
Save this manual to your list of manuals |
Page 5 highlights
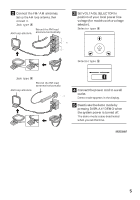
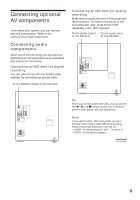
2 Connect the FM/AM antennas. Set up the AM loop antenna, then connect it. Jack type A Extend the FM lead AM loop antenna antenna horizontally. 3 Set VOLTAGE SELECTOR to position of your local power line voltage (for models with a voltage selector). Selector type A VOLTAGE SELECTOR FM75 AM 230 - 240V 220V 120V Selector type B VOLTAGE SELECTOR 110-120V 220-240V Jack type B AM loop antenna Extend the FM lead antenna horizontally. CFMOA75XIAL AM 4 Connect the power cord to a wall outlet. Demo mode appears in the display. 5 Deactivate the demo mode by pressing DISPLAY/DEMO when the system power is turned off. The demo mode is also deactivated when you set the time. continued 5
-
 1
1 -
 2
2 -
 3
3 -
 4
4 -
 5
5 -
 6
6 -
 7
7 -
 8
8 -
 9
9 -
 10
10 -
 11
11 -
12
-
13
-
14
-
15
-
16
-
17
-
18
-
19
-
20
-
21
-
22
-
23
-
24
-
25
-
26
-
27
-
28
-
29
-
30
-
31
-
32
-
33
-
34
-
35
-
36
-
37
-
38
-
39
-
40
-
41
-
42
-
43
-
44
-
45
-
46
-
47
-
48
-
49
-
50
-
51
-
52
 |
 |

5
Set VOLTAGE SELECTOR to
position of your local power line
voltage (for models with a voltage
selector).
Selector type
A
Selector type
B
Connect the power cord to a wall
outlet.
Demo mode appears in the display.
Deactivate the demo mode by
pressing DISPLAY/DEMO when
the system power is turned off.
The demo mode is also deactivated
when you set the time.
FM75
AM
FM75
AM
COAXIAL
Extend the FM lead
antenna horizontally.
2
5
4
Connect the FM/AM antennas.
Set up the AM loop antenna, then
connect it.
Jack type
A
Jack type
B
continued
AM loop antenna
Extend the FM lead
antenna horizontally.
AM loop antenna
3
VOLTAGE
SELECTOR
220V
120V
230
240V
-
110-120V
220-240V
VOLTAGE SELECTOR