Sony MVC-FD51 Operating Instructions - Page 16
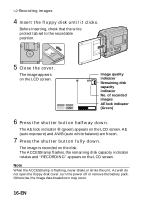
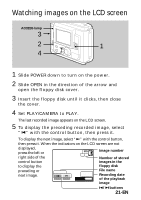
Insert the floppy disk until it clicks., Close the cover., Press the shutter button halfway down.,
 |
View all Sony MVC-FD51 manuals
Add to My Manuals
Save this manual to your list of manuals |
Page 16 highlights
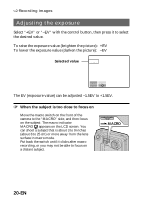
÷ Recording images 4 Insert the floppy disk until it clicks. Before inserting, check that the write protect tab set to the recordable position. 5 Close the cover. The image appears on the LCD screen. STD 11 -EV +EV MENU 120min Image quality indicator Remaining disk capacity indicator No. of recorded images AE lock indicator (Green) 6 Press the shutter button halfway down. The AE lock indicator r (green) appears on the LCD screen. AE (auto exposure) and AWB (auto white balance) are frozen. 7 Press the shutter button fully down. The image is recorded on the disk. The ACCESS lamp flashes, the remaining disk capacity indicator rotates and "RECORDING" appears on the LCD screen. Note When the ACCESS lamp is flashing, never shake or strike the unit. As well do not open the floppy disk cover, turn the power off or remove the battery pack. Otherwise, the image data breakdown may occur. 16-EN
-
 1
1 -
2
-
3
-
4
-
5
-
6
-
7
-
8
-
9
-
10
-
 11
11 -
 12
12 -
 13
13 -
 14
14 -
 15
15 -
 16
16 -
 17
17 -
 18
18 -
 19
19 -
 20
20 -
 21
21 -
22
-
23
-
24
-
25
-
26
-
27
-
28
-
29
-
30
-
31
-
32
-
33
-
34
-
35
-
36
-
37
-
38
-
39
-
40
-
41
-
42
-
43
-
44
-
45
-
46
-
47
-
48
-
49
-
50
-
51
-
52
-
53
-
54
-
55
-
56
-
57
-
58
-
59
-
60
-
61
-
62
-
63
-
64
-
65
-
66
-
67
-
68
-
69
-
70
-
71
-
72
-
73
-
74
-
75
-
76
-
77
-
78
-
79
-
80
-
81
-
82
-
83
-
84
-
85
-
86
-
87
-
88
-
89
-
90
-
91
-
92
-
93
-
94
-
95
-
96
-
97
-
98
-
99
-
100
-
101
-
102
-
103
-
104
-
105
-
106
-
107
-
108
-
109
-
110
-
111
-
112
-
113
-
114
-
115
-
116
-
117
-
118
-
119
-
120
-
121
-
122
-
123
-
124
-
125
-
126
-
127
-
128
-
129
-
130
-
131
-
132
-
133
-
134
 |
 |
