Sony MZ-B100 Operating Instructions (primary manual) - Page 12
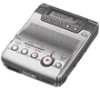
Select the recording mode., Record an MD
 |
View all Sony MZ-B100 manuals
Add to My Manuals
Save this manual to your list of manuals |
Page 12 highlights
3 Select the recording mode. REC MODE 1 Press REC MODE repeatedly until "STEREO" lights up in the display. You can select normal stereo, LP2 stereo, LP4 stereo, or monaural as the recording mode. For details, see "Recording for long times" (page 16). The factory setting is normal stereo. The recording mode cannot be changed when recording is in progress. 4 Record an MD. built-in microphones xSTOP Connect firmly to i. zREC x REC indicator Connect firmly to i 1 Press zREC. "REC" appears, REC indicator lights up, and then recording starts. You can monitor the recording conditions, such as the recording position, through the display or the REC indicator (page 26). If the disc is blank, the recording starts from the beginning. If the disc is partially recorded, the recording automatically starts from the end of the existing material. To stop recording, press xSTOP. After you press the xSTOP button to stop the recorder, the recorder will automatically turn off after about 10 seconds (when using an alkaline dry battery) or 5 minutes (when using the AC power adaptor). To monitor the sound during recording. Connect the supplied headphones with remote control to the i jack. You can adjust the volume by turning the VOL control. This adjustment does not affect the recording level since the level is adjusted automatically. To Operation Record partway through the previous recording Press NPLAY, >CUE/AMS or .REVIEW/ AMS to find the beginning of the material to be recorded, and then press XPAUSE. Press zREC so that the recorder changes to recording pause. Press XPAUSE again to start recording. 12-GB
-
 1
1 -
2
-
3
-
4
-
5
-
6
-
 7
7 -
 8
8 -
 9
9 -
 10
10 -
 11
11 -
 12
12 -
 13
13 -
 14
14 -
 15
15 -
 16
16 -
 17
17 -
18
-
19
-
20
-
21
-
22
-
23
-
24
-
25
-
26
-
27
-
28
-
29
-
30
-
31
-
32
-
33
-
34
-
35
-
36
-
37
-
38
-
39
-
40
-
41
-
42
-
43
-
44
-
45
-
46
-
47
-
48
-
49
-
50
-
51
-
52
-
53
-
54
-
55
-
56
-
57
-
58
-
59
-
60
-
61
-
62
-
63
-
64
-
65
-
66
-
67
-
68
-
69
-
70
-
71
-
72
-
73
-
74
-
75
-
76
-
77
-
78
-
79
-
80
-
81
-
82
-
83
-
84
-
85
-
86
-
87
-
88
-
89
-
90
-
91
-
92
-
93
-
94
-
95
-
96
-
97
-
98
-
99
-
100
-
101
-
102
-
103
-
104
-
105
-
106
-
107
-
108
-
109
-
110
-
111
-
112
-
113
-
114
-
115
-
116
-
117
-
118
-
119
-
120
-
121
-
122
-
123
-
124
-
125
-
126
-
127
-
128
-
129
-
130
-
131
-
132
-
133
-
134
-
135
-
136
-
137
-
138
-
139
-
140
-
141
-
142
-
143
-
144
-
145
-
146
-
147
-
148
-
149
-
150
-
151
-
152
-
153
-
154
-
155
-
156
-
157
-
158
-
159
-
160
-
161
-
162
-
163
-
164
 |
 |
