Sony NWZX1061FBLK Service Manual - Page 9
Panel Rear
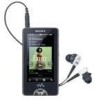 |
UPC - 027242755192
View all Sony NWZX1061FBLK manuals
Add to My Manuals
Save this manual to your list of manuals |
Page 9 highlights
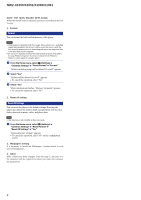
NWZ-X1050/X1051/X1060/X1061 Note: Follow the disassembly procedure in the numerical order given. 2-2. PANEL (REAR) Note 1: This illustration sees the set from rear side. Note 2: Please work noting that the panel (rear) is damaged. panel rear section 8 panel (rear) 7 two adhesive sheet (rear) 3 claw hold assy 4 2 Peel off panel (rear) section of the hold assy side in the adhesive sheet (rear) two places. 1 two screws (M1.4) 5 claw (panel) 6 plate (rear) 2-3. HOLD ASSY Note: This illustration sees the set from rear side. 1 screw (M1.4) 3 hold assy 2 screw (B1.4) 9
-
 1
1 -
2
-
3
-
 4
4 -
 5
5 -
 6
6 -
 7
7 -
 8
8 -
 9
9 -
 10
10 -
 11
11 -
 12
12 -
 13
13 -
 14
14 -
15
-
16
-
17
-
18
-
19
-
20
-
21
-
22
-
23
-
24
-
25
-
26
-
27
-
28
-
29
-
30
-
31
-
32
-
33
-
34
 |
 |

NWZ-X1050/X1051/X1060/X1061
9
Note:
Follow the disassembly procedure in the numerical order given.
2-2.
PANEL (REAR)
Note 1
: This illustration sees the set from rear side.
2-3.
HOLD
ASSY
Note:
This illustration sees the set from rear side.
1
two screws
(M1.4)
4
hold assy
panel rear section
7
two adhesive sheet
(rear)
8
panel (rear)
5
claw
(panel)
6
plate (rear)
3
claw
2
Peel off panel (rear) section of
the hold assy side in the adhesive
sheet (rear) two places.
Note 2:
Please work noting that the
panel (rear) is damaged.
1
screw
(M1.4)
3
hold assy
2
screw
(B1.4)