Sony PAM-200 Installation Manual - Page 6
Height Adjustment
 |
UPC - 027242240773
View all Sony PAM-200 manuals
Add to My Manuals
Save this manual to your list of manuals |
Page 6 highlights
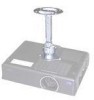
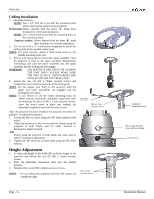
PAM-200 Ceiling Installation 1. Mounting Surfaces NOTE: Use a 1/4" drill bit to pre-drill the mounting holes before securing the wood screws (supplied). Wood studs: Where denoted with the letter 'A', mark these locations for wood stud installation. NOTE: Use a masonry bit to pre-drill the mounting holes in the concrete surface. Concrete surface: Where denoted with the letter 'B', mark these locations for concrete installation. 2. Use two (2) #14 x 2" wood screws (supplied) to attach the ceiling plate to the wooden ceiling stud. NOTE: For extra security, attach a third wood screw to the middle mounting point (A). 3. Slowly raise the projector toward the upper assembly. Once the projector is close to the upper assembly, MagnaGuide Technology will pull the lower assembly into the upper assembly and the locking tab will engage. WARNING: THE MAGNETS ARE USED FOR GUIDING THE UNIT ONLY! PLEASE MAKE SURE THE TWO (2) M4 X 12MM SCREWS ARE USED TO SECURE THE PROJECTOR. 4. Attach the two (2) M4 x 12mm security screws and washers that are located on each side of the locking tab. NOTE: Do not release your hold on the projector until the upper and lower assemblies are engaged and the locking tab is in place. NOTE: If you choose to use the center mounting point for added security, detach the adjustable suspension neck by removing the two (2) M6 x 12mm security screws, drive the wood screw in place and reattach the adjustable suspension neck and security screws. After the projector has been installed, the projector must then be adjusted. To adjust the projector: 1. Loosen the M5 set screw using the M5 Allen wrench (both sides). 2. Adjust the projector to the correct position. Firmly grasp the projector in both hands, and tilt either forward or backward to adjust the level. -ORFirmly grasp the projector in both hands and rotate side to side for orientation adjustment. 3. Tighten the M5 set screw on both sides using the M5 Allen wrench. Height Adjustment 1. To adjust the height of the PAM-200, hold the weight of the projector and loosen the two (2) M6 x 12mm security screws. 2. Slide the adjustable suspension neck into the desired position. 3. Retighten the two (2) M6 x 20mm security screws. NOTE: Do not release the projector until the M6 screws are completely tight. M5 Allen Wrench M6 x 12mm Security Screw M6 x 20mm Security Screws Page - 6 - Adjustable Suspension Neck M4 x 12mm Security Screw and Star Washer M5 Set Screw Installation Manual
-
 1
1 -
 2
2 -
 3
3 -
 4
4 -
 5
5 -
 6
6 -
 7
7 -
 8
8
 |
 |
