Sony PCV-RS220 Online Help Center (User Guide)
Sony PCV-RS220 - Vaio Desktop Computer Manual
 |
View all Sony PCV-RS220 manuals
Add to My Manuals
Save this manual to your list of manuals |
Sony PCV-RS220 manual content summary:
- Sony PCV-RS220 | Online Help Center (User Guide) - Page 1
and software applications included with your system. View the Electronic Flyer, which provides updates and supplemental information about your computer. View the VAIO® Computer Specifications, which lists your computer's hardware specifications and preinstalled software information. Page 1 - Sony PCV-RS220 | Online Help Center (User Guide) - Page 2
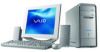
Started Congratulations on your purchase of the Sony VAIO® computer! Your new, high-performance, multimedia computer combines state-of-the-art computer functionality with the latest audio, video and information technology features. Unpacking Your Computer Planning An Ergonomic Work Space Page - Sony PCV-RS220 | Online Help Center (User Guide) - Page 3
included with your system. To access the online manual: 1. Click Start in the Windows taskbar, then click VAIO Help and Support. 2. From the VAIO Help and Support Center menu, click VAIO User Guide. Creating DVDs - (For models equipped with a DVD-RW drive) This online guide provides information - Sony PCV-RS220 | Online Help Center (User Guide) - Page 4
3. Click the Welcome link. The Welcome page displays in the right-side frame. 4. Locate the link in the text, "View the VAIO® Computer Specifications..." Other Software Library containing the Microsoft software license agreement and Sony end-user license agreement. Page 4 - Sony PCV-RS220 | Online Help Center (User Guide) - Page 5
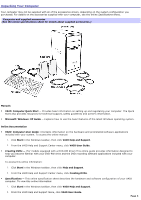
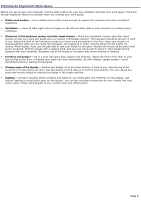
you set up your new computer, find the best location for your new computer and plan your work space. There are several ergonomic factors to consider when you arrange your work space: Stable work surface - Use a stable work surface large enough to support the computer and other peripheral equipment - Sony PCV-RS220 | Online Help Center (User Guide) - Page 6
on your computer. Your computer may not be equipped with all of these hardware features and the location of the controls, ports, and jacks may vary from the illustrations shown in this section. To view the specific connection capabilities for your system, see the online specifications sheet. About - Sony PCV-RS220 | Online Help Center (User Guide) - Page 7
panel of your VAIO® Computer enables access to the optical and floppy disk drives. It also includes access to the Universal Serial Bus (USB) and i.LINK® ports that enable you to connect compatible peripheral devices. Front panel 1 Optical drive 1 See the online specifications sheet for optical - Sony PCV-RS220 | Online Help Center (User Guide) - Page 8
floppy disk. 11 Power indicator (VAIO) Light is blue when the computer is on. The light turns off when the computer is in Standby mode or turned off. 12 Hard disk drive and optical disc drive access indicator Light is amber while reading and writing data. 13 Universal Serial Bus (USB 2.0) ports - Sony PCV-RS220 | Online Help Center (User Guide) - Page 9
icons on the back panel locate and identify the ports and jacks on your computer. Your system may vary based on the configuration you purchased. Back panel 1 AC Input port Connection for the supplied power cord. 2 Mouse port Connection for a PS/2® mouse. 3 Keyboard port Connection for a PS - Sony PCV-RS220 | Online Help Center (User Guide) - Page 10
full/low-speed USB devices. 6 supplied speakers or optional headphones. 11 Line In jack Connection for an audio computer. 14 Modem line jack Connection for the modem cable to the wall jack. i.LINK is a trademark of Sony system, such as an optical or hard disk drive, confirm their operating system - Sony PCV-RS220 | Online Help Center (User Guide) - Page 11
key arrangement with additional keys that perform specific functions. VAIO Keyboard KEY DESCRIPTION Function The 12 function speaker. Press the Mute button again to restore Standby Press the button to place the computer in Standby mode. Press the Power button or any key briefly, to resume - Sony PCV-RS220 | Online Help Center (User Guide) - Page 12
arrow and correction keys on the numeric keypad area are active. Caps Lock The Caps Lock indicator lights up to advise you that the keyboard is set to type letters in uppercase. When the indicator is off, the letters appear in lower case as you type. Scroll Lock The Scroll Lock indicator lights up - Sony PCV-RS220 | Online Help Center (User Guide) - Page 13
the online specifications sheet for your system's configuration. Connecting a Display (Monitor) Connecting the Speakers Connecting the Keyboard and Mouse Connecting the Telephone and Modem Cables Connecting the Power Cords Turning On Your Computer Registering your Computer Setting Up - Sony PCV-RS220 | Online Help Center (User Guide) - Page 14
Connecting a Display (Monitor) Plug the display's cable into the Monitor port. If necessary, plug the display's cable into the back of the display. To connect a display Install your equipment so that you can easily reach the power outlet in the event of an emergency. Page 14 - Sony PCV-RS220 | Online Help Center (User Guide) - Page 15
the Speakers The right and left speakers are attached. The right speaker has a speaker wire that ends in a jack connector and an AC cord that supplies power to both speakers. 1. From the right speaker, plug the jack connector into the Headphones jack located on the back panel of your - Sony PCV-RS220 | Online Help Center (User Guide) - Page 16
Connecting the Keyboard and Mouse 1. Plug the keyboard cable into the keyboard port on the back of the computer. 2. Plug the mouse cable into the mouse port on the back of the computer. To connect the keyboard and m ouse Page 16 - Sony PCV-RS220 | Online Help Center (User Guide) - Page 17
wall jack and plug its cable into the telephone jack located on the back panel of your computer. 2. Plug the modem cable (supplied) into the modem line jack located on the back panel of your computer 3. Plug the other end of the modem cable into the wall jack. To connect the telephone and - Sony PCV-RS220 | Online Help Center (User Guide) - Page 18
Connecting the Power Cords 1. Plug the power cord connector into the AC Input port, located on the back panel of the computer. 2. Plug both the display and computer power cords into a grounded AC wall outlet or a power strip. To connect the power cords Page 18 - Sony PCV-RS220 | Online Help Center (User Guide) - Page 19
On Your Computer When you start your system for the first time, your computer may detect new equipment and display a dialog box that prompts you to restart your computer. Respond to this prompt immediately. 1. Press the power button on the computer to turn on the power. 2. Press the power button on - Sony PCV-RS220 | Online Help Center (User Guide) - Page 20
with a Support Representative to troubleshoot problems you may be having with your computer. Limited warranty - Protect your investment. See the Warranty Card for more details. You are prompted to register your computer the first time you turn on the unit. Follow the on-screen instructions to - Sony PCV-RS220 | Online Help Center (User Guide) - Page 21
Connection The first time you turn your computer on, follow these steps to set up your dial-up connection: 1. Click Start from the Windows taskbar and select All Programs. 2. Point to Accessories, point to Communications, and then click New Connection Wizard. The Location Information window appears - Sony PCV-RS220 | Online Help Center (User Guide) - Page 22
5. Follow the on-screen instructions to finish setting up your dial-up connection. Page 22 - Sony PCV-RS220 | Online Help Center (User Guide) - Page 23
4. Turn off any peripheral devices connected to your computer. If you plan to turn off your computer for a short period of time, you may want to use Stand by mode instead. About the power button If your system stops responding, press and hold the Power button for more than six seconds to force your - Sony PCV-RS220 | Online Help Center (User Guide) - Page 24
VAIO® computer has a collection of preinstalled audio and video (AV) applications that make it easy to use your system's advanced multimedia features. Your computer may not be supplied with all of the software applications listed, depending on the system configuration you purchased. Your computer - Sony PCV-RS220 | Online Help Center (User Guide) - Page 25
visualizer, a sleek player skin design, audio CD burning capability, and a parametric equalizer for fine-tuning audio playback. VAIO Media software-makes it easy to share video, images, and music between the VAIO computers on a network. A single VAIO computer becomes the media server, providing - Sony PCV-RS220 | Online Help Center (User Guide) - Page 26
on your VAIO® computer makes it easy to import and edit videos from a compatible digital video (DV) or MICROMV camera equipped with an i.LINK® port. You can save finished movies to your hard disk drive to use on the Internet, to send to others by e-mail, or to distribute on CD media using - Sony PCV-RS220 | Online Help Center (User Guide) - Page 27
connecting your digital video camera to your computer, see the manual supplied with your camera. video clips from a compatible digital video (DV) camera. Combine your clips into a finished movie and export it back to your compatible digital video camera. DVgate software does not support MICROMV video - Sony PCV-RS220 | Online Help Center (User Guide) - Page 28
LINK® cable (optional) between the i.LINK ports on your computer and on a compatible digital video (DV) camera. 2. Turn on the DV camera and specify a location on your hard disk drive where the video clips is saved. In most cases, the default location of your D: drive partition is a good choice. You - Sony PCV-RS220 | Online Help Center (User Guide) - Page 29
. 3. In the ADD dialog box, select the video clip files you want to include in your combined movie hard disk drive. The Save As dialog box appears. 8. Save your movie to the desired location, type a name for your movie, and click Save. If you intend later to export your movie to your digital video - Sony PCV-RS220 | Online Help Center (User Guide) - Page 30
to turn off the computer when connecting the camcorder. DVgate software does not support MICROMV digital video cameras. Under the Microsoft® Windows® XP operating system, do not capture DV- AVI video files to the root directory (the top level) of your hard disk drive. Instead, create a folder - Sony PCV-RS220 | Online Help Center (User Guide) - Page 31
The DVgate software does not support hard disk compression. To maximize recording capabilities, video and audio data are not available while you are recording. If the DVgate software indicates that frames are dropped, try closing all open applications or defragmenting your hard drive. Page 31 - Sony PCV-RS220 | Online Help Center (User Guide) - Page 32
floppy disk or Memory Stick media is inserted into your computer, you can copy your pictures to your hard disk drive. About cameras without USB connectivity If your digital camera does not have a USB connection or is not directly supported by the Windows XP operating system, see the manual supplied - Sony PCV-RS220 | Online Help Center (User Guide) - Page 33
, and photo collections can only be viewed or edited using PictureGear Studio software. To share a PictureGear Studio creation over the Internet or by using another computer, use the Export feature. See the section, To export a photo album. Page 33 - Sony PCV-RS220 | Online Help Center (User Guide) - Page 34
Stick® media is displayed in a Select Device window. Connect your digital camera or camcorder to your computer, or insert your Memory Stick media into the appropriate slot, before attempting to import pictures. Select Dev ice window 2. Click List to view all pictures that are located on - Sony PCV-RS220 | Online Help Center (User Guide) - Page 35
a folder option. If you are importing to a new folder, type in the folder name before clicking Start the right and thumbnail versions on the left. Save to relocate the individual picture to a new folder. Delete to remove the picture from the photo collection. Rotate to change the picture - Sony PCV-RS220 | Online Help Center (User Guide) - Page 36
Using the PhotoCollection feature You can organize and manage your imported pictures on your computer's hard drive or from your ImageStationSM account. 1. Click PhotoCollection. A list of available photo sources is displayed on the left, with the selected source's contents displayed as thumbnail - Sony PCV-RS220 | Online Help Center (User Guide) - Page 37
on the right. Binder window You can create your own custom binder styles by clicking Create Title. 2. Select a binder style, then click New Page. Available photo sources are displayed as thumbnails. 3. Click to select a photo. An information form appears. 4. Fill in your information and click - Sony PCV-RS220 | Online Help Center (User Guide) - Page 38
albums with friends and family. 1. Click PhotoAlbum. PhotoAlbum window 2. Click New Album. The Select Photo area appears. If you want to work on a previously created album, do not click Create New Album. Instead, select the desired album from the Album Collection view on - Sony PCV-RS220 | Online Help Center (User Guide) - Page 39
5. Click to select a design layout for your album. Use the scroll bar to view all available album designs. A Select Layout window appears. Select Layout window 6. Click to select a page layout for your album. Use the scroll bar to view all available layout designs. A preview of your selected design - Sony PCV-RS220 | Online Help Center (User Guide) - Page 40
Export as a Light Package to create a compressed file that can be viewed on a computer. Export as a Full Package to create an uncompressed file to be saved to recordable media, such as a CD-R/CD-RW or Memory Stick® media. Export your completed photo album to enable viewing over the Internet, with - Sony PCV-RS220 | Online Help Center (User Guide) - Page 41
3. Click to select an export format. A Select Folder window appears. Select Folder window 4. Click Browse and navigate to the destination folder. Enter a file name, if desired. 5. Click Export. A progress window appears briefly. Finish Exporting window 6. An export completion message window appears, - Sony PCV-RS220 | Online Help Center (User Guide) - Page 42
number of copies to be printed and select a connected printer. Click Print. Use the appropriate paper when creating items, such as postcards, labels or business cards. Page 42 - Sony PCV-RS220 | Online Help Center (User Guide) - Page 43
copies of your audio CDs-On computer models equipped with a CD recording device, SonicStage software's Backing Up Audio CDs utility makes it easy to create backup copies of your audio CDs. Use Playlists to organize and manage your music-SonicStage software's powerful, hierarchical Playlist feature - Sony PCV-RS220 | Online Help Center (User Guide) - Page 44
Main window) Music Drive - View the audio files stored in the music database or registered to a Playlist. CD - View the contents of the audio CD or CD-R. Enables you to record audio files to the hard disk drive. MS - View the audio files stored on the MagicGate Memory Stick media, if one - Sony PCV-RS220 | Online Help Center (User Guide) - Page 45
Import window, where you can import audio files from the hard disk drive to the Music Drive. 11 Visualizer button Displays or hides the you can download or stream audio files via EMD services. 6 Categorized List (Tree view) Displays the playlists stored in the Music Drive by artist name, genre, - Sony PCV-RS220 | Online Help Center (User Guide) - Page 46
Optimization dialog box appears. Click Start to verify your optical drive. After the verification is performed, recording begins. 1. Insert an audio CD into your computer's optical drive. The Microsoft Windows® system recognizes the CD, and a window may appear asking you to select an action. Click - Sony PCV-RS220 | Online Help Center (User Guide) - Page 47
bit rate. See the online SonicStage Help guide for more information. 9. You have two options for recording the audio tracks on a CD: 1. Click the Record All button to record all the tracks on a CD. 2. Click the Rec Selection button to record the specific tracks you checked in the List Area. 10 - Sony PCV-RS220 | Online Help Center (User Guide) - Page 48
from the Music Drive to a USB device, a MiniDisc, or a MagicGate Memory Stick® media. For instructions on automatically checking in and out audio files, see the online SonicStage Help guide. To check-out songs 1. Connect the external device or insert the media into your computer. 2. Open SonicStage - Sony PCV-RS220 | Online Help Center (User Guide) - Page 49
Music Drive (or hard drive) of the same computer from which the songs were originally checked out. 1. Connect the external device or insert the media into your computer. Your computer of the Check-In/Out See the SonicStage Help guide for more information about using SonicStage software. Page 49 - Sony PCV-RS220 | Online Help Center (User Guide) - Page 50
in the Write to: drive list. 7. Click Start. The audio data is read from your audio CD. On computer models that have both a read-only optical drive (CD-ROM or DVD-ROM) and an optical writing drive (CD-RW or DVD-RW), the data is immediately written to the blank CD-R disc. The Copy Successful message - Sony PCV-RS220 | Online Help Center (User Guide) - Page 51
restore music, graphics, and information data managed by SonicStage software. You must be connected to the Internet to use the SonicStage Backup Tool. Import audio files in various formats-You can import audio mode can be changed by selecting a new "skin," which enhances the window's appearance. The Simple - Sony PCV-RS220 | Online Help Center (User Guide) - Page 52
or later installed can be VAIO Media servers for video. Image files-VAIO Media supports image files in JPEG, GIF, BMP, and TIFF formats. VAIO Media feature ov erv iew This guide provides a brief overview of the VAIO Media software and features. For detailed instructions about setting up and using - Sony PCV-RS220 | Online Help Center (User Guide) - Page 53
Media Software To share music, video, and photos with the VAIO Media system, set up one computer on your network as the central library or "media server," and install the VAIO Media client software on other computers. Computers on the network with the VAIO Media client software can then view the - Sony PCV-RS220 | Online Help Center (User Guide) - Page 54
Setting up a VAIO Media server computer A VAIO® computer that shipped with VAIO Media software preinstalled, can be used as a VAIO Media server, within a network environment. To support video files, the VAIO computer must have Giga Pocket software, vers.5.0 or later, installed. 1. Prepare your - Sony PCV-RS220 | Online Help Center (User Guide) - Page 55
. You can copy the file to storage media that can be read by the client computer, such as a CD-R disc or Memory Stick® media, for transfer and set up of the installer package to client computers. The VM20Inst.exe file is 16MB in size. Verify the capacity of the storage media before attempting - Sony PCV-RS220 | Online Help Center (User Guide) - Page 56
more than one client computer is actively seeking registration, only one client is registered. The registration process must be restarted for the next client computer. 8. Restart the client machine. A new icon, VAIO Home Network, appears. The installation is complete and users can access media files - Sony PCV-RS220 | Online Help Center (User Guide) - Page 57
Programs, and point to VAIO Media. Or click the VAIO Home Network icon on the desktop. The VAIO Media main window is displayed. VAIO Media m ain window 2. Click the content you want to access (MUSIC, PHOTO, or VIDEO). VAIO Media searches for an available VAIO Media server computer on your network - Sony PCV-RS220 | Online Help Center (User Guide) - Page 58
, thumbnail images of the image files in that folder are displayed. Click an image thumbnail to view the image file. Video Cabinets-When you click a folder in the Video Cabinets window, a list of Video Capsules in the cabinet is displayed. Click a Video Capsule on the list to view it. Page 58 - Sony PCV-RS220 | Online Help Center (User Guide) - Page 59
software can act as a VAIO Media video server. Client system requirements All client machines must be VAIO computers running Windows XP Home Edition or Windows XP Professional Edition operating system. Other computers and environments are not supported. All client computers must be on the same - Sony PCV-RS220 | Online Help Center (User Guide) - Page 60
may not be equipped with all of the hardware features described in this section, depending on the system configuration purchased. To view the specific hardware configuration for your computer, see the online specifications sheet. About Your Hard Disk Drive About i.LINK Compatibility Page 60 - Sony PCV-RS220 | Online Help Center (User Guide) - Page 61
About Your Hard Disk Drive To improve the performance of Sony audio and video software applications, the hard disk drive on your computer has been formatted with two partitions, drives C and D. Some Sony software applications save files to the drive D partition. This prevents large video captures - Sony PCV-RS220 | Online Help Center (User Guide) - Page 62
About i.LINK Compatibility Your VAIO® computer may be equipped with a 4-pin and/or a 6-pin i.LINK port, depending on the system configuration purchased. A 4-pin i.LINK port cannot supply power to a connected i.LINK device. A 6-pin i.LINK port can supply power (10V to 12V) to a connected i.LINK - Sony PCV-RS220 | Online Help Center (User Guide) - Page 63
's System Reference Manual. You can download the System Reference Manual from the Sony Computing Support Web site at http://www.sony.com/pcsupport. Overview About Opening your System About Add-on Card Installation About Installing Memory About the Lithium Battery About Hard Disk Drive - Sony PCV-RS220 | Online Help Center (User Guide) - Page 64
may vary from the illustrations, depending the computer purchased. To view the specific hardware configuration for your system, see the online specifications sheet. Before upgrading your computer Disconnect the computer from its power source and from telecommunications links, networks, or modems - Sony PCV-RS220 | Online Help Center (User Guide) - Page 65
and turn off all peripheral devices, such as your printer. 2. Unplug your computer and disconnect any peripheral devices. 3. Position the system unit so that the back panel is facing towards you. 4. Unscrew the three cover release screws located on the edges of the back panel and - Sony PCV-RS220 | Online Help Center (User Guide) - Page 66
Replacing the cover 1. Carefully align the cover to the chassis frame. The cover should align evenly against the chassis. 2. Slide the cover firmly onto the unit, sliding it forward until the cover snaps into place. 3. Replace the release screws. Replacing the cov er Page 66 - Sony PCV-RS220 | Online Help Center (User Guide) - Page 67
models, such as Configure-to-Order (CTO) systems, may contain preinstalled add-on cards. Observe the proper safety precautions when you add cards to your Sony computer. See Before upgrading your computer. Installing an add-on card 1. Shut down your computer and turn off all peripheral devices, such - Sony PCV-RS220 | Online Help Center (User Guide) - Page 68
6. Attach any internal cables that the card requires. See the instructions supplied with the add-on card. 7. Replace the cover. See Replacing the cover. 8. Reconnect the power cord and all peripheral devices. 9. Turn on the computer. Page 68 - Sony PCV-RS220 | Online Help Center (User Guide) - Page 69
may vary, depending on the system configuration you purchased. Your computer may ship with all available memory slots filled. See the online specifications sheet for details about the amount of memory installed in your computer. For memory replacement or upgrades, use only 2.5 V, 64-bit, PC2100 - Sony PCV-RS220 | Online Help Center (User Guide) - Page 70
2. Unplug your computer and any peripheral devices. 3. Remove the cover. See Removing the cover. 4. Gently place the unit on its side. If necessary, remove any cables, add-on cards, or other components to access the memory module slots. 5. Remove the memory module from its anti-static package, - Sony PCV-RS220 | Online Help Center (User Guide) - Page 71
You can return your unwanted lithium batteries to your nearest Sony Service Center or Factory Service Center. To locate a Service Center near you, visit the Sony Computing Support Web site at http://www.sony.com/pcsupport. Resetting the computer's date and time 1. Double-click on the time readout - Sony PCV-RS220 | Online Help Center (User Guide) - Page 72
2. From the Date & Time tab, change the settings as desired. Click Apply, then click OK. Page 72 - Sony PCV-RS220 | Online Help Center (User Guide) - Page 73
upgrading your computer. Replacing the original hard disk drive If you replace the original, factory-installed hard disk drive, your system cannot restore the drive partitions, operating system, or original software, using the instructions provided in the section, Using the VAIO Recovery Wizard - Sony PCV-RS220 | Online Help Center (User Guide) - Page 74
. 12. Connect the second drive connector to the new drive. Orient the connector to align pin 1 on the red side of the ribbon cable with pin 1 on the new drive. 13. Connect the second power connector to the new drive, following the instructions supplied with the drive. Replacing the driv e holder - Sony PCV-RS220 | Online Help Center (User Guide) - Page 75
the Unallocated area of the disk and then right-click to display a shortcut menu. 7. Select New Partition. The New Partition wizard appears. 8. Follow the wizard's on-screen instructions to complete the process. The Windows® XP operating system recognizes the new hard disk drive and applies the NTFS - Sony PCV-RS220 | Online Help Center (User Guide) - Page 76
enables you to recover your computer's operating system and preinstalled software. The information1 provided in this section, describes the recovery process. Creating a Recovery Startup CD Overview of System and Application Recovery Using the VAIO Recovery Wizard 1 T he s c reen views s hown - Sony PCV-RS220 | Online Help Center (User Guide) - Page 77
a Recovery Startup CD A recovery startup CD can be used to start your computer in the event your system is unable to start normally. Sony recommends creating a recovery startup CD when you begin using your machine. If you have previously created a recovery startup CD, the VAIO Recovery Startup CD - Sony PCV-RS220 | Online Help Center (User Guide) - Page 78
or use your system in any way during the Recovery Startup CD creation process. VAIO Recov ery Startup CD Wizard (Status) 5. When the message, The VAIO Recovery Startup CD is complete, is displayed, click Next. 6. Follow the onscreen instructions to properly label your Recovery Startup CD and store - Sony PCV-RS220 | Online Help Center (User Guide) - Page 79
. The VAIO System Recovery Utility begins. 4. After the system recovers, remove the recovery startup CD from the drive. Click Finish. Some recovery options are not available if you use the recovery startup CD to start your computer. To disable the screen saver 1. Right click on the Windows® desktop - Sony PCV-RS220 | Online Help Center (User Guide) - Page 80
3. In the Screen saver area, open the drop-down list box and select (None). Click Apply. 4. Click OK. Page 80 - Sony PCV-RS220 | Online Help Center (User Guide) - Page 81
and Application Recovery A system or application recovery may become necessary if your computer becomes unstable or the operating system and original software stops working properly. Your system's data is not retained during the system recovery process. Perform a full backup of your system's data to - Sony PCV-RS220 | Online Help Center (User Guide) - Page 82
screen saver) Avoid connecting or disconnecting peripheral equipment, such as a USB or i.LINK® device. Maintain power to the system during the recovery process. Using the Recovery Wizard utility may require you to restart your system, even if you cancel and exit the wizard. 3. Click Next. You - Sony PCV-RS220 | Online Help Center (User Guide) - Page 83
have not created your Recovery Startup CD, select the option, Create Recovery Startup CD and click Next. For more information, see Creating a Recovery Startup CD 4. If you have already created a Recovery Startup CD, select the option, "I have already created the Recovery Startup CD" and click Next - Sony PCV-RS220 | Online Help Center (User Guide) - Page 84
Default System Drive Recovery (Recommended) Your computer's drive C is restored to the original factory-installed settings. All data on drive C is deleted. Data on other drive partitions or other hard disk drives are not changed. The system recovery process cannot be interrupted once it has been - Sony PCV-RS220 | Online Help Center (User Guide) - Page 85
computer. Full System Recovery 1. Select the option, Full System Recovery and click Next. In the section, Current Partition Information, the current partition size settings for your system are displayed. In the section, New Partition Information, the pie chart shows the division of the hard disk - Sony PCV-RS220 | Online Help Center (User Guide) - Page 86
Select the option, Operating System and Drivers Recovery Only and click Next. In the section, Current Partition Information, you can see the current partition size settings for your system. In the section, New Partition Information, the pie chart shows the division of the hard disk according to your - Sony PCV-RS220 | Online Help Center (User Guide) - Page 87
If you select the Application Recovery option, you cannot return to the system recovery portion of the VAIO Recovery Wizard without restarting your computer. 2. Click the checkbox for each software application you want to recover. You may need to use the scrollbar to view all available software. - Sony PCV-RS220 | Online Help Center (User Guide) - Page 88
properly. If your hard drive loses its partitions and you are not able to restore your system using the instructions provided here, you can order a Partition Recovery CD Assembly (PRCD ASSY) to restore your system. To order the Partition Recovery CD Assembly: 1. Go to the Sony Direct Accessories and - Sony PCV-RS220 | Online Help Center (User Guide) - Page 89
how to troubleshoot common problems. You can also find helpful information on how to use your computer's hardware features and preinstalled software. Your computer may not be equipped with all of the features or software discussed in this section, depending on the system configuration purchased - Sony PCV-RS220 | Online Help Center (User Guide) - Page 90
a bootable floppy disk). Confirm that a CD is not in an optical drive (unless you are using a bootable CD). Confirm that the power cord and all cables are connected firmly. If you plugged the computer into a power strip or Uninterruptible Power Supply (UPS), make sure the power strip or UPS - Sony PCV-RS220 | Online Help Center (User Guide) - Page 91
? You can find details about the drives, cards, and memory modules that are installed on your system by viewing the online specifications sheet. This online document describes the hardware configuration of your VAIO computer. To access the online specifications sheet: 1. Click Start in the Windows - Sony PCV-RS220 | Online Help Center (User Guide) - Page 92
The Welcome page displays on the right. 4. Locate the link in the text, "View the VAIO® Computer Specifications..." 1 C ertain V A I O c omputers are not equipped with a floppy dis k drive. Y ou c an purc has e this equipment s eparately. 2 Y our V A I O c omputer may not be equipped with a parallel - Sony PCV-RS220 | Online Help Center (User Guide) - Page 93
Software Your computer may not be supplied with all of the software discussed in this section, depending on the system configuration you purchased. How do I create an audio CD with preinstalled Sony software? Your VAIO® computer has SonicStage software preinstalled on your computer. SonicStage is - Sony PCV-RS220 | Online Help Center (User Guide) - Page 94
menu, click VAIO User Guide. 3. Click the Welcome link. The Welcome page displays on the right. 4. Locate the link in the text, "View the VAIO® Computer Specifications..." 1 U nauthorized duplic ation of audio or video files is a violation of applic able laws . 2 T he read/write drive letter des - Sony PCV-RS220 | Online Help Center (User Guide) - Page 95
according to the manufacturer's instructions. If your drive reads some DVDs or CDs, but not others, check the shiny side of the disc for dirt or scratches. To recover the CD or DVD software applications that are preinstalled on your computer, see Application Recovery for more information. Why - Sony PCV-RS220 | Online Help Center (User Guide) - Page 96
read the disc. If necessary, remove the disc and check that it is not dirty or damaged. To recover the CD or DVD software applications that are preinstalled on your computer, see Application Recovery for more information. Why doesn't my recordable optical drive (DVD-RW/CD-RW) record to CD-RW media - Sony PCV-RS220 | Online Help Center (User Guide) - Page 97
USB mouse, verify that the mouse is plugged securely into the appropriate USB port. Save and close all open applications. Turn off your computer, wait approximately 10 seconds, and then restart your computer to reinstall the mouse drivers. See Application Recovery to reinstall VAIO Driver. How do I - Sony PCV-RS220 | Online Help Center (User Guide) - Page 98
Internet Service Providers ( by Sony are compatible with your computer's Troubleshoot button. The VAIO Help and Support Center window appears. 6. Follow the on-screen instructions to resolve the problem. You may need to reinstall the modem drivers. See Application Recovery to reinstall VAIO Driver - Sony PCV-RS220 | Online Help Center (User Guide) - Page 99
4. Select the Tone or Pulse option. Click OK. Page 99 - Sony PCV-RS220 | Online Help Center (User Guide) - Page 100
power strip. If your speakers have volume control, check the volume level. You cannot hear sound from your speakers if headphones are connected to your computer Speech, and Audio Devices, then click Adjust the system volume. 3. drivers. See Application Recovery to reinstall VAIO Driver. Page 100 - Sony PCV-RS220 | Online Help Center (User Guide) - Page 101
following these steps: 1. Click Start in the Windows taskbar, then click Control Panel. 2. Click Sounds, Speech, and Audio Devices, then click Sounds and Audio Devices. 3. From the Audio tab, locate the Sound recording section and click Volume. The Recording Control dialog box appears. 4. Select the - Sony PCV-RS220 | Online Help Center (User Guide) - Page 102
choose an alternate printer driver that your printer may emulate. Refer to the manual that came with your printer for specific emulation information. The connected printer does not function properly when the computer resumes from a powersaving mode. Clear the printer memory by turning the printer - Sony PCV-RS220 | Online Help Center (User Guide) - Page 103
locating upgrade procedures. A support resource listing is also provided to help you locate the appropriate support options. About the Power Source About Disposing of the Lithium Battery About Handling the Computer System About Handling a Monitor (Display) About DVD, CD, and Floppy Disk - Sony PCV-RS220 | Online Help Center (User Guide) - Page 104
on the system. To disconnect the cord, pull it out by the plug. Never pull the cord itself. Unplug your computer from the wall outlet if you will not be using the computer for a long time. Do not attempt to open the power supply. There are no user-serviceable parts in the power supply. To - Sony PCV-RS220 | Online Help Center (User Guide) - Page 105
be prohibited. You can return your unwanted lithium batteries to your nearest Sony Service Center or Factory Service Center. For the Sony Service Center nearest you, visit the Sony Computing Support Web site at http://www.sony.com/pcsupport. Do not handle damaged or leaking lithium batteries. The - Sony PCV-RS220 | Online Help Center (User Guide) - Page 106
on your computer. If any problem occurs, unplug your computer, and contact your Sony Service Center. The hard disk drive Your computer's hard disk has 5 GB allocated to a special recovery partition. This hard disk space is not available for use. See the section, Using the VAIO Recovery Wizard - Sony PCV-RS220 | Online Help Center (User Guide) - Page 107
not turn off the power while the computer is accessing the hard disk drive. The optical disc drives Your computer is equipped with two optical disc drives that have a drive eject button on the drive door. After pushing the eject button, wait for the drive to stop reading the CD. It may take a few - Sony PCV-RS220 | Online Help Center (User Guide) - Page 108
Handling a Monitor (Display) Do not change the display refresh rate to 85 Hz, as DVD playback and the DVgate software may not function correctly. Sony recommends that you keep your display at the preset, optimal refresh rate (75 Hz). Do not place the display near a strong magnetic force. Do - Sony PCV-RS220 | Online Help Center (User Guide) - Page 109
About DVD, CD, and Floppy Disk Media Handling CD or DVD media Do not touch the surface of the disc. Do not drop or bend the disc. Do not use adhesive labels to identify the disc. The label may come off while the disc is in use in the optical drive and damage the drive. Cleaning CD or DVD media - Sony PCV-RS220 | Online Help Center (User Guide) - Page 110
common problems or to locate technical support for your VAIO® computer. This section describes all available resources and offers suggestions on how to access this information for maximum results. Immediate Help and Support Software Help and Support Contacting Sony for Help and Support Page - Sony PCV-RS220 | Online Help Center (User Guide) - Page 111
find instructions on how to plan an ergonomic work space, connect power cords, cables and peripheral devices, register your computer with Sony, and establish a dial-up connection to the Internet. The Quick Start can also provide troubleshooting support, if problems occur. VAIO Computer User Guide - Sony PCV-RS220 | Online Help Center (User Guide) - Page 112
software, check with these software publishers to access troubleshooting support from the publisher's Web site, by e-mail, or by telephone. Your computer may not be supplied with all of the software discussed in this section, depending on the system configuration you purchased. To view the - Sony PCV-RS220 | Online Help Center (User Guide) - Page 113
www.corel.com phone 613-274-0500 hours M-F, 8:30 A.M.-7:30 P.M. (Eastern time) Sony Service Center To locate the Sony Service Center nearest you, visit the Sony Computing Support Web site at http://www.sony.com/pcsupport. Computing support is free of charge for 90 days after the original date of - Sony PCV-RS220 | Online Help Center (User Guide) - Page 114
call to the Sony Customer Information Services Center, have this basic information readily available. 1. VAIO® computer system type 2. Model number 3. Serial number1 4. Operating system 5. Hardware feature or software application that has a problem. (See Software Help and Support for the appropriate
-
 1
1 -
 2
2 -
 3
3 -
 4
4 -
 5
5 -
 6
6 -
 7
7 -
8
-
9
-
10
-
11
-
12
-
13
-
14
-
15
-
16
-
17
-
18
-
19
-
20
-
21
-
22
-
23
-
24
-
25
-
26
-
27
-
28
-
29
-
30
-
31
-
32
-
33
-
34
-
35
-
36
-
37
-
38
-
39
-
40
-
41
-
42
-
43
-
44
-
45
-
46
-
47
-
48
-
49
-
50
-
51
-
52
-
53
-
54
-
55
-
56
-
57
-
58
-
59
-
60
-
61
-
62
-
63
-
64
-
65
-
66
-
67
-
68
-
69
-
70
-
71
-
72
-
73
-
74
-
75
-
76
-
77
-
78
-
79
-
80
-
81
-
82
-
83
-
84
-
85
-
86
-
87
-
88
-
89
-
90
-
91
-
92
-
93
-
94
-
95
-
96
-
97
-
98
-
99
-
100
-
101
-
102
-
103
-
104
-
105
-
106
-
107
-
108
-
109
-
110
-
111
-
112
-
113
-
114
 |
 |

Welcome
Thank you for purchasing your Sony VAIO
®
computer! Your new computer is a superb blend of high technology and
easy-to-use functionality. The information provided here is designed to help you to become familiar with the hardware and
software applications included with your system.
View the
Electronic Flyer,
which provides updates and supplemental information about your computer.
View the
VAIO
®
Computer Specifications,
which lists your computer's hardware specifications and preinstalled
software information.
Page 1