Sony PCV-V100G Quick Start Guide - Page 25
To set up the wireless keyboard
 |
View all Sony PCV-V100G manuals
Add to My Manuals
Save this manual to your list of manuals |
Page 25 highlights
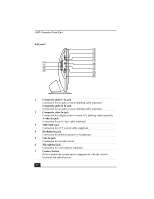
About the Keyboard 1 Battery compartment Storage compartment for the supplied AA batteries. 2 Keyboard feet Extend to adjust the keyboard height. 3 Connect button Press to enable the keyboard to communicate with the system unit. To set up the wireless keyboard Insert two AA batteries (supplied) into the wireless keyboard as shown. You can check your keyboard's battery power level by clicking (Wireless Keyboard icon), located in the Windows® taskbar notification area. Inserting batteries into the wireless keyboard ✍ If your wireless keyboard does not operate properly, the batteries may need to be replaced. If your wireless keyboard is not being used for extended periods of time, remove the batteries to avoid possible damage from battery leakage. 25
-
 1
1 -
2
-
3
-
4
-
5
-
6
-
7
-
8
-
9
-
10
-
11
-
12
-
13
-
14
-
15
-
16
-
17
-
18
-
19
-
 20
20 -
 21
21 -
 22
22 -
 23
23 -
 24
24 -
 25
25 -
 26
26 -
 27
27 -
 28
28 -
 29
29 -
 30
30 -
31
-
32
-
33
-
34
-
35
-
36
-
37
-
38
-
39
-
40
-
41
-
42
-
43
-
44
-
45
-
46
-
47
-
48
 |
 |
