Sony PMW200 User Manual (PMW-100 Memory Camcorder Operation Manual for Firmwar - Page 37
Recording, Basic Operation Procedure - reviews
 |
View all Sony PMW200 manuals
Add to My Manuals
Save this manual to your list of manuals |
Page 37 highlights
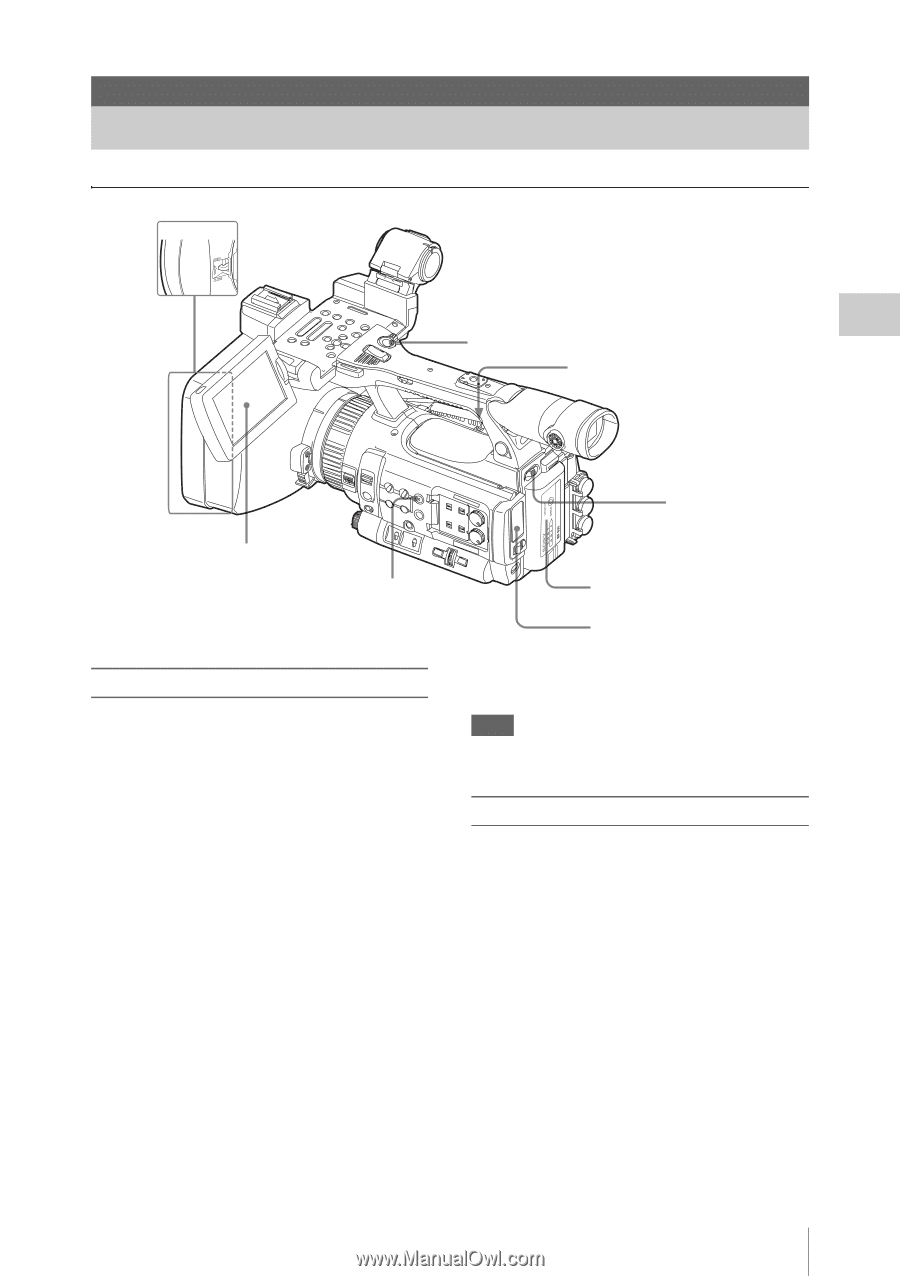
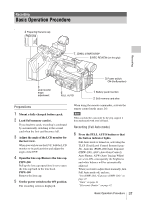
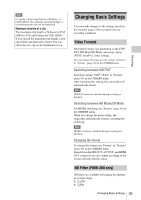
Recording Basic Operation Procedure 4 Preparing the lens cap PMW-200 7, 8 REC START/STOP 9 REC REVIEW (on the grip) Recording 3 LCD monitor angle adjustment 6 FULL AUTO 5 Power switch: ON (the " position) 1 Battery pack insertion 2 SxS memory card slots Preparations 1 Mount a fully charged battery pack. 2 Load SxS memory card(s). If you load two cards, recording is continued by automatically switching to the second card when the first card becomes full. 3 Adjust the angle of the LCD monitor for the best view. When you wish to use the EVF, fold the LCD monitor to its park position and adjust the angle of the EVF. 4 Open the lens cap./Remove the lens cap. PMW-200 Pull up the lens cap open/close lever to open the lens cap built in the lens hood. PMW-100 Remove the lens cap. 5 Set the power switch to the ON position. The recording screen is displayed. When using the remote commander, activate the remote control mode (page 24). Note When you hold the camcorder by the grip, support it from underneath with your left hand. Recording (Full Auto mode) 6 Press the FULL AUTO button so that the button indicator lights. Full Auto mode is turned on, activating the TLCS (Total Level Control System) (page 86). Auto Iris (PMW-200)/Auto Exposure (PMW-100), AGC (Auto Gain Control), Auto Shutter, ATW (Auto Tracing White) are set to ON, consequently the brightness and white balance will be automatically adjusted. When you wish to adjust them manually, turn Full Auto mode off, and see; "Iris (PMW-200) / Exposure (PMW-100)" on page 42 "Gain" on page 41 "Electronic Shutter" on page 41 Basic Operation Procedure 37
-
 1
1 -
2
-
3
-
4
-
5
-
6
-
7
-
8
-
9
-
10
-
11
-
12
-
13
-
14
-
15
-
16
-
17
-
18
-
19
-
20
-
21
-
22
-
23
-
24
-
25
-
26
-
27
-
28
-
29
-
30
-
31
-
 32
32 -
 33
33 -
 34
34 -
 35
35 -
 36
36 -
 37
37 -
 38
38 -
 39
39 -
 40
40 -
 41
41 -
 42
42 -
43
-
44
-
45
-
46
-
47
-
48
-
49
-
50
-
51
-
52
-
53
-
54
-
55
-
56
-
57
-
58
-
59
-
60
-
61
-
62
-
63
-
64
-
65
-
66
-
67
-
68
-
69
-
70
-
71
-
72
-
73
-
74
-
75
-
76
-
77
-
78
-
79
-
80
-
81
-
82
-
83
-
84
-
85
-
86
-
87
-
88
-
89
-
90
-
91
-
92
-
93
-
94
-
95
-
96
-
97
-
98
-
99
-
100
-
101
-
102
-
103
-
104
-
105
-
106
-
107
-
108
-
109
-
110
-
111
-
112
-
113
-
114
-
115
-
116
-
117
-
118
-
119
-
120
-
121
-
122
-
123
-
124
-
125
-
126
-
127
-
128
-
129
-
130
-
131
-
132
-
133
-
134
-
135
-
136
-
137
-
138
-
139
-
140
-
141
-
142
 |
 |