Sony RMT-VP1K Operating Instructions - Page 1
Sony RMT-VP1K Manual
 |
View all Sony RMT-VP1K manuals
Add to My Manuals
Save this manual to your list of manuals |
Page 1 highlights
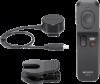
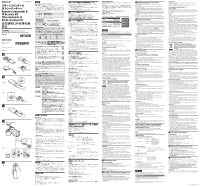
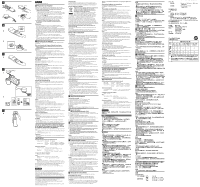
4-558-992-01(1) IR Remote Commander & IR Receiver Kit Télécommande et kit de récepteur IR Operating Instructions/ Mode d'emploi/Manual de instrucciones/ RMT-VP1K ©2014 Sony Corporation Printed in China ЌСႨb 1 4 2 5 3 7 6 10 12 11 9 8 13 14 2 3 2 1 a 2 A b MULTI MULTI 4 4 ͍ͩ͞ɻ ͍ɻ URL http://www.sony.co.jp/support ओͳಛ 360 ch1 ʙ ch3 ϦϞίϯ 1 2 TC RESETϘλϯɹ3 4 5 REC (START/STOP)Ϙλϯɹ 6 7 8 9 Ϩγʔόʔ 10 11 12 13 ϑοτɹ14 Ch1ʣ νϟϯωϧΛCh2/Ch3 1 Ch2/Ch3 2 4 2 1 2 1 1-a 90 2 OFF b 1 2 OFF RECʢSTART/STOP RECʢSTART/STOP LED LED Ch1 TC RESETϘλϯΛ5 OFF TC RESET TC RESET Aʣ T W ͍ͩ͞ɻ TC RESET Ch2 Ch3 ओͳ༷ 360 ਫฏɿ360 30ʢʶ15 45ʢʶ22.5 40ʢʶ20ʣ ϦϞίϯɿ 32 mm ʷ 122 mm ʷ 18.6 mm 37.1 mm ʷ 27 mm 350 mm ࣭ྔ 30 g 25 g ಉࠝ RMT-VP1ʣʢ1ʣɺIR RMT-RC1ʣʢ1 1 6 mm ʙ 12 mmɺ͞40 mm 1ؒͰ͢ɻ 7 RMT-VP1K Before operating the product, please read this manual thoroughly and retain it for future reference. WARNING To reduce the risk of fire or electric shock, 1) do not expose the unit to rain or moisture. 2) do not place objects filled with liquids, such as vases, on the apparatus. Do not expose the batteries to excessive heat such as sunshine, fire or the like. CAUTION Replace the battery with the specified type only. Otherwise, fire or injury may result. Dispose of used batteries according to the instructions. For Customers in the U.S.A. CAUTION You are cautioned that any changes or modifications not expressly approved in this manual could void your authority to operate this equipment. Note: This equipment has been tested and found to comply with the limits for a Class B digital device, pursuant to Part 15 of the FCC Rules. These limits are designed to provide reasonable protection against harmful interference in a residential installation. This equipment generates, uses, and can radiate radio frequency energy and, if not installed and used in accordance with the instructions, may cause harmful interference to radio communications. However, there is no guarantee that interference will not occur in a particular installation. If this equipment does cause harmful interference to radio or television reception, which can be determined by turning the equipment off and on, the user is encouraged to try to correct the interference by one or more of the following measures: --Reorient or relocate the receiving antenna. --Increase the separation between the equipment and receiver. --Connect the equipment into an outlet on a circuit different from that to which the receiver is connected. --Consult the dealer or an experienced radio/TV technician for help. This device complies with Part 15 of the FCC Rules. Operation is subject to the following two conditions: (1) This device may not cause harmful interference, and (2) this device must accept any interference received, including interference that may cause undesired operation. For the Customers in Europe Disposal of Old Electrical & Electronic Equipment (Applicable in the European Union and other European countries with separate collection systems) This symbol on the product or on its packaging indicates that this product shall not be treated as household waste. Instead it shall be handed over to the applicable collection point for the recycling of electrical and electronic equipment. By ensuring this product is disposed of correctly, you will help prevent potential negative consequences for the environment and human health, which could otherwise be caused by inappropriate waste handling of this product. The recycling of materials will help to conserve natural resources. For more detailed information about recycling of this product, please contact your local Civic Office, your household waste disposal service or the shop where you purchased the product. Notice for the customers in the countries applying EU Directives Manufacturer: Sony Corporation, 1-7-1 Konan Minato-ku Tokyo, 1080075 Japan For EU product compliance: Sony Deutschland GmbH, Hedelfinger Strasse 61, 70327 Stuttgart, Germany Notes on use Batteries ••Depending on how long ago the batteries were manufactured, they may have a shorter life even if they were provided as new batteries with this unit. We recommend having spare batteries. Battery capacity also decreases as the temperature drops, so allow the batteries to return to normal room temperature to restore them to their normal charge. Replacing the batteries ••If the operable distance from the remote commander to the camera becomes shorter, replace both batteries with new ones. Operating temperature ••Rapid changes in temperature cause condensation to form inside this unit. Before bringing this unit directly from a cold outdoor environment into a warm indoor environment, seal it in a plastic bag while you are outdoors and try to remove as much air as you can from inside the bag. Indoors, remove the unit from the bag when it has fully reached the surrounding temperature. Other cautions ••Be sure not to drop this unit or spill liquid on it. ••This unit is not waterproof. If it comes into contact with water, wipe it dry with a clean cloth and take it to your nearest dealer of Sony immediately. ••Never attempt to disassemble this unit. For repairs, always take it to a dealer of Sony. ••Never leave this unit where it may be subjected to very high temperatures, such as in direct sunlight inside a car, or to high humidity. ••Do not touch this unit with wet hands. This may cause electric shock. Cleaning ••When dirty, clean this unit with a clean, dry cloth. Never use a cleaning fluid that includes an organic solvent such as thinners, benzine, etc. ••After using this unit at a beach or where there is a sea breeze, wipe it clean with a dry cloth. Compatibility ••See the following URL for information about the compatibility of this unit with Interchangeable Lens Digital Cameras. http://www.sony.net Features ••This unit can operate basic recording functions (still image/video recording and zooming). ••The receiver can receive a signal from any direction in a 360-degree radius. ••You can change the initiating and receiving infrared signal with the channel selector switches on the receiver and remote commander. (ch1 to ch3) ••The RMT-VP1K is a Remote Commander Kit (referred below as "this unit") for operating devices that have a Sony Multi Terminal. This unit may not be compatible with all devices equipped with a Sony Multi Terminal. Please see the website of Sony for compatible models. Identifying the Parts Remote commander 1 Transmitter 2 TC RESET button 3 Zoom button 4 Release button (with locking function) 5 REC (START/STOP) button 6 Strap hole 7 Battery compartment 8 Battery compartment lid 9 Channel selector switch Receiver 10 Front sensor 11 Multi plug 12 Channel selector switch 13 Foot 14 Tripod screw hole Setting the Channel (Default setting: Ch1) If there is interference of the remote commander signals, such as when using more than one of these units, change the channel of this unit to Ch2 or Ch3. 1 Change the channel of the remote commander. Slide the battery compartment lid of the remote commander to open it, and set the channel selector switch to Ch2 or Ch3. 2 Change the receiver to the same channel as the remote commander. Preparing the Remote Commander Prepare batteries (not supplied). Using two AAA alkaline dry batteries manufactured by Sony is recommended. This device may not give the best performance with batteries of other manufacturers. 1 Insert the batteries into the battery compartment of the remote commander correctly according to the polarity mark inside. 2 Close the battery compartment lid of the remote commander by sliding it in the opposite direction to when opening it. Notes Be sure to confirm the poles of the battery. Inserting the battery with the pole in the wrong direction may cause leakage or ruptures. Preparing the Receiver Always turn off the power of the camera when attaching the receiver to the camera or removing the receiver from the camera. 1 Attach the foot of the receiver to the Multi Interface Shoe of the camera. ••If an external flash is attached to the Multi Interface Shoe of the camera, or if there is a pop-up function near the Multi Interface shoe, use the supplied clip to attach the receiver wherever you want, such as on a tripod. (See illustration -1-a) ••The operating distance is extended in the direction on the front sensor. The receiver can also be attached to the shoe of the camera in other directions with the front sensor of the receiver turned in increments of 90 degrees. 2 Connect the Multi plug of the receiver straight into the multi terminal of the camera. Notes ••When using this unit with a camera equipped with a remote sensor, turn off the remote sensor of the camera. ••When connecting the Multi plug of the receiver to the multi terminal of the camera (shaped as in (b)), if there is a mark on the multi terminal of the camera, align it with the mark on the plug. Forcing the plug in the wrong way round will cause a malfunction. ••Pulling the cable part of the receiver could damage the receiver, so hold the plug part when detaching. ••Be careful not to knock the receiver when attaching it to the camera with the supplied clip. The receiver may come away from the clip and fall. Using this Unit Also see the operating instructions of your camera. Turning on the camera 1 Turn on the camera and set it to standby mode. 2 Set the camera to the movie or still image mode. Notes ••You cannot use this unit if the power switch of the camera is set to OFF, or if it is in the power save mode. ••If you operate the remote commander near the camera, the eyepiece sensors of the camera may respond. Point the remote commander at the receiver to operate the camera. To record a moving image Press the REC (START/STOP) button. To stop recording, press the REC (START/STOP) button again. To record a still image Half-press the release button to bring the image into focus, and then fully press the button. When you half-press the release button, the LED of the receiver lights up, so you can confirm that the infrared signal reaches the receiver. You can turn off the LED of the receiver by pressing down the TC RESET button of the remote commander for 5 seconds or more when the remote commander and receiver are both set to Ch1. (TC RESET is also executed with cameras that have the TC RESET function.) Notes ••If you half-press the release button for too short a time, you may be unable to shoot still images or the images you shoot may be out of focus. Locking function (A) Set the camera to bulb shooting. Press the release button fully down and slide it in the direction of the arrow. The locking function lets you keep the release button pressed down. Notes ••With the release button locked, you do not have to keep pointing the transmitter of the remote commander at the receiver. ••When unlocking the release button, point the transmitter of the remote commander at the receiver first. ••Not all cameras support bulb shooting. See the operating instructions of your camera for details. ••Do not press or slide the release button with excessive force, or the remote commander may break. ••Do not leave the release button locked. Zooming Press the zoom button. T side (telephoto): Subject appears closer. W side (wide angle): Subject appears farther away. The zooming speed is slow when you press the zoom button lightly, and quick when you press the button all the way down. Notes ••The zooming speed changes depending on the camera models and lens models. ••The zoom function can be used with camera models and lens models that support power zoom. After recording Turn the camera off before removing the receiver. Notes ••Unplug the receiver cable from the camera when carrying the camera. TC RESET ••TC RESET is a function to reset the time code of the movie image. ••For details about compatible models, refer to the Instruction Manual of the camera. When operating a camera equipped with a remote sensor without using the receiver supplied with this unit You can operate still image recording and video recording. Ch2: Interchangeable lens digital camera manufactured by Sony Ch3: Video camera manufactured by Sony Notes ••Operations are not guaranteed for all cameras. Specifications Remote commander operating range 360-degree sensor Horizontal: 360 degrees Vertical: Approx. 30 degrees (± 15 degrees) Front sensor Horizontal: Approx. 45 degrees (± 22.5 degrees) Vertical: Approx. 40 degrees (± 20 degrees) Dimensions (Approx.) Remote Commander: 32 mm × 122 mm × 18.6 mm (1 5/16 in. × 4 7/8 in. × 3/4 in.) (w/h/d) Receiver : 37.1 mm × 27 mm (1 1/2 in. × 1 1/8 in.) (diameter/height) Length of receiver cable Approx. 350 mm (13 7/8 in.) Mass Remote Commander: Approx. 30 g (1.1 oz) (excluding the battery) Receiver: Approx. 25 g (0.9 oz) (excluding the clip) Included items Remote commander (RMT-VP1) (1), IR receiver (RMT-RC1) (1), Clip (with base for the IR receiver) (1), Set of printed documentation The clip can be attached to a tripod pan handle that has a diameter of 6 mm to 12 mm and a length of 40 mm or more. Design and specifications are subject to change without notice. Avant d'utiliser ce produit, lisez attentivement ce mode d'emploi et conservez-le pour toute référence ultérieure. AVERTISSEMENT Pour réduire les risques d'incendie ou d'électrocution, 1) n'exposez pas l'appareil à la pluie ou à l'humidité ; 2) ne placez pas d'objets remplis de liquides (vases, etc.) sur l'appareil. N'exposez pas les piles à une chaleur excessive, notamment aux rayons directs du soleil, à une flamme, etc. ATTENTION Remplacez la batterie par une batterie correspondant au type spécifié uniquement. Sinon vous risquez de provoquer un incendie ou des blessures. Éliminez vos piles usées selon les instructions. À l'intention des clients aux É.-U. AVERTISSEMENT : Par la présente, vous êtes avisé du fait que tout changement ou toute modification ne faisant pas l'objet d'une autorisation expresse dans le présent manuel pourrait annuler votre droit d'utiliser l'appareil. Note : L'appareil a été testé et est conforme aux exigences d'un appareil numérique de Classe B, conformément à la Partie 15 de la réglementation de la FCC. Ces critères sont conçus pour fournir une protection raisonnable contre les interférences nuisibles dans un environnement résidentiel. L'appareil génère, utilise et peut émettre des fréquences radio; s'il n'est pas installé et utilisé conformément aux instructions, il pourrait provoquer des interférences nuisibles aux communications radio. Cependant, il n'est pas possible de garantir que des interférences ne seront pas provoquées dans certaines conditions particulières. Si l'appareil devait provoquer des interférences nuisibles à la réception radio ou à la télévision, ce qui peut être démontré en allumant et éteignant l'appareil, il est recommandé à l'utilisateur d'essayer de corriger cette situation par l'une ou l'autre des mesures suivantes : --Réorienter ou déplacer l'antenne réceptrice. --Augmenter la distance entre l'appareil et le récepteur. --Brancher l'appareil dans une prise ou sur un circuit différent de celui sur lequel le récepteur est branché. --Consulter le détaillant ou un technicien expérimenté en radio/ téléviseurs. Cet appareil est conforme à la section 15 des règlements FCC. Son fonctionnement est soumis aux deux conditions suivantes : (1) cet appareil ne doit pas provoquer d'interférences nuisibles, (2) cet appareil doit accepter toute interférence, y compris celles susceptibles de provoquer son fonctionnement indésirable. Pour les clients en Europe Traitement des appareils électriques et électroniques en fin de vie (Applicable dans les pays de l'Union Européenne et aux autres pays européens disposant de systèmes de collecte sélective) Ce symbole, apposé sur le produit ou sur son emballage, indique que ce produit ne doit pas être traité avec les déchets ménagers. Il doit être remis à un point de collecte approprié pour le recyclage des équipements électriques et électroniques. En vous assurant que ce produit sont mis au rebut de façon appropriée, vous participez activement à la prévention des conséquences négatives que leur mauvais traitement pourrait provoquer sur l'environnement et sur la santé humaine. Le recyclage des matériaux contribue par ailleurs à la préservation des ressources naturelles. Pour toute information complémentaire au sujet du recyclage de ce produit, vous pouvez contacter votre municipalité, votre déchetterie locale ou le point de vente où vous avez acheté le produit. Avis aux consommateurs des pays appliquant les Directives UE Fabricant: Sony Corporation, 1-7-1 Konan Minato-ku Tokyo, 108-0075 Japon Pour toute question relative à la conformité des produits dans l'UE: Sony Deutschland GmbH, Hedelfinger Strasse 61, 70327 Stuttgart, Allemagne Remarques sur l'emploi Piles ••Selon le temps écoulé depuis leur fabrication, les piles peuvent avoir une autonomie réduite, bien qu'elles aient été livrées neuves avec cet appareil. Il est conseillé de toujours avoir à disposition des piles de rechange. L'autonomie des piles diminue également lorsque la température descend. Les piles reviennent à leur capacité de recharge normale lorsqu'elles sont revenues à une température ambiante normale. Remplacement des piles ••Si la portée de la télécommande vers l'appareil photo/caméscope diminue, remplacez les deux piles par des piles neuves. Température de fonctionnement ••Des variations rapides de température forment de la condensation à l'intérieur de cet appareil. Si cet appareil passe sans transition d'un environnement froid à un environnement chaud, mettez-le dans un sac en plastique lorsque vous êtes encore à l'extérieur et essayez d'extraire la plus grande quantité d'air possible du sac. Une fois à l'intérieur, retirez l'appareil du sac dès la température ambiante atteinte. Autres précautions à prendre ••Ne laissez pas tomber cet appareil et ne renversez pas de liquide dessus. ••Cet appareil n'est pas étanche. S'il devait être mouillé, essuyez-le avec un chiffon propre et portez-le immédiatement au revendeur Sony le plus proche. ••N'essayez jamais de démonter cet appareil. Pour toute réparation, portez-le toujours au revendeur Sony. ••Ne laissez jamais cet appareil à un endroit exposé à de très hautes températures (dans une voiture en plein soleil par exemple), ni à un taux d'humidité élevé. ••Ne touchez pas l'appareil avec les mains mouillées. Ceci peut causer une électrocution. Nettoyage ••Lorsque cet appareil est sale, nettoyez-le avec un chiffon sec et propre. N'utilisez jamais de détergent liquide composé d'un solvant biologique tel que les diluants, benzine, etc. ••Après avoir utilisé cet appareil à la plage ou à un endroit exposé aux embruns marins, nettoyez-le avec un chiffon sec. Compatibilité ••Reportez-vous à l'URL suivante pour plus d'informations sur la compatibilité de cet appareil avec un appareil photo à objectif interchangeable. http://www.sony.net Caractéristiques ••Cet appareil peut commander les fonctions d'enregistrement de base (prise de photos, enregistrement de films et zoom). ••Le récepteur peut recevoir un signal de toutes les directions dans un rayon de 360°. ••Vous pouvez modifier le signal infrarouge de déclenchement et de réception à l'aide des commutateurs de sélection de canal sur le récepteur et la télécommande. (ch1 à ch3) ••Le RMT-VP1K est un kit à télécommande (appelé ci-dessous « cet appareil ») pouvant être utilisé sur des appareils dotés d'un connecteur à usages multiples Sony. Cet appareil peut ne pas être compatible avec certains appareils dotés d'un connecteur à usages multiples Sony. Veuillez consulter le site de Sony pour les modèles compatibles. Identification des éléments Télécommande 1 Émetteur 2 Touche TC RESET 3 Touche de zoom 4 Déclencheur (avec fonction de verrouillage) 5 Touche REC (START/STOP) 6 Trou de sangle 7 Logement des piles 8 Couvercle du logement des piles 9 Commutateur de sélection de canal Récepteur 10 Capteur avant 11 Multiprise 12 Commutateur de sélection de canal 13 Sabot 14 Trou de vis de trépied Réglage du canal (par défaut : Ch1) En cas d'interférences des signaux de la télécommande, à l'utilisation de plusieurs appareils par exemple, utilisez le canal Ch2 ou Ch3 de cet appareil. 1 Changez le canal de la télécommande. Faites glisser le couvercle du logement des piles de la télécommande pour l'ouvrir, puis réglez le commutateur de sélection de canal sur Ch2 ou Ch3. 2 Changez le récepteur sur le même canal que celui de la télécommande. Préparation de la télécommande Préparez les piles (non fournies). L'utilisation de deux piles sèches alcalines AAA fabriquées par Sony est conseillée. Cet appareil peut ne pas fonctionner de manière optimale avec des piles d'autres marques. 1 Insérez les piles dans le logement de la télécommande en vous basant sur le repère de polarité indiqué à l'intérieur. 2 Fermez le couvercle du logement des piles de la télécommande en le faisant glissant dans le sens contraire à celui de l'ouverture. Remarques Veillez à bien orienter les pôles des piles. L'insertion d'une pile dans le mauvais sens peut entraîner une fuite ou une rupture de la pile. (Suite à la page arrière)
-
 1
1 -
 2
2
 |
 |