Sony SA-NS500 Quick Setup Guide - Page 1
Sony SA-NS500 Manual
 |
View all Sony SA-NS500 manuals
Add to My Manuals
Save this manual to your list of manuals |
Page 1 highlights
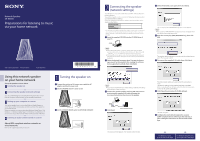
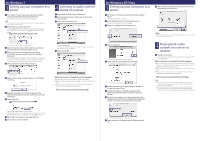
Network Speaker SA-NS500 Preparations for listening to music via your home network ©2011 Sony Corporation Printed in China 4-295-602-11(1) Using this network speaker on your home network Set up the speaker as shown below. Turning the speaker on Connecting the speaker (network settings) You can use the AirPlay function after performing both steps 1 and 2. Refer to "Using the AirPlay function" in the operating instructions. Setting up your computer as a server This section explains how to set up the Windows Media Player as a server (device where stored audio content) to connect this speaker to your home network. When you want to use a server other than Windows Media Player 12 of Windows 7 or Windows Media Player 11 of Windows Vista/Windows XP as your server, access the web site written on the back side of this flyer. Listening to audio content stored on a server About WPS compliant wireless networks or wired networks Refer to the supplied operating instructions. Turning the speaker on Connect the unit to an AC power source with the AC adaptor and the AC power cord. Set the OPERATE ON/OFF switch to ON. Set the STANDBY MODE switch to NETWORK STANDBY. Connecting the speaker (network settings) Your Windows PC must be connected to a wireless LAN router/access point in advance. You will be required to select or enter the following information when you make the network settings. Check the following information in advance and record them in the space provided below. Network name (SSID)* Security Key (WEP, WPA/WPA2 key)* * This information should be available from a label on your wireless LAN router/ access point, from the operating manual, from the person who set up your wireless network, or from the information provided by your Internet service provider. Insert the supplied CD-ROM into the CD-ROM drive of your PC. CD‑ROM Note If the "Starting the wireless connection setup" screen does not appear automatically, double-click [Computer] (For Windows XP: [My Computer]) [NSWFU_***]. *** are displayed as numerals in the actual screen. If the AutoPlay screen appears, select "Run NetworkSpeakerWiFiUtility.exe" and follow the instructions that appear on the screen to proceed with the installation. Select the desired language, select [I accept the license agreements for this product] after reading the software license agreement carefully, then click [Next]. Select the desired access point, then click [Next]. The security key (WEP, WPA/WPA2 key) input screen appears. Note The security key (WEP, WPA/WPA2 key) input screen does not appear when you select an unencrypted access point. Enter the security key (WEP, WPA/WPA2 key), then click [OK]. The speaker starts to attempt a connection to the selected access point. This may take a while. Disconnect the supplied LAN cable, then click [Next]. Note If you have not made the Windows firewall settings, make the UPnP settings following the on-screen instructions. Connect the speaker and the wireless LAN router/access point using the supplied LAN cable following the on‑screen instructions, then turn on the speaker. The LINK indicator lights up in green when the connection is made. The network settings for the speaker have been completed. Refer to steps 8 and 9, or the back side of this flyer for instructions on how to set up the DLNA settings. Click [Open the procedure for DLNA settings]. Click [Next]. Connect a LAN cable to LAN port. The access point list appears. This may take a few minutes. The web site opens. Configure the environment required to use your DLNA‑compliant devices referring to the web site, or after reading the instructions on the back side of this flyer. For Windows 7 users, go to left side of rear page For Windows Vista/XP users, go to right side of rear page
-
 1
1 -
 2
2
 |
 |