Sony SA-NS500 Quick Setup Guide - Page 2
for Windows 7, for Windows XP/Vista
 |
View all Sony SA-NS500 manuals
Add to My Manuals
Save this manual to your list of manuals |
Page 2 highlights
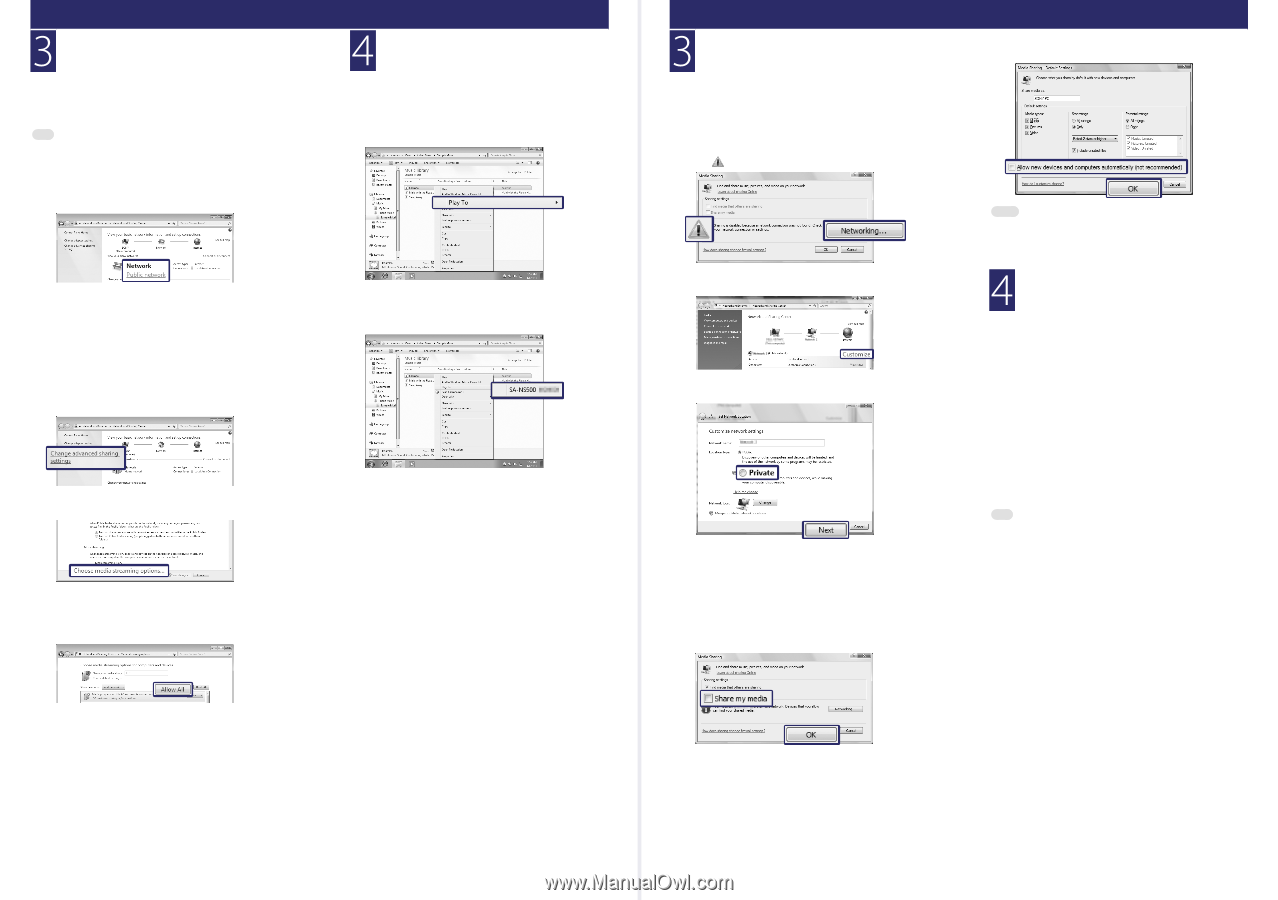
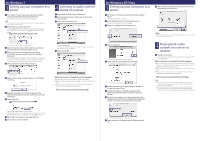
for Windows 7 Setting up your computer as a server Go to [Start] - [Control Panel] and select [View network status and tasks] under [Network and Internet]. The [Network and Sharing Center] window appears. Tip If the desired item does not appear in the display, try to change the display type used by the Control Panel. Check [View your active networks]. Go to step when [Home network] or [Work network] appears. Select [Public network] and go to step when [Public network] appears. Listening to audio content stored on a server Start [Windows Media Player] of Windows 7. Select the desired audio content, then click the right mouse button. Select [Play To] from the menu. The [Set Network Location] window appears. Select [Home network] or [Work network] according to the environment in which the speaker is used. Follow the instructions that appear on the display according to the environment in which the speaker is being used. When the change is completed, confirm that the item under [View your active networks] has been changed to [Home network] or [Work network] in the [Network and Sharing Center] window. Select [Change advanced sharing settings]. The device list appears. Close the window, then perform the process again from step 1 if the device list does not appear. Select [SA-NS500]. Select [Choose media streaming options...] from [Media streaming]. If [Media streaming is not turned on] appears in the Media streaming options window, select [Turn on media streaming]. Select [Allow All]. The audio content is played back from this speaker. When sound is not output from this speaker It may take several tens of seconds for sound to be output. Make sure the volume level of this speaker is not set to the minimum level. Changes in the settings of the security software may be needed. Access the following customer support site. http://www.sony.net/audio/netsettings for Windows XP/Vista Setting up your computer as a server Go to [Start] - [All Programs] and select [Windows Media Player]. Windows Media Player 11 starts up. Select [Media Sharing...] from the [Library] menu. If you are using Windows XP, go to step . When is displayed, select [Networking...]. Add a check next to [Allow new devices and computers automatically] and select [OK]. The [Network and Sharing Center] window appears. Select [Customize]. The [Set Network Location] window appears. Add a check next to [Private] and select [Next]. Confirm that the [Location type] has been changed to [Private] and select [Close]. Confirm that [(Private network)] is displayed in the [Network and Sharing Center] window and close the window. If a check is not added next to [Share my media] in the [Media Sharing] window that is displayed in step , add a check next to [Share my media], then select [OK]. Note Uncheck this item after you confirm that the speaker can connect to the PC and play audio data on the PC. Playing back audio content on a server at random Press on the remote. Audio content is played back only at random on the server which is recognized first. When sound is not output from this speaker Make sure that you select home network as the input. If the AirPlay indicator or the AUDIO IN indicator lights up, press the INPUT button repeatedly until both indicators go off. Make sure the volume level of this speaker is not set to the minimum level. Changes in the settings of the security software may be needed. Access the following customer support site. http://www.sony.net/audio/netsettings Tip This function allows you to play back audio content at random on the server which is recognized first. Turn off the server other than Windows Vista/Windows XP in advance. If you are using an iPhone or iPod touch, you can use those devices as a DLNA controller (music controller) with the "Network Audio Remote" application. You can download "Network Audio Remote" from the App Store. The [Allow all media devices] window opens. If [Allow All] cannot be selected, all the devices in the local network are [Allowed] to access your network. Go to step in this case. Select [Allow all computers and media devices]. Select [OK] to close the window. A list of connectable devices is displayed. Select [Settings...] that appears beside [Share my media to:].
-
 1
1 -
 2
2
 |
 |