Sony SLT-A35K Instruction Manual (Large File - 12.9 MB) - Page 109
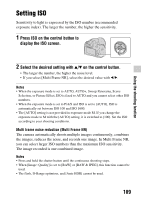
Setting ISO, Press ISO on the control button to, display the ISO screen.
 |
View all Sony SLT-A35K manuals
Add to My Manuals
Save this manual to your list of manuals |
Page 109 highlights
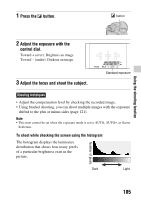
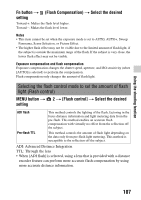
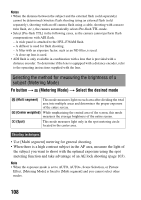
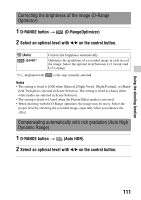
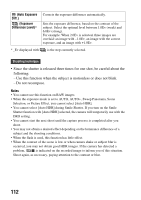
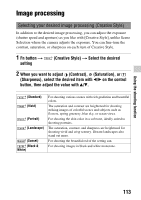
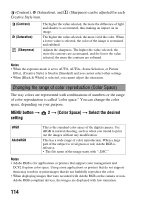
Using the shooting function Setting ISO Sensitivity to light is expressed by the ISO number (recommended exposure index). The larger the number, the higher the sensitivity. 1 Press ISO on the control button to display the ISO screen. 2 Select the desired setting with v/V on the control button. • The larger the number, the higher the noise level. • If you select [Multi Frame NR], select the desired value with b/B. Notes • When the exposure mode is set to AUTO, AUTO+, Sweep Panorama, Scene Selection, or Picture Effect, ISO is fixed to AUTO and you cannot select other ISO numbers. • When the exposure mode is set to P/A/S and ISO is set to [AUTO], ISO is automatically set between ISO 100 and ISO 1600. • The [AUTO] setting is not provided in exposure mode M. If you change the exposure mode to M with the [AUTO] setting, it is switched to [100]. Set the ISO according to your shooting conditions. Multi frame noise reduction (Multi Frame NR) The camera automatically shoots multiple images continuously, combines the images, reduces the noise, and records one image. In Multi Frame NR, you can select larger ISO numbers than the maximum ISO sensitivity. The image recorded is one combined image. Notes • Press and hold the shutter button until the continuous shooting stops. • When [Image: Quality] is set to [RAW] or [RAW & JPEG], this function cannot be used. • The flash, D-Range optimizer, and [Auto HDR] cannot be used. 109
-
 1
1 -
2
-
3
-
4
-
5
-
6
-
7
-
8
-
9
-
10
-
11
-
12
-
13
-
14
-
15
-
16
-
17
-
18
-
19
-
20
-
21
-
22
-
23
-
24
-
25
-
26
-
27
-
28
-
29
-
30
-
31
-
32
-
33
-
34
-
35
-
36
-
37
-
38
-
39
-
40
-
41
-
42
-
43
-
44
-
45
-
46
-
47
-
48
-
49
-
50
-
51
-
52
-
53
-
54
-
55
-
56
-
57
-
58
-
59
-
60
-
61
-
62
-
63
-
64
-
65
-
66
-
67
-
68
-
69
-
70
-
71
-
72
-
73
-
74
-
75
-
76
-
77
-
78
-
79
-
80
-
81
-
82
-
83
-
84
-
85
-
86
-
87
-
88
-
89
-
90
-
91
-
92
-
93
-
94
-
95
-
96
-
97
-
98
-
99
-
100
-
101
-
102
-
103
-
 104
104 -
 105
105 -
 106
106 -
 107
107 -
 108
108 -
 109
109 -
 110
110 -
 111
111 -
 112
112 -
 113
113 -
 114
114 -
115
-
116
-
117
-
118
-
119
-
120
-
121
-
122
-
123
-
124
-
125
-
126
-
127
-
128
-
129
-
130
-
131
-
132
-
133
-
134
-
135
-
136
-
137
-
138
-
139
-
140
-
141
-
142
-
143
-
144
-
145
-
146
-
147
-
148
-
149
-
150
-
151
-
152
-
153
-
154
-
155
-
156
-
157
-
158
-
159
-
160
-
161
-
162
-
163
-
164
-
165
-
166
-
167
-
168
-
169
-
170
-
171
-
172
-
173
-
174
-
175
-
176
-
177
-
178
-
179
-
180
-
181
-
182
-
183
-
184
-
185
-
186
-
187
-
188
-
189
-
190
-
191
-
192
-
193
-
194
-
195
-
196
-
197
-
198
-
199
-
200
-
201
-
202
 |
 |
