Sony SLT-A77V Instruction Manual (Large File - 18.18 MB) - Page 169
Setup of the camera, GPS setting (SLT-A77V only), MENU button, GPS Settings], GPS On/Off]
 |
View all Sony SLT-A77V manuals
Add to My Manuals
Save this manual to your list of manuals |
Page 169 highlights
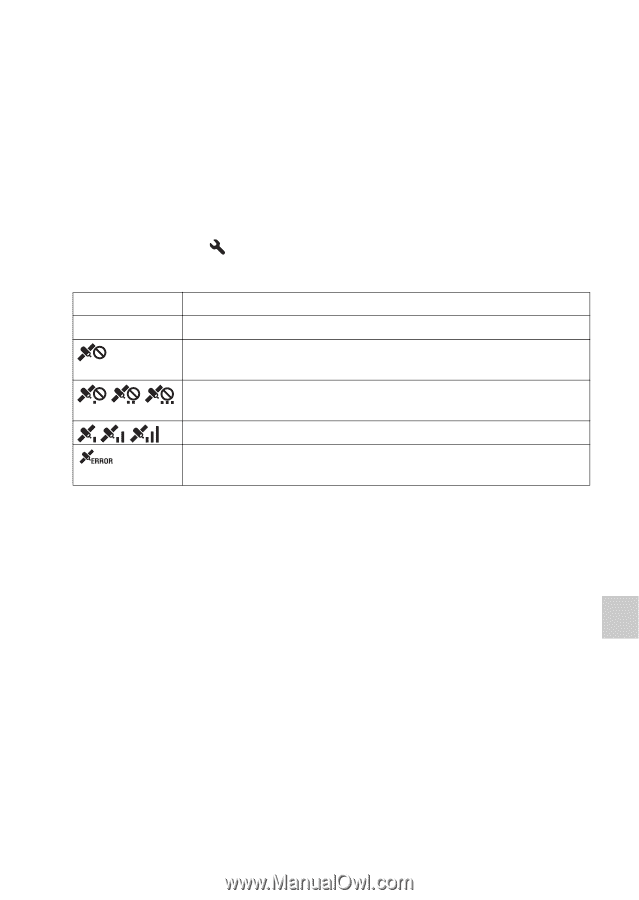
Setup of the camera (Advanced operations) Setup of the camera (Advanced operations) Setup of the camera GPS setting (SLT-A77V only) If the camera has acquired location information using the built-in GPS feature, this information is recorded in the images or movies at that location. Using the supplied software "PMB," you can import images recorded with location information to a computer and enjoy viewing them with a map which shows their shooting location. See "PMB Help" for details. MENU button t 1 t [GPS Settings] t [GPS On/Off] t [On] The indicator changes according to the strength of GPS signal reception. GPS indicators No indicator GPS reception status [GPS On/Off] is set to [Off]. Your camera cannot record the location information. Use your camera in an open area. Calculating the location information. Wait until the location information is recordable. The current location information is recordable. There is a problem with the GPS feature. Turn the camera off and on. To receive a GPS signal • Proper triangulation is not possible indoors or near tall buildings. Use your camera in an open area outside, and turn on your camera again. • It may take several tens of seconds to several minutes to acquire the location information. You can shorten the positioning time by using GPS assist data. Notes • Right after you turn the camera on, it may take several tens of seconds to several minutes to acquire the location information. If you shoot images with the location information not acquired, the information is not recorded. To record the correct information, wait until the camera can receive radio signals from GPS satellites. • During take off and landing of an airplane, turn off the camera, as you will be instructed to do by the on-board announcement. • Use GPS in accordance with the regulations of the place or situation. • For detailed notes on the GPS feature, see page 219. 169
-
 1
1 -
2
-
3
-
4
-
5
-
6
-
7
-
8
-
9
-
10
-
11
-
12
-
13
-
14
-
15
-
16
-
17
-
18
-
19
-
20
-
21
-
22
-
23
-
24
-
25
-
26
-
27
-
28
-
29
-
30
-
31
-
32
-
33
-
34
-
35
-
36
-
37
-
38
-
39
-
40
-
41
-
42
-
43
-
44
-
45
-
46
-
47
-
48
-
49
-
50
-
51
-
52
-
53
-
54
-
55
-
56
-
57
-
58
-
59
-
60
-
61
-
62
-
63
-
64
-
65
-
66
-
67
-
68
-
69
-
70
-
71
-
72
-
73
-
74
-
75
-
76
-
77
-
78
-
79
-
80
-
81
-
82
-
83
-
84
-
85
-
86
-
87
-
88
-
89
-
90
-
91
-
92
-
93
-
94
-
95
-
96
-
97
-
98
-
99
-
100
-
101
-
102
-
103
-
104
-
105
-
106
-
107
-
108
-
109
-
110
-
111
-
112
-
113
-
114
-
115
-
116
-
117
-
118
-
119
-
120
-
121
-
122
-
123
-
124
-
125
-
126
-
127
-
128
-
129
-
130
-
131
-
132
-
133
-
134
-
135
-
136
-
137
-
138
-
139
-
140
-
141
-
142
-
143
-
144
-
145
-
146
-
147
-
148
-
149
-
150
-
151
-
152
-
153
-
154
-
155
-
156
-
157
-
158
-
159
-
160
-
161
-
162
-
163
-
 164
164 -
 165
165 -
 166
166 -
 167
167 -
 168
168 -
 169
169 -
 170
170 -
 171
171 -
 172
172 -
 173
173 -
 174
174 -
175
-
176
-
177
-
178
-
179
-
180
-
181
-
182
-
183
-
184
-
185
-
186
-
187
-
188
-
189
-
190
-
191
-
192
-
193
-
194
-
195
-
196
-
197
-
198
-
199
-
200
-
201
-
202
-
203
-
204
-
205
-
206
-
207
-
208
-
209
-
210
-
211
-
212
-
213
-
214
-
215
-
216
-
217
-
218
-
219
-
220
-
221
-
222
-
223
-
224
-
225
-
226
-
227
-
228
-
229
-
230
-
231
-
232
-
233
-
234
-
235
-
236
-
237
-
238
-
239
-
240
-
241
-
242
 |
 |