Sony SLV-D251P Operating Instructions (primary manual) - Page 21
Using Manual Clock Set
 |
View all Sony SLV-D251P manuals
Add to My Manuals
Save this manual to your list of manuals |
Page 21 highlights
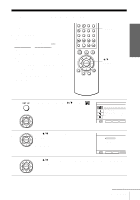
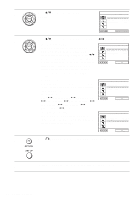
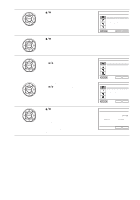
Getting Started Notes • The clock cannot be set automatically if you do not receive a channel that carries a time signal in your area. If so, set the clock manually (page 21). • If there are only a few channels in your area that carry time signals, setting the clock automatically may take up to about 20 minutes. If nothing happens even after you wait about 20 minutes, set the clock manually (page 21). • If you made Hookup 3, make sure you leave the cable box on. • To record TV programs using the timer, you must set the clock accurately. • The clock display appears when VIDEO mode is selected with no tape inserted or when the DVD-VCR is turned off. Using Manual Clock Set Before you start... • Turn on the DVD-VCR and your TV. • To control the DVD-VCR, set TV / DVD·VIDEO to DVD·VIDEO on the remote (page 9). • Set the "RF Output Channel" to "3CH" or "4CH" in "OPTION SETUP" menu (page 95). If your TV is connected to the DVD-VCR using A/V connections, set the TV to video input. • If the DVD player is in play mode, you cannot display the setup menu. Stop the DVD playback. SET UP V/v/B/b ENTER 1 Press SET UP, then press V/v to select (OPTION) and press ENTER. OPTION SETUP Language :English Clock Set/Adjust Channel Setup Auto Power Off [ Off ] RF Output Channel [3CH] V v ENTER RETURN SET UP 2 Press V/v to select "Clock Set/Adjust", then CLOCK SET/ADJUST press ENTER. Auto Manual The "CLOCK SET/ADJUST" menu appears. V v ENTER RETURN SET UP continued Setting the clock 21
-
 1
1 -
2
-
3
-
4
-
5
-
6
-
7
-
8
-
9
-
10
-
11
-
12
-
13
-
14
-
15
-
 16
16 -
 17
17 -
 18
18 -
 19
19 -
 20
20 -
 21
21 -
 22
22 -
 23
23 -
 24
24 -
 25
25 -
 26
26 -
27
-
28
-
29
-
30
-
31
-
32
-
33
-
34
-
35
-
36
-
37
-
38
-
39
-
40
-
41
-
42
-
43
-
44
-
45
-
46
-
47
-
48
-
49
-
50
-
51
-
52
-
53
-
54
-
55
-
56
-
57
-
58
-
59
-
60
-
61
-
62
-
63
-
64
-
65
-
66
-
67
-
68
-
69
-
70
-
71
-
72
-
73
-
74
-
75
-
76
-
77
-
78
-
79
-
80
-
81
-
82
-
83
-
84
-
85
-
86
-
87
-
88
-
89
-
90
-
91
-
92
-
93
-
94
-
95
-
96
-
97
-
98
-
99
-
100
-
101
-
102
-
103
-
104
-
105
-
106
-
107
-
108
-
109
-
110
-
111
-
112
-
113
-
114
-
115
-
116
 |
 |